
Practice makes perfect, it is an excellent quotation. Well, the truth is if you are new to MCSA, you need to a lab to work on otherwise you won’t get anything. So, that’s the reason why you have to Create an Offline Training Lab of Windows Server for Training Purposes.
As Part of the virtualization, there are multiple Virtual Software where you can create a Training Lab for Yourself. The Microsoft Virtualization Software is known as the Hyper-V, the VMware is known as the VMware Workstation Pro and the Oracle is known as VirtualBox.
If you are about to give the Exam of MCSA, I recommend you to use the Hyper-V. There are two reasons why I recommend you to use the Hyper-V for the MCSA Exam;
- While giving exam you will face questions of Hyper-V.
- Working with the Hyper-V will help you answer those questions.
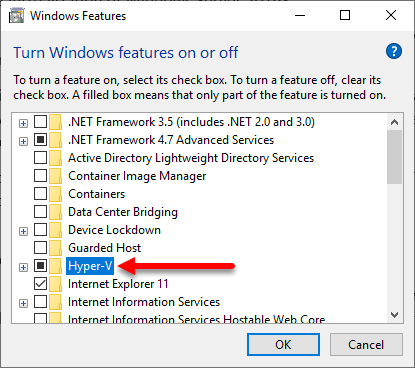
However, if you want to enable Hyper-V Hold the Windows+ R button to open Run Dialog Box and type their Appwiz.cpl. Once the Programs and features is opened on the left pane select the Turn on Windows features on or Off.
Find the Hyper-V and check the Hyper-V Box and click Ok.
In addition, I don’t like so much Hyper-V and VirtualBox because they are limited Compared to VMware Workstation Pro. So, in this
Required Files:
Create an Offline Training Lab of Server 2019
Creating an offline Virtualization platform is not so much hard for an IT student who is preparing for MCSA, MCSE or another IT certification Program. But again in this post I will show you How to Create an Offline Training Lab for training Purposes.
For each lesson you need to train each and every concept and for that you need to create a virtualization Platform for training purposes. To do that you have to purchase the VMware Workstation Pro 15 or you can use the Open Source Virtual Machine called VirtualBox.
Both of these Virtual Machines for Windows, and mac. However, I recommend you to use the VMware Workstation Pro, because here you have more features with Virtual Technology.
Step 1. Install VMware workstation Pro 15
Step 1. Once you purchased the VMware Workstation Pro, install it on your computer. The Installing process is really easy but if you are struggling with it follow the below steps. If not, skip it and move to the step 2.
- Double click on the step and start the Installation Process.
- On the Welcome screen click next.
- Agree to the
lisence and agreement and click next. - Click next on the custom setup window.
- Deal yourself with the custom user settings and move to the next step.
- Decide yourself if you want shortcuts of VMware workstation Pro on no.
- Click Install to install the VMware workstation Pro on your computer.
- Once the installation is complete
lisence the Program.
Step 2. Create a New Virtual Machine
Here you have to create a new virtual machine for the Windows Server 2019. To do that, open the VMware Workstation Pro and select Create a New VM.
- On the
Welcome Wizard, select Typical and move to the next step. - Select I will Install the operating system Later.
- Select the Guest Operating system as Microsoft Windows.
- Provide a Name and give a location to save the Windows Server Files.
- Specify Disk Capacity for Windows Serve 2019.
Once you reached the ready to create Virtual Machine Window, you can customize the Virtual Machine Settings. If not click Finish to finish the process of creating a Virtual Machine for the Windows Server 2019.
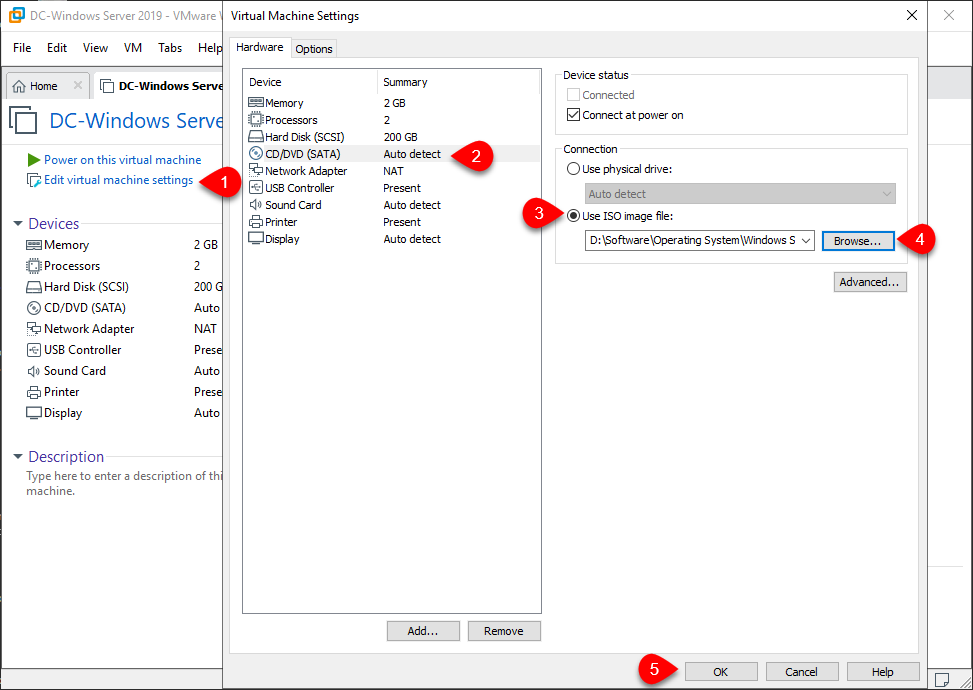
Step 3. Add the Windows Server iSO to the Virtual Machine
Once the windows Server Virtual Machine is created, you will be directed to the home page of created Virtual Machine.
Here click on the edit Virtual Machine settings> CD\DVD (SATA)> then select USE ISO Image File and located the windows Server 2019 iSO.
Once the ISO is located click Ok and move to the Installation Window.
Step 4. Start the Windows Server Installation Process
I’m sure you know How to Install Windows Server 2019, because it is the same as Installing Windows 10 and the other versions of Windows. Here I won’t provide you the screenshots but I will tell you the steps, but once the installation is completed I will let you know to configure the windows Server Settings for next time use.
- Power on the Virtual Machine form the home page of Created Virtual Machine
- Select your language, time currency format and finally the keyboard layout.
- Now click on the install Now.
- Enter you purchased key or select I don’t have a product key.
Windows Server 2019 comes in two formats of Standard and Datacenter and each one of them comes into two different parts of Desktop Experience and Core.
The Desktop Experience comes with the Graphical Interface and the Windows Server Core comes only with the CMD Window, where you will do everything using Commands. Windows Server Core is more secure comparing to the Windows Server Graphical Interface but working with Graphical Interface is more comfortable then Core.
However, since you are a beginner and you are creating for the first time a Windows Virtualization platform for training, I recommend you to use the GUI. Once you learned the GUI methods, later you will find yourself How All the Windows Server Features Works.
- Now you got the idea of what’s GUI and Core, so here you have to select the Windows Server 2019 Datacenter (Desktop Experience).
- Agree to the Terms and condition of Microsoft for using server.
- Select Custom: Install Windows Only (Advanced)
- Create partition and click next.
- Now Wait until the Windows Server Files should be copied to the selected drive.
- Once you reached the customize settings window, enter a Password and click Finish.
- Hit the Ctrl+ Alt+ Enter button on the Virtual Machine and login in inside the Windows Server for the First Time.
Configuring Windows Server Training Lab Settings
Since we are working on Virtual Lab we need to configure the settings, because without configuring those settings you will face some problems.
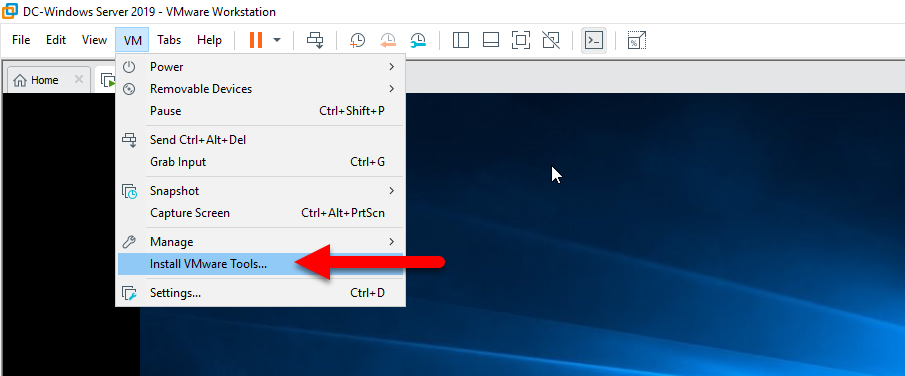
Step 1. Install VMware Tools
If you are on VMware Workstation Pro, you have to install the VMware Tools. VMware tools allows us to copy and paste files between the host and the Virtual Windows.
To Install the VMware tools, click on the VM Menu> Install VMware Tools.
The Installation is so simple; you can skip it or else if you are stuck follow the below steps.
- On the Welcome Screen click next.
- Select Typical and click next.
- Click Install and wait until the Installation is complete.
- Once the Installation is complete click Finish and the Virtual Machine OS will restart.
Now you can do read and write between the Host and the Virtual machine.
Step 2. Add a custom IP
Custom IP address is required later for configuring Dynamic Host Control Protocol (DHCP), Active Directory Domain Services (ADDS) and Domain Name Service (DNS).
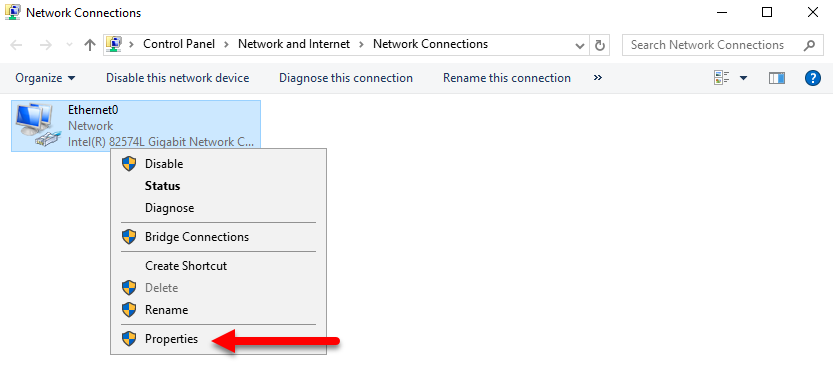
To add a custom IP, there are multiple ways where you can change that, but I will show you the easiest way. Hold the Windows + R buttons to open Run Dialog Box and type their ncpa.cpl and hit enter.
Once the Network connections are opened, right click on the Ethernet and select Properties.
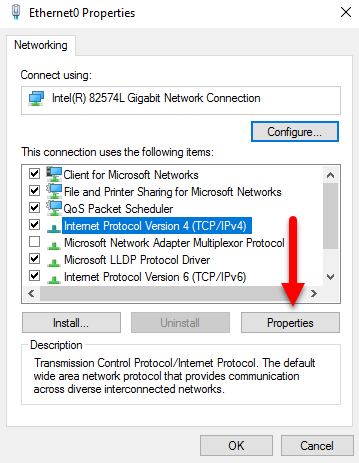
Then open the Internet Protocol Version 4 (TCP/IPV4)’ properties.
Select use the Following IP Address and type an IP Address of 192.168.10.10.
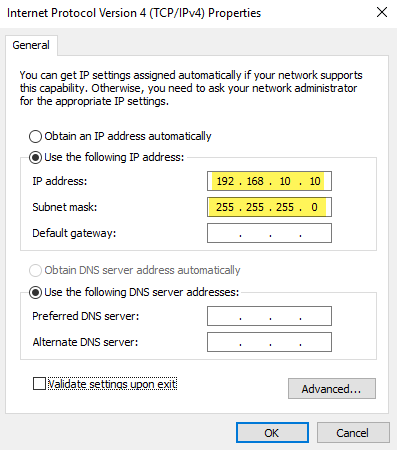
Once you Installed and Configured ADDS and DHCP, this Ethernet port will be used for Domain and if you want to add an internet connection you have to add another Ethernet port.
Step 3. Change Name of the Server
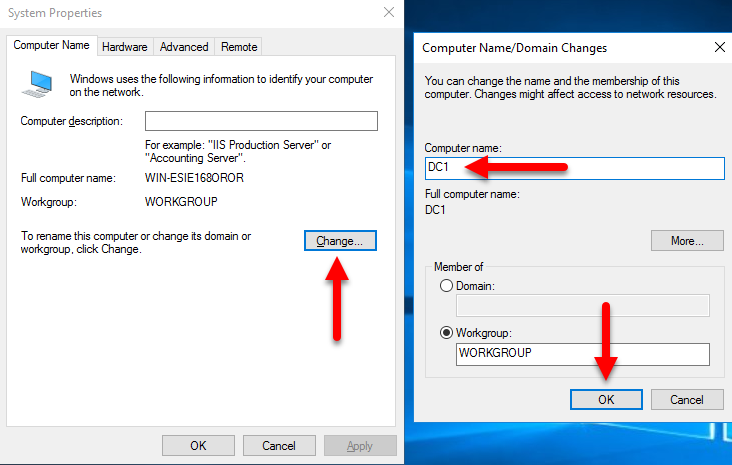
Another thing which is so much important and it is required is changing the name. Because Later you will configure it as your domain.
To Change the name of the server again open run dialog box and type their the sysdm.cpl> click change and type a name for your server. Once you hit Ok, you OS virtual Machine will ask you to restart.
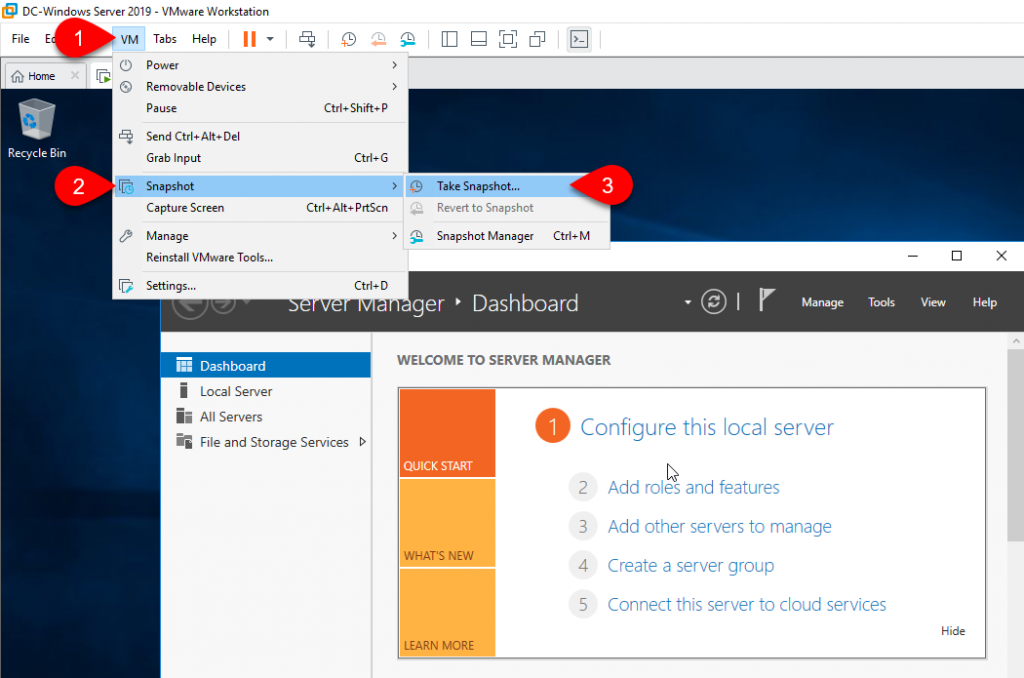
Step 4. Create a Snapshot
While Training or practicing sometimes something will go wrong or you can have practiced once and you want to practice it again. That snapshot is really amazing, basically it takes a full snapshot and when some goes wrong you can switch back there.
To create a snapshot, click on the VM> Snapshot> Take Snapshot, after that give a name for the Snapshot.
Conclusion
That’s all with How to Create an Offline Training Lab of Windows Server 2019 For Training Purposes. I hope this post helped you and make sure to share it with your friends and colleagues.
2 comments
Your article made my day thanks dear
thanks dear it was nice article