Well, you probably have used the TransMac in macOS High Sierra in order to create bootable USB for Mac. I also used that many times and none of them worked to create bootable USB for mac on windows 10 except for one. and that was the macOS High Sierra itself on windows 10 which I used to create bootable USB Flash Drive on Windows.
Do you know what I did to create bootable USB Flash drive for macOS High Sierra, I installed macOS High 10.13 inside the Vmware Workstation Pro. then I downloaded and Install Unibeast inside the macOS High Sierra on Vmware Workstation. Then I dual booted my system.
Yes, the same method I am offering you to use, I know it is lengthy but it gives you 100% Result in one try. So, in order to create bootable USB for macOS Mojave on windows 10, download and Install the Vmware Workstation Pro, after that install in it the macOS Mojave 10.14
If you don’t know How to Install macOS Mojave on Vmware, read the below post.
If you are wondering to use the VirtualBox to Create Bootable USB for macOS Mojave on windows 10, I won’t recommend that. Because VirtualBox for macOS Mojave has many errors.
Required Files:
- 16 GB USB Flash Drive
- macOS Mojave
- Commands to Copy macOS Mojave to USB Flash Drive
Create Bootable USB for macOS Mojave on Windows 10
Step 1. Download macOS Mojave 10.14
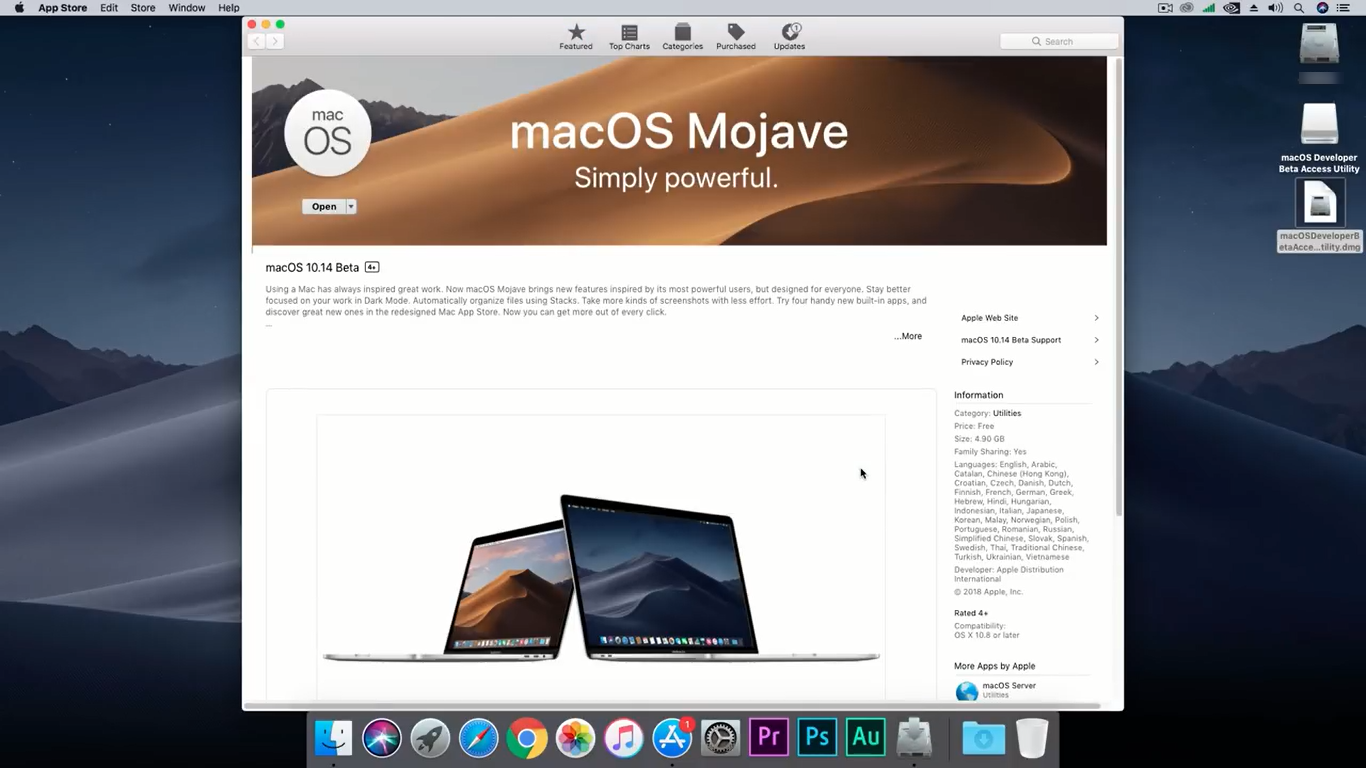
To create a bootable USB for macOS Mojave on windows 10, the very first thing you need is the macOS Mojave. Since the macOS Mojave Public beta has been released, you have to download that from App store if you are a developer account. If you don’t have a developer account follow the below steps to download macOS Mojave.
- Download the Developer Tool and double-click on it to start the installation process.
- On the welcome screen, click continue.
- Agree to the license and agreement of Developer tool and click continue.
- Select a location where to install and click Install.
- Enter your password for confirmation and click install the software.
- When the installation completes close the Developer utility tool.

Step 2. Erase the USB Flash Drive
Actually, Before getting started with How to Create Bootable USB Flash Drive for macOS Mojave on Windows 10, you have to partition the USB Flash Drive. In other words, you need to erase the USB, and to do that follow the below steps.
- First, Insert the USB Flash Drive.
- Open spotlight & search for Disk Utility.
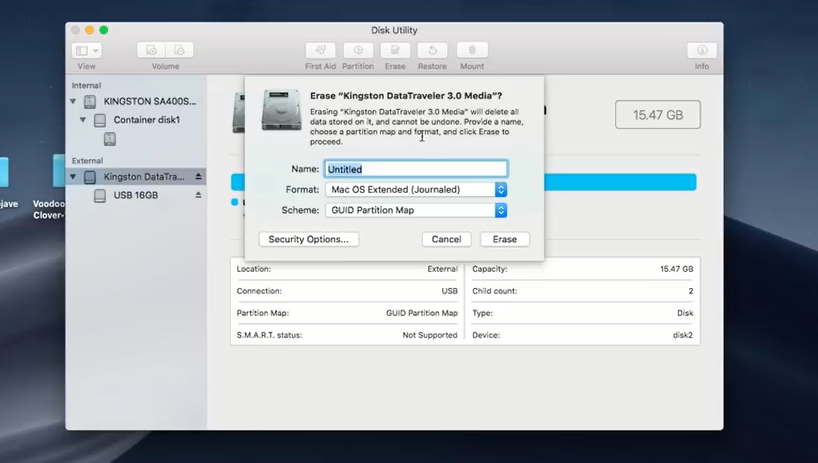
- In Disk Utility select the USB and Erase it with the following settings.
- Name: Provide any Name
- Format: Mac OS X Extended (Journaled)
- Scheme: GUID Partition Map
When you are with the settings, select erase to partition the USB, after the USB erased click is done, and close the disk utility.

Step 3. Copy macOS Mojave to USB using Terminal
You can copy macOS Mojave to USB Flash Drive using other software too, a good example can be Clover and Unibeast. But why we should not use the Terminal which is a built-in feature of mac. So, follow the below procedures to create bootable USB For macOS Mojave on Windows 10.
- First, Open the terminal by searching in the spotlight.
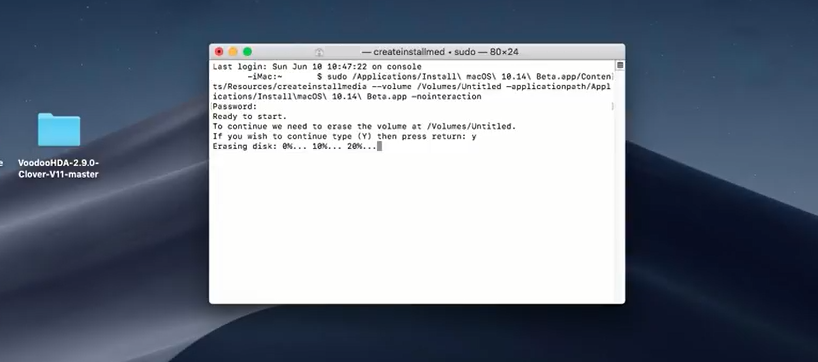
- When the terminal opens, paste the below command in terminal and hit return.
sudo /Applications/Install\ macOS\ 10.14\ Beta.app/Contents/Resources/createinstallmedia --volume /Volumes/Untitled —applicationpath/Applications/Install\macOS\ 10.14\ Beta.app —nointeractionIf you have any problem with First Command try the second command.
sudo /Applications/Install\ macOS\ 10.14\ Beta.app/Contents/Resources/createinstallmedia --volume /Volumes/USB --applicationpath /Applications/Install\ macOS\ 10.14\ Beta.appAfter you enter the command, Terminal will ask you enter your password for confirmation. Keep in mind, the password is secured and you won’t be able to see it. After that terminal asks you to type y to continue, type y and go wait until the macOS Mojave is copied to USB.

After creating a bootable USB for macOS Mojave on Windows 10 you also need to configure the drivers in order to Install on a PC or any other desktop. If you want to install macOS Mojave on PC or inside a Hackintosh, Read the below Post.
How to Install macOS Mojave 10.14 on PC or Hackintosh?
Conclusion:
Well, It was about How to create bootable USB for macOS Mojave on windows 10 if you had any question please know. Also if you think this post worth for sharing, please share it with your friends and colleagues.


11 comments
Hi Gulam ,
I’ve installed Mojave 10.14.4 on Vmware workstation pro 15.1.0,Win 10, via a .vmdk file, for download and using Garageband specially ,instead of working on it in my ipad ,…but long story short , it doesn’t work properly ,so now I need to try the mentioned method ,
1- do I need to redownload mac mojave , this time the installer one, or is there a way to convert .vmdk to dwg or iso file to creatie the bootable USB ?
2- is it functional to dual boot on one drive , while Win 10 is installed on it ?
Why my unibeast doesn’t moving when copying file
I leave it for 4 hours but still no changes
Is th problem comes from my flash drive or permission on virtual machine? (I’m using virtual box)
Hi,
This happens because of the USB flash drive. Epically if it is USB 2.0.
Most USBs created on a VM do not work.
Hi john
I have no idea but every time I have tried the VM it worked 100% fine.
Hi Ghulam,
how to install Mojave on the HyperV virtual machine?
So far as I know, you can’t. Hyper-V is a type-1 hypervisor, which means VMs running under it run closer to the metal. This provides performance benefits over other virtualization types.
What part of this tutorial was Windows 10?
You didn’t get the point. You can create bootable USB for macOS Mojave on windows 10 with Virtual Machine. First, you have to Install macOS on the VMware or VirtualBox then start creating bootable USB.
I’ve tried to install like you told. but It just downloaded only 15MB and finished. I don no why
Hi, Hey can you tell where you have downloaded the macOS Mojave? If you have downloaded it from App Store then follow the below steps.
Step 1. Open Finder → Applications and right-click on Install macOS 10.14 Beta and select Show Package Contents.
Step 2: Open Contents → Resources.
Step 3: Open a Terminal window via Applications → Utilities → Terminal.
Step 4: In the Terminal window type sudo followed by a space.
Step 5: Drag createinstallmedia to the Terminal window from the Finder location in Step 2.
Step 6: Type –volume followed by a space.
Step 7: Open Finder → Go → Go To Folder…
Step 8: In the Go to the folder box type /Volumes and click Go.
Step 9: Connect your USB drive to your Mac, and it should appear in the Finder window.
Step 10: Drag the USB flash drive volume into the Terminal window.
Step 11: Press Return on the Keyboard to submit the full command.
Step 12: Type a ‘y’ to continue when prompted, and press return on the keyboard.