
Full Disk Usage or Disk Usage 100% is a common problem with Windows 10 and other versions of Windows, which significantly reduces speed of your system or even programs is not responding.
Confronting 100% hard disk usage or Disk Usage 100% is a very annoying problem for most users because it slows down the system significantly and sometimes causes applications to not respond and crash. Also, in the latest versions of Windows hard drives are becoming increasingly involved and this can make the Disk Usage problem even more accurate than before.Even if your system is equipped with SSD memory, this problem can still bother you, which can be exploited, of course. A few simple tricks that don’t take too long to solve this problem.
In this article, we are going through a series of Windows 10 tutorials to teach you how to solve this problem in Windows 10. Of course, some of these methods can fix this problem in Windows 7 and 8 as well.
When users first encountered this problem, there were few solutions to this problem, but as time went on and reports increased to Microsoft, there were more ways to fix it and more bugs were introduced. We recommend that after performing any of the introduced tricks, check amount of disk conflict in the task manager [(to open the task manager Hold Ctrl, Shift and esc buttons or Ctrl, Shift and Del buttons at the same time or right-click on the taskbar and (See Task Manager)] to make sure your issue is resolved.
if you update Windows, all changes made will be reset to their default state, so you will need to make adjustments again if Windows updates.
1. Use Disk Check Utility
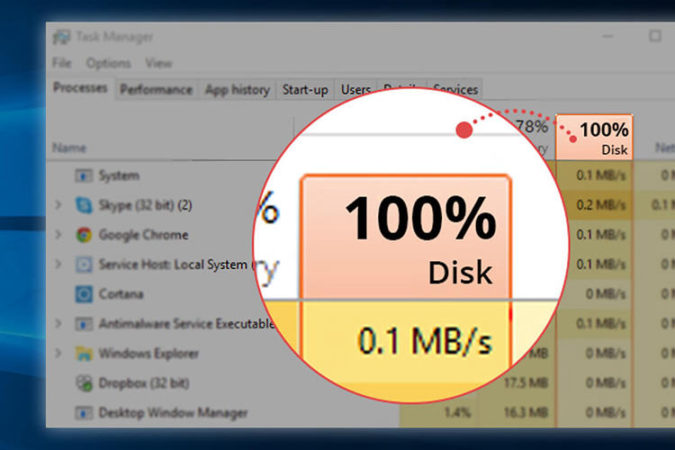
If your system speed is slow, first open the task manager and then click on the Process tab (which is the same as the default tab). You will see several columns in this tab. If the top of the Disk column is 100% displayed and the color is red, your hard drive is completely involved and you should fix this problem to improve your system performance.
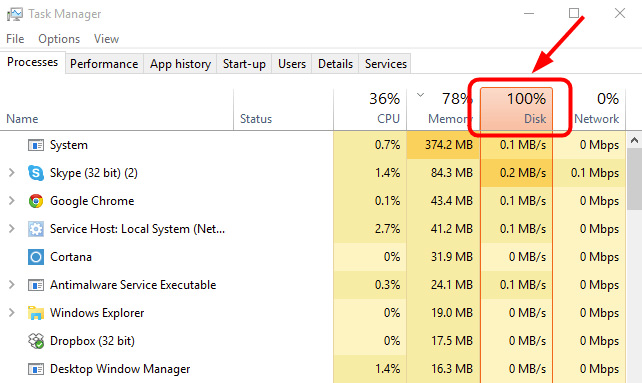
Hard drives and drives are usually involved when you’re looking for a file or app or if your HHD have problems (SSDs don’t have that problem, of course). Copying and pasting information can also affect the hard drive.
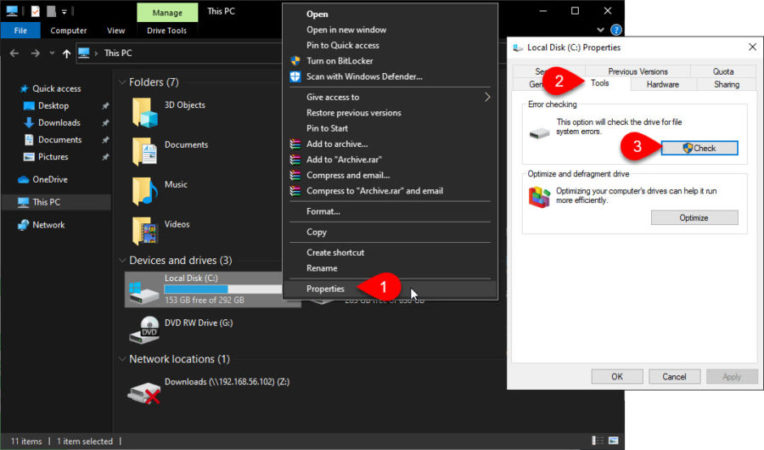
Our first suggested way to fix this problem is to use the Disk Check tool. To use this tool after right-clicking on the drive (usually Drive C) and selecting the Properties option, click on the Tool tab and select the Check option under the Error Checking section. After selecting this option, you can scan the drive using the scan drive option to identify and fix possible errors. Allow drive scanning to be complete. Also, the drive may require complete repair and may take a few minutes.
2. Using System Antivirus and Checking its Reports
In general, we recommend that you scan it with antivirus software whenever your system crashes to make sure your system is not infected with malware and viruses. Almost all free and paid software can detect malware.
The Malwarebytes Anti-Malware software is one of the practical options in this area, although it can be extremely scary while scanning your system. If in doubt, remove them with the help of software and restart the system. After restarting, check the amount of hard disk involvement in the task manager. If the problem persists, try other solutions.
3. Disable Windows Search feature
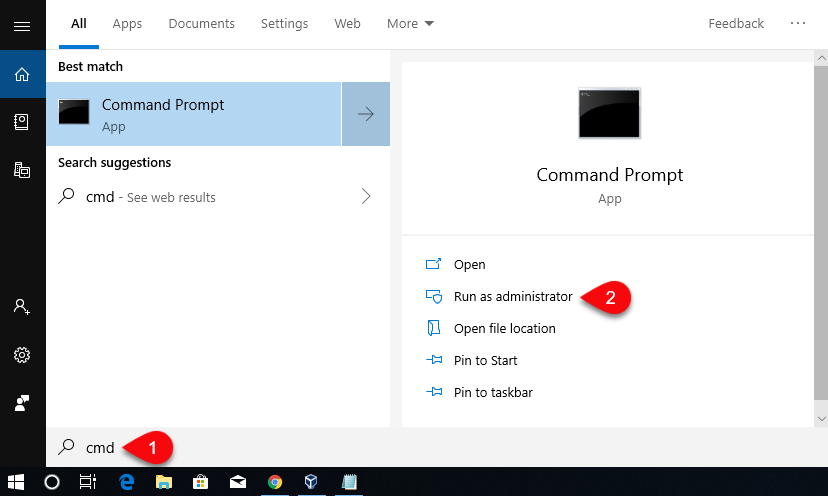
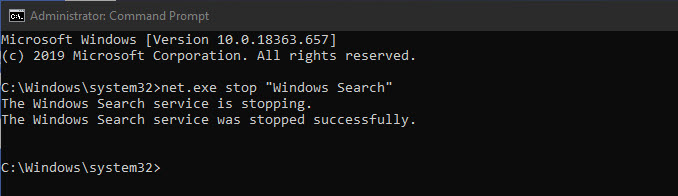
Windows search can also sometimes involve a hard drive completely, as it puts a lot of pressure on the hard drive. In Windows 10, there is a new bug called a search loop that can severely affect the hard drive, but fortunately there is an easy way to stop it or prevent it. To do this, first open the command prompt by searching for the word CMD in the Windows search area, then right-click on the Command Prompt and Run as administrator.
After opening the window, type net.exe stop “Windows Search”.
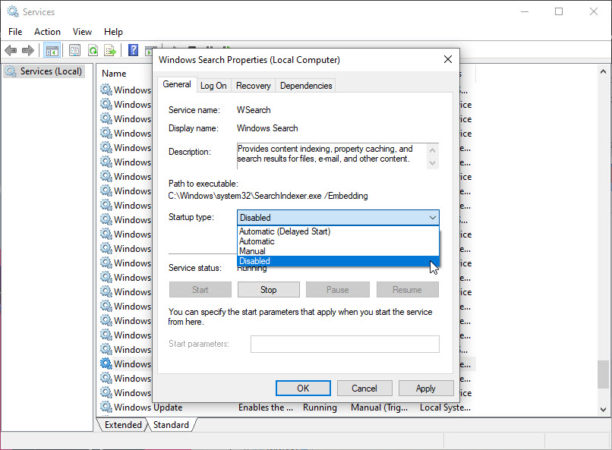
To disable this feature permanently, after hitting the Windows and R buttons, type the services.msc in the Run box dialog box then hit the enter button to open Windows services. After you open this window, find and search for Windows search at the bottom of the page. After the window opens, select Disabled from the Start up drop-down menu (in the General tab) and click OK to save the settings. To stop this feature temporarily, click the Stop option under the service status section.
Windows functionality should be improved a few moments after disabling Windows Search. If that doesn’t happen, keep trying other methods.
4. Disable Superfetch service
The Superfetch Service is one of the very good (or maybe not so good) features of Windows 10 that can improve system performance, but in some systems it can be a nuisance to users. This service speeds up the reloading of applications on the RAM, as this feature will no longer need to run on a hard drive each time, which is another reason for the 100% Disk Usage problem.
To fix this problem, enter the following command on CMD:
net.exe stop superfetch
After disabling this service, you should wait for a moment to see if it has the effect of resolving the problem. Also run the Check Disk command by entering the following command in the command prompt window.
chkdsk.exe /f /r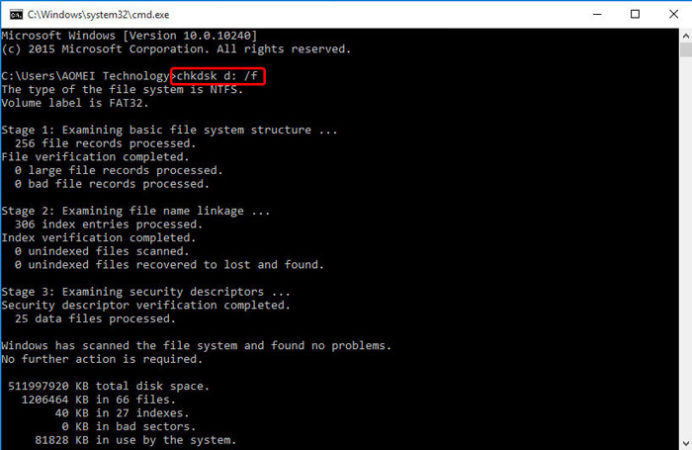
After executing this command, the system prompts you to restart your system. You must close all applications before doing restarting.
5. Use other Browser instead of Chrome
Sometimes Flash is not the cause of system crashes and the browser itself is the culprit! The simplest way to do this is to choose another browser.
Google Chrome always usees too much of the hard drive, so we recommend using another browser. Microsoft Edge based on chromium is a good replacement but since it is based on google chrome source code you may still face the same problem. If you do not want to use this browser, you can also try other browsers like Mozilla Firefox, Tor, Vivaldi and Slimjet. Slim Jet is extremely fast and Vivaldi is one of the best browsers in the field of responsive management of a large number of headers.
6. Close Skype when you don’t use
Skype, one of the most widely used Windows applications, it is also one of the applications that can severely affect the hard drive.
To make sure Skype is involved with your hard drive, open task manager and check the hard disk usage programs. If Skype was included exit Skype, if it is not involved try the other solutions.
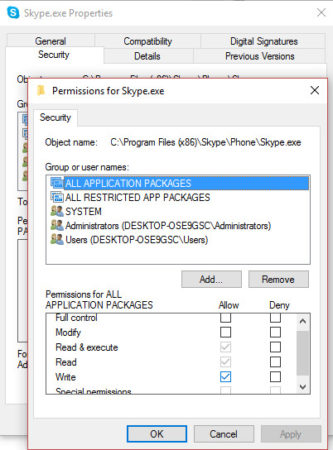
Or you may use this method which is completely blocking write changes of Skype over your system. Open Run Dialog box by holding Windows + R, type their the following path.
\C:\Program Files (x86)\Skype\Phone
Find the Skype, then right click and choose properties, go to security tab choose All Application Packages and uncheck the write box.
You can also use other similar messenger apps instead of Skype, such as Google Hangout, oovoo, Line, Viber, Tox, ICQ, and other similar apps.
7. Fix PCI Express bug
Some drivers in Windows 10 are not performing well. The StorAHCI.sys driver, which has a firmware bug, can sometimes be quite tricky. The StorAHCI.sys driver is designed for storing devices that connect to a laptop or PC motherboard via the PCI Express port with the AHCI interface (software for communicating with SATA devices).
To fix this driver bug you should follow these steps:
First, You have to check if this bug available in your PC or not. open the Device Manager using the search box or right click on this PC. select Properties and click on the Device Manager option. Look under the HCI Controller, if it is their click on it and choose Driver Details option.
Right click on the Standard SATA AHCI Controller and choose properties.
Go to the Driver’s tab and choose driver details, if you see their this path C:\Windows\system32\DRIVERS\storahci.sys it means your computer has this bug.
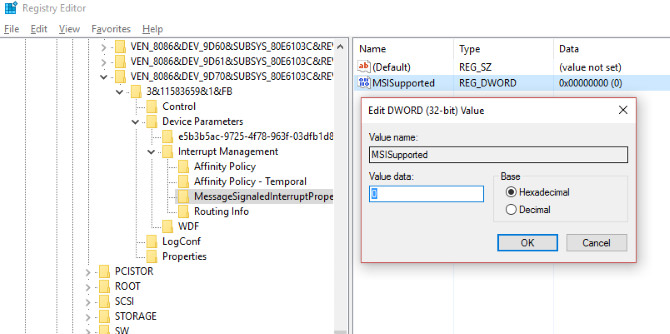
You need to disable the MSI Controller from registry.
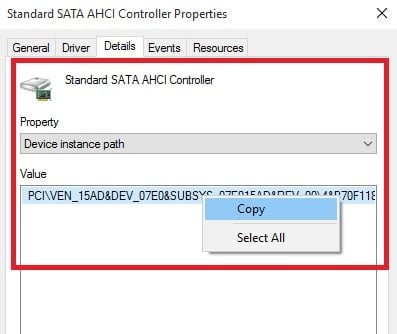
- close driver file details and go to details tab., then choose device instant path.
- Copy that path into Notepad.
Once done, hit the Windows and R buttons and enter the regedit in the Run box. After opening the registry window, go to the below path.
HKEY_LOCAL_MACHINE\System\CurrentControlSet\Enum\PCI\ <AHCI Controller>\<Random Number>\Device Parameters\Interrupt Management\MessageSignaledInterruptProperties
Above AHCI controller is same string which you noted down, also, “random Number” can vary from PC to PC. Open MSISupported and type 0 or 1 value and click and restart your pc.
8. Exit the Steam app
If you are a gamer and have installed steam software on your system, it may be the causing of the Disk Usage, because it delivers various updates to the system and always downloads.
If Steam is causing a hard drive crash, you can fix the problem by clearing the cache; first of all, you need to make sure you exit the app. If this application is one of the possible causes of 100% Usage Error, it hangs when you try to exit it and you have to close it in the Task Manager.
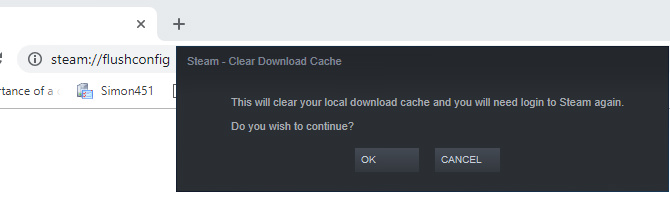
Next, after pressing the Windows and R buttons and opening the Run box, enter the following statement:
steam://flushconfig
After doing so, a message will appear asking you to clear the content and you should continue the process by tapping OK. It will alert you, saved games and settings will not be erased.
9. Disable Diagnostic tracking
The Diagnostic tracking service, which runs automatically, sends data to Microsoft to improve the Windows platform. Some users disable this service for their privacy. This service maybe in some cases cause a full hard drive crash and should be disabled or prevented from running.
To disable this service you must first open the command prompt window and enter the following commads:
sc config "DiagTrack" start= disabled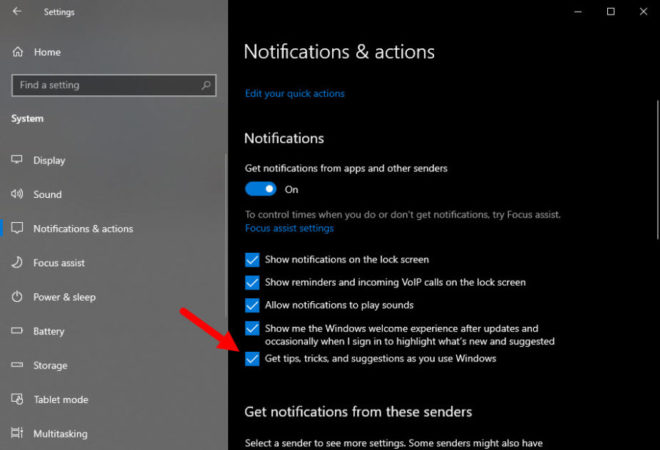
sc stop "DiagTrack"You can also do this by going to Settings> System> Notification & actions and uncheck Get tips, tricks and suggestions as you use Windows. This can also enhance the performance of the system to some extent.
10. Fix for update issues
If Windows fails to update properly, it can cause the drive to crash, and this can occur when the Windows update service crashes and one of the update files is not downloaded. There are two ways to do this:
- Leave the computer to itself: Close the open apps and wait for the files to finally download. In such cases, you may need to restart your computer, depending on the Windows update schedule.
- Shut down the computer: After doing so, you should restart your computer and wait for Windows Update to fix the problem.
Once all the update files have been downloaded, we recommend updating your Windows immediately.
11. Disable Virtual Memory
Virtual memory is a combination of RAM and hard drive that in some cases affects the hard drive. In some cases where the RAM is not sufficient to perform a specific task, the hard drive is used as a supplement to the RAM and some of the information is transferred to the drive and the system restores them when needed.
Hold Windows + Pause/break keys together and it will launch the system window. Choose Advanced system settings, choose settings and from the performance tab go to the advanced tab. In the advanced tab choose change under the Virtual memory.

Disable the box automatically manage paging file size for all drives.
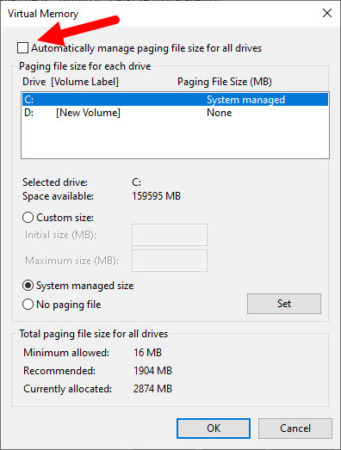
Once you have done so, select the drive that is usually the C drive and specify the size you want by activating the Custom option. In this section you should enter the minimum and maximum space in units of MB.
We recommend that you specify the minimum amount of space required and that the maximum space is 1.5 times your system’s RAM. For example, if your computer’s RAM is 4 GB, the maximum virtual storage space should be no more than 6.5 GB.
After setting the values, click OK to apply the settings. Also, after creating new memory, Temporary files of the previous memory should also be erased. To check if the temporary files are removed type temp on the run dialog box. If they weren’t erased Hold Ctrl + A and delete all of them.
12. Enable High Performance mode
Different power modes can also affect the amount of hard drive conflict. Standard modes involve more power than high performance hard drives. Although activating this mode increases the power consumption of the computer, but modern CPUs consume less power and users of the new PCs do not have to worry about this. Of course, notebooks and laptops will have a reduced battery life; It can solve the problem of Disk Usage 100%, and improves system performance significantly.
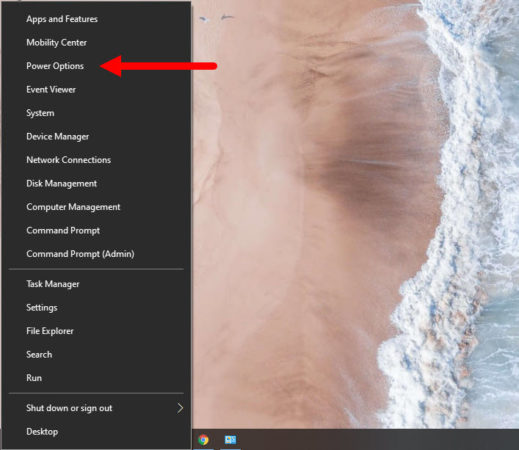
To enable High Performance after pressing Windows + X buttons, select the power options option. Then, after selecting the Additional power settings option, first click the High performance option and finally select the OK option.
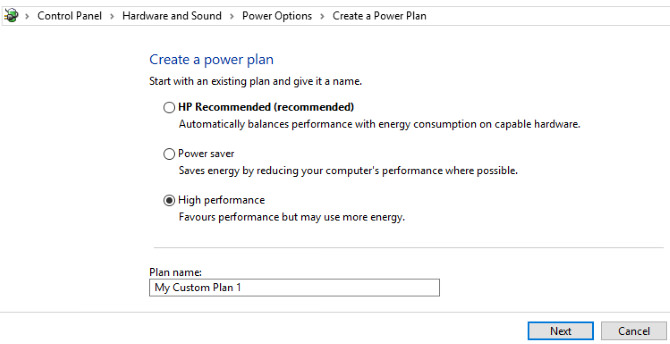
If this is not the case, you should choose your own custom mode. To create such a case, first click on the Create a power plan option and then select High Performance. After selecting this option, also select the name of your custom mode and adjust to your liking. Doing so within a matter of minutes should reduce your hard drive conflict from 2% to 5%.
13. Install the latest SATA drivers
Do you think drivers for storage devices can cause a 100% hard drive usage?
New computers use SATA ports for connecting HHD and SSDs and optical drives, and if the drivers for these devices are not up to date, an error will occur; however, updating SATA drivers can easily fix the problem.
To do this, after pressing Windows + X, select Device Manager and open the Storage Controllers section below. Then select the right controller for your devices. If you are unable to detect the right controller, update both controllers.
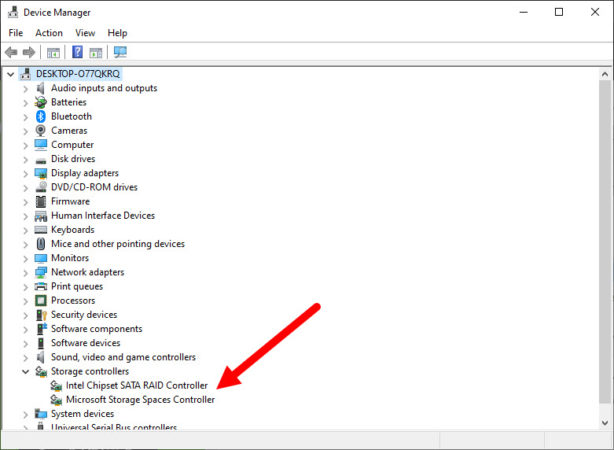
To update these controllers, right-click on them and select the Update Driver option, and after opening the new window, select “Let me pick from a list of available drivers on my computer” and then select the Standard AHCI Controller option. This can significantly improve system performance.
After updating the drivers, you will notice the effects by restarting the computer. You can also get the latest drivers and install them by following their instructions on the manufacturer website.
Final Point
In the end, it should be noted that a 100% hard drive usage is not a natural incident and should not happen under normal circumstances. If the Disk Usage 100% problem was not resolved by disabling browser plugins, stopping unnecessary services, scanning your computer with antivirus software, and other things mentioned, the hardware issues caused this error. Also your computer may be outdated or its cables may need to be replaced.
If your computer is defragmenting the hard drive (a process that speeds up access to hard files and has to be periodically enhanced on older computers as files increase) and your system is powered by SSD, Stop because it can cause serious problems. To do this, you first have to open the Task Scheduler by tapping Windows + Q buttons, and then disable all scheduled scheduling tasks.
1 comment
Nice, I found many solutions on the internet but not work, you have solved my problem. Thank you so much!