
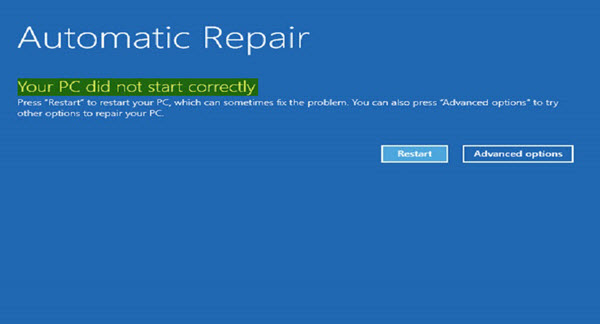
Have you ever faced this message which says “Your PC did not start correctly”?
Thoughts, ideas, suggestions and most necessary practice are the tools which make use better in any field. If there should not be an error how we will be perfect mastering Windows. Today I will Guide you through the message error called Your PC did not start correctly.
First, you will know what are the causes of this error, then you will know what Advanced options and How to Access them with 6 different methods. Once you accessed the Advanced options, I will walk you through system restore, system image recovery, startup repairs, Command Prompt and Startup Settings one by one. Once you got this options, then you will How to fix Your PC did not start correctly Error on Windows 10.
- Also Read: Recover Deleted Files on Windows and Mac
How to Fix Your PC did not start correctly Error on Windows10?
Reasons for this message:
- Power Failure
- Upgrading Your PC to Newer Version
- Maybe Hardware Problems
The Main reason why this error occurs on Windows 10, 8 and 7, is the power failure and upgrading your pc. Basically, when a Power failure happens, the data corruption inside the root directory of the operating system will happen. Once the data corruption occurs the Boot Configuration Data (BCD) file will be corrupted or Missing.
The same thing goes with the upgrading your pc to newer versions of Windows. Where the newer BCD and the older BCD will manipulate themselves which will cause the Your PC did not start correctly message.
Access Advanced Boot options on Windows 10 & 8
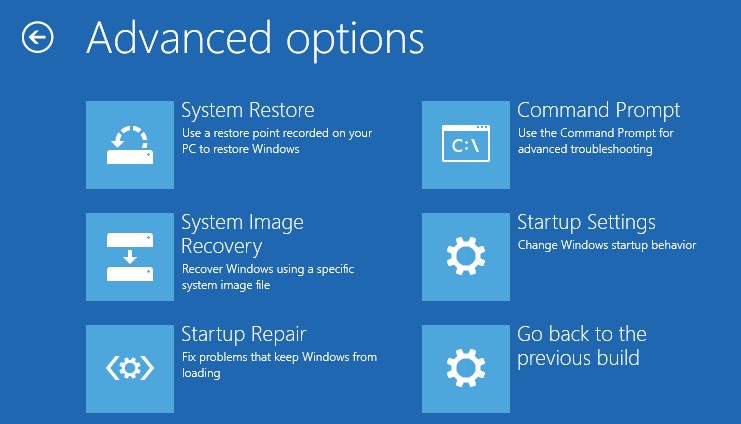
The final strategy on behave of fixing the startup problem on windows 10 and 8 is the advanced boot options. If your operating system is total damaged, it isn’t stating normally the windows, the final key to fix windows BCD and MBR is advanced boot options. Advanced Boot options can give us the tools to troubleshoot, diagnose, repair and fix the damage windows. Basically, advanced boot options are divided into five categories of
- System Restore
- System image recovery
- Startup Repairs
- Command Prompt
- Startup settings
These five options can help you fix the unexpected system shutdown, blue screen error, malware, virus and other windows errors.
How to Access Advanced Boot Options?
Microsoft has provided to their user variety of methods to access Advanced Boot options
1. Access Advanced Boot Options with Settings
If your system is working and it is optional but having trouble with windows, you can easily access it with windows settings. To do that, open Windows Settings> update & security> Recover> Advanced startup.
2. Access Advanced Boot Options using CMD
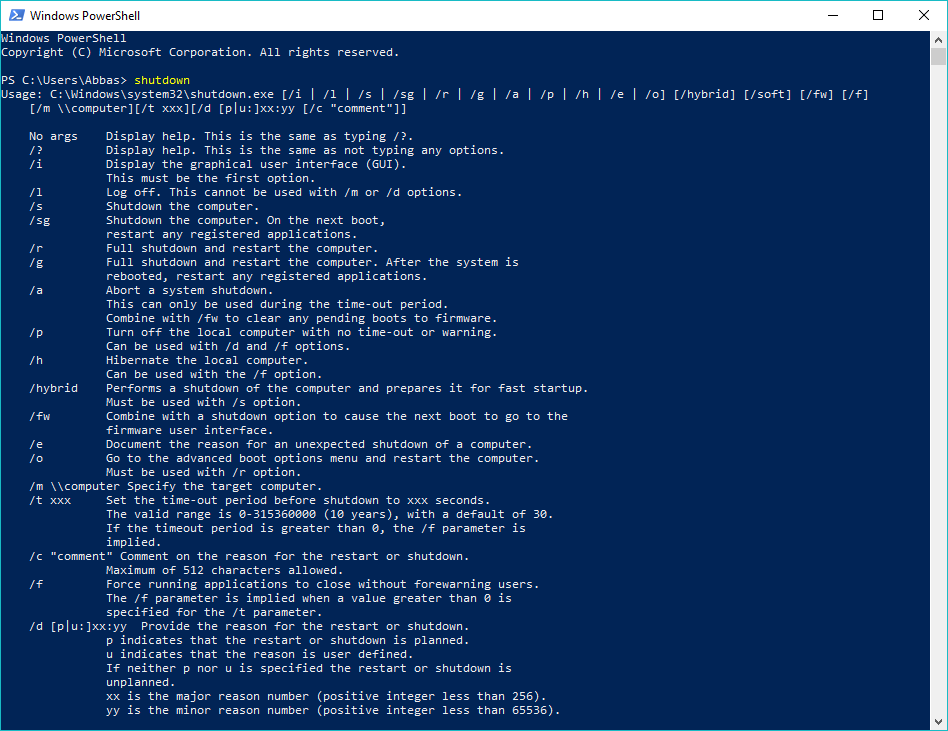
CMD and Powershell are really powerful tools of windows, which graphical interface can’t do in most cases. Open CMD and type their the below the command.
shutdown /r /o /f /t 0This command will do multiple tasks at once. First, it will shut down the system then it will restart the system and will take you to the advanced options. F stands for Force, if some windows programs try to stop the shutdown process, it will force them to shut down in 0 seconds. If you type shutdown in PowerShell it will list you all the parameters which can come after the shutdown.
3. Access Advanced Options with Start Menu
Keyboard shortcuts are really amazing and really safes too much time from wasting. If you Press and Hold Shift button on the keyboard and click on the restart, it will take you to Advanced options.
4. Access Advanced Boot Options with Installation Media
If you don’t have access to the operating system installed on your system and every time you power on the system it takes you to startup check-ins. Then you can use and installation media to access the Advanced boot options. If you have a bootable USB or CD/DVD insert that and boot easily up to the language section of windows. There, under the Install windows, select repair Windows and it will take you Advanced options.
If you don’t have a bootable windows 10 or CD/DVD, you can borrow it from your friends and buy a DVD.
5. Access Advanced Boot options with Recovery Drive
Insert the Windows Recovery Drive and boot that normally until selecting a language. Select your language and the advanced boot will appear.
6. Access Advanced Boot options with F11
In most computers, F11 is known as the recovery button, when you press this button while windows stars it will take you to the system recovery. Every company has a direct key, if that is pressed it will redirect the windows to system recovery. Remember it is available on all the computers, even those who had the legacy boot options. Obviously, the UEFI boot has it.
Fix Your PC did not start correctly Error on Windows 10
If you want to fix the message which says your PC did not start correctly, first you have to access the Advanced boot options. Once you are inside the Advanced boot options you have to choose an option. If you don’t know what they are, don’t worry I will explain them one by one to you.
System Restore
System Restore is a Windows feature which allows you to revert the changes with windows settings and your files. It is by default enabled on Windows 7, 8 and 10 root directory. But whenever a big change to the windows files happens, especially if that is an error, you can restore the settings back. Whenever you are using a system restore, it creates a restore point with a specified date. According to that data you able to bring back the windows settings.
As I said by default it enabled overdrive c, but if you want to configure it for another drive you can do that too. But I recommend you to let of enabling this feature over your files because may even vanish forever. and Even the Recovery software won’t bring them back.
Your PC did not start correctly
System Image Recovery
Windows can create a system image backup which includes windows and all the files on your Hard Disk. The system image backup is available since Windows 7, where users are using it take backup of their windows and files on an external Hard Drive of a Bluray DVD. Depending on the size of your files it will take that much storage. If you take a system image recovery backup of only your system without the files, it will be 10 to 15 GB.
Creating a system backup is too much easy which can be done from the control panel if you want to know how. Follow the below steps to create a system image recovery.
- Attach your HDD or USB Flash Drive to Computer.
- Press Windows +R to open run dialog box, and then type their control + hit enter.
- Change the view to small icons then open the backup and restore.
- On the left side select to create a system image.
- When it found the HDD or USB Flash, click next.
- Then select which drives you want to create a system image backup and click next.
if you ever faced a problem with windows startup, you can use it to fix the problem. And if you don’t know how to use system image recovery to restore files, follow the below procedures.
- Access the advanced options and select system image recovery or simply press F11 while windows start to directly take you to the Advanced options.
- Once you select the system image recovery, you have to attach the HDD or USB Flash Drive to recover the files from.
- When it found the system image recovery, select next and it will restore the files of yours.
Automatic Repair
If a power failure happens back to back on a system, may be one of the below system files is corrupted or may be missing.
- corrupt/incompatible drivers
- corrupt system files
- corrupt boot configuration settings
- Corrupt registry settings
- Corrupt disk metadata (master boot record, partition table, or boot sector)
- Problematic update installation
When you power on the system windows will try to a normal start of windows. But when it sees the files are corrupted or missing it will start the automatic repair. Unfortunately, some when it starts the system after automatic repair, a blue screen will appear which says your PC did not start correctly. So, that time you have to try the other option of Advanced options. Another thing which bothers me too much about automatic repair is time. Sometimes it takes two hours to repair the system. When I think with myself, it may be the number of damaged files are too much.
Command Prompt
Oh, I love Command Prompt and PowerShell, If you have them, then you have no worries. I remembered a time when a friend of mines’ laptop was damaged and all the files were inside the drive C. He was too worried about his files. That time he brought his laptop to my teacher, he copied all the files with cmd to external hard drive, then installed new windows. Guess How much Command Prompt is PowerFul, even now if you have a windows error you can do a system check with the command prompt on the advanced options.
You can check your system or you can use the DISM command or you can simply repair the Master Boot Record(MBR) and Boot Configuration Data (BCD) to start windows normally.
1. Fix Windows Startup Problems with system file checker on CMD
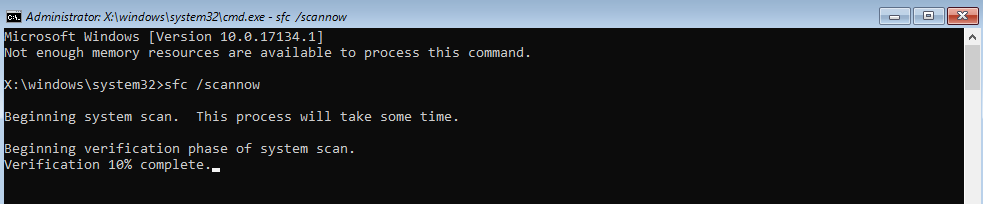
System Repair or Automatic Repair can’t solve every problem of Windows Startup, in this case, you have to the system file checker on CMD. Once you open CMD on Advanced options, type their the below command.
sfc /scannowThis command will search for windows problems, and when it found it will fix that in no time. Remember every time it is not working, that’s why you can use the DISM Command to fix the windows startup problems.
2. Fix Windows Problems with DISM
If the SFC utility founds the corrupt files and wasn’t able to fix them. You can use the DISM Tool to restore their health. In order to use the DISM Tools to Fix the error type the below command.
Dism.exe /online /cleanup-image /restorehealth3. Repair Master Boot Record(MBR)
Another tool which has a role in the startup is the Master Boot Record, where it tells the system that there are files and you need to boot those files. But if MBR itself has been damaged and DISM Tools didn’t do anything, that you have to repair the Master Boot Record. To repair the MBR once again you need to open CMD in the Advanced Options. Then Apply the below codes one by one on CMD
bootrec /fixmbr
bootrec /fixboot
bootrec /ScanOS
4. Repair Boot Configuration Data
At the beginning of this post, I said one of the reasons which cause startup problems is the Boot Configuration Data. To repair the Boot Configuration open CMD and type the below commands.
bootrec /rebuildbcdThis will scan for other operating systems and lets you select the OS’s you want to add to BCD. Now there are two scenarios you can encounter:
(1)Total identified Windows installations: 0. Perform next commands below.
(2)Total identified Windows installations: 1. Type Y hit Enter and reboot your computer.
Type the commands below and hit Enter:
bcdedit /export c:bcdbackup
attrib c:bootbcd -h -r -s
ren c:bootbcd bcd.old
bootrec /rebuildbcd
Type Y and hit Enter.
Startup Settings
Another which you can find on Advanced options is the startup settings of Windows. If you have faced an error 95% this option won’t help you to fix that problem. If you don’t believe me just have a look at the below settings and decide yourself.
- Enable low-resolution video Mode
- Enable debugging Mode
- Enable boot logging
- Enable Safe Mode
- Disable driver signature enforcement
- Disable early-launch antimalware protection
- Disable automatic restart after failure
Conclusion:
well, It was all about Fix Your PC did not start correctly Error on Windows 10?, I hope it was helpful and wish you that you have recovered all of your memory stuff. If you really liked the post please comment on the post, so we feel better. And by the Once read the what’s your idea for this Post and give us 5 stars.