

There are many reasons to be interested in Linux. Like mac OS, which has a legacy of Unix (or at least a Unix clone called GNU). Some Linux desktops, such as Ubuntu Unity, are similar in nature to the Aqua interface (as used in macOS).
Linux is also very versatile and designed to run everything from mobile phones to supercomputers. This makes it ideal for installing on old PCs like old Polycarbonate MacBooks. They don’t even run the latest version of Mac OS X. But they can easily run or they can be upgraded to any Linux distributions.
Linux is a favorite operating system for developers for good reasons. If you are coding, moving to Linux can be great. It seems that macOS is better for software development (in many ways) than Windows, but Linux is even easier to do.
The open source nature of the code ensures that the code is freely shared, and programs and solutions are usually appropriate. Apple Macs are great devices for Linux. You can install Linux on any Mac with an Intel processor.
Step 1. Create a Partition for Kali Linux
Kali Linux is an operating system which requires at least 20 GB of storage with 1 GB of RAM. However the official Kali Linux’s site recommends to use 2 GB of RAM for Kali Linux for better performance.
For Every dual boot a certain amount of storage is required, as for Kali Linux 20 GB storage is required. However I recommend you to use at least 50 GB of storage but why? Kali Linux is is penetration testing platform, gods knows at what certain point you required some extra amount of storage. So, its good to take the precaution before the incident.
To Create or separate amount of storage from your running macOS, open Disk Utility. There are various methods to open Disk Utility but the quickest method is to hold Command + Space keys together. This will open the spotlight, type Disk Utility and hit return key to launch it.
Once it is launched choose your Storage device and click on partition. To Create a New Partition, click on the plus (+) icon, this will separate the storage to equal half partition. I am going to give 50 GB of storage, with MS-DOS (FAT) format and I am calling this drive KL.
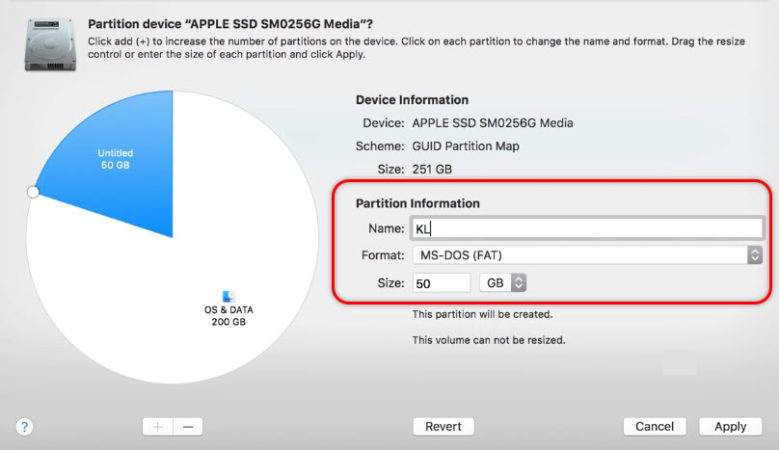
To Apply changes over the storage choose Apply, then click on partition and wait a moment until the drive is ready.
Step 2. Create a Bootable USB for Kali Linux in macOS
There are several ways to create a bootable USB for Kali Linux in macOS. Since this tutorial is to provide convenient steps to dual boot macOS Catalina and Kali Linux for our reader, I will guide you with an open source software. However, if it didn’t work look for alternative method method to create bootable USB for Kali Linux in mac, If not then use the Terminal.
Download the Bootable Driver Maker from Github or Google Drive from Below Links.
- Download Bootable Drive Maker for mac [Github]
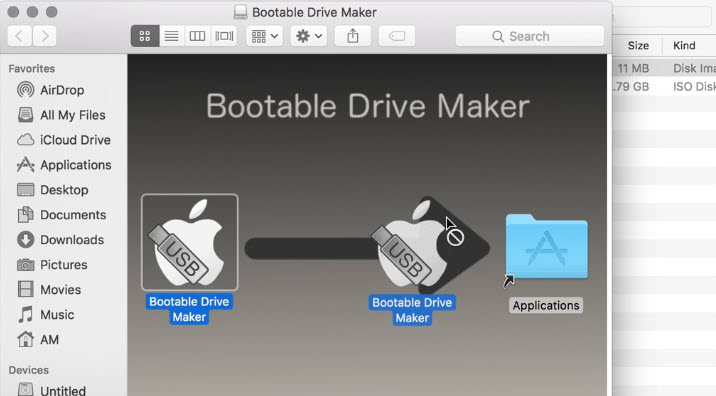
After downloading the Bootable Drive Maker launch it, drag the app to application directory.
Download Kali Linux ISO. I recommend to download the Kali Linux ISO using the Xtreme Download Manager. XDM is an alternative to the powerful downloader called IDM in Windows. But XDM is an open source software developed for cross platform.
Why I am recommending to use XDM?
America, Europe, Australia and other continents have a power internet connection but in Pakistan it is great Deal if it should reach 1 MB. I personally have 4 MB network of PTCL but these days it can’t reach even 500 KB/Sec. There are also other reasons which I posted on other post, if you wish read it their.
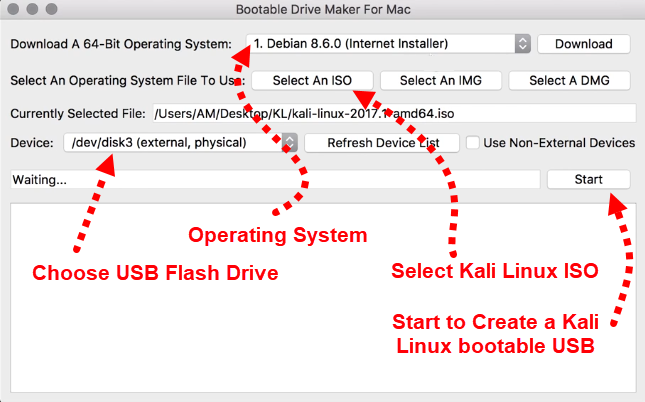
Attach the USB flash drive to the computer, make sure it must be empty and at least it is 4 GB.
Open the Bootable Driver Maker, you can open it with Launchpad, Application or the Spotlight. I am good with Spotlight so I will open it with spotlight.
- The first is to locate the Kali Linux ISO, to do that click on Select An ISO, then locate the location of the operating system.
- Make sure to choose the Kali Linux operating system version Debian, don’t choose Ubuntu.
- Make sure that the USB flash drive is detected by the app.
- Once you are ready with the all stuff, click on start, then it will prompt for confirmation, simply enter your password and wait until the files are copied.
Step 3. Install Kali Linux with macOS on Single Drive
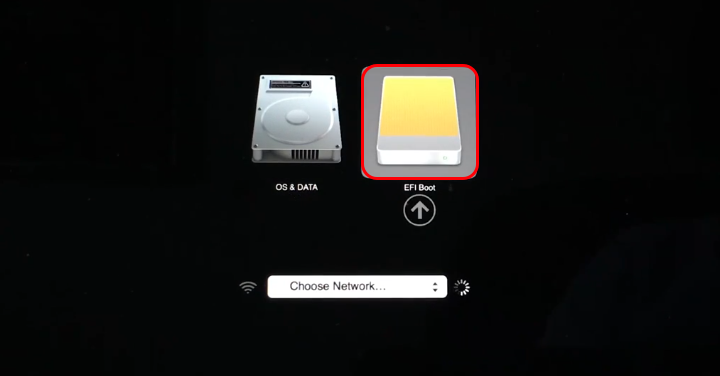
The final process of dual is to install Kali Linux itself on the mac, so, restart the mac with Bootable USB attached. Once the computer is turned off hold the option key and wait until it takes to the boot options. Choose the USB Flash drive using the arrow keys and return key.
The next step of installing kali linux along side the macOS to choose a type of Installation. Without the Installation option you can test the Kali linux Live running from USB. For Installing Kali Linux you have to two options:
- Graphical Install
- Install
You can go with any of them, the difference is that the graphical installation provide you GUI interface but the other option do not provide. I prefer the second option because it is faster compare to the graphical installation.

- Kali Linux is asking you to choose a language for the installation option. Basically I will go with the English Language.
- Choose the territory, country or area and press return key.
- After verifying the territory wait until the hardware and additional components should be detected by the Linux.
- Type a host name for the computer and hit return key.
- Type a password for your Linux operating system, then re-enter the password.
- Choose a Time zone and move on.
This is the most important part, here you have to partition your Hard Disk. For the partitioning method choose manual, don’t choose Guided- Use entire partition.
Once all the drives are listed, choose the drive which you created before creating bootable USB.
After choosing that, on the next window, delete the partition to make it free space.
Now choose the free space, select Guided partition using the largest free space. Choose All files in one partition and continue.
Once the partition is created choose finish partition and write changes to disk.
- For the confirmation Kali asks again to install Linux on the free space, choose yes.
- Now wait until the Kali Linux should be installed.
- Choose No for Network mirror.
- Wait until the bootloader should be installed, if it asks choose yes to install it.
- Then choose the Linux drive to install the bootloader.
- When the installation is complete choose continue and the system will restart.
- Type your user name and password to log in inside the Kali Linux.
To switch macOS, retsart or power on your system and hold the option key, choose the mac or Linux drive.
2 comments