
Beta versions are not stable, every company says this for their consumers. This is a place where you can use the Virtual machine software to test the beta operating system just like macOS Big Sur. There are plenty of Virtual machine apps for mac, but in this article, I will be focusing on VMWare Fusion. The Steps are so much easy except it will require plenty of time, a fast network connection, storage, and patience. If I have to be more specific; I am talking about How to download macOS Big Sur with and without the developer account. If you have both or non, you can use the assistant package tool to download macOS Big Sur. After that, you will be heading towards the creation of the macOS Big Sur DMG file. Then create a New Virtual Machine and start installing macOS Big Sur.
Step 1. Download macOS Big Sur
Soon in October Apple will release the final version of the macOS Big Sur, then you can download it from the App store. But the big issue for non-developers is, How to download and Install macOS Big Sur on their mac. Although I have already created a post where I have guided How to Download and Install macOS Big Sur Without a developer account, You may visit that.
However, if you are living in their world countries downloading such a big file is mass, because of the slow internet connection. Therefore Soon we will be uploading the macOS big Sur DMG and ISO file but since the upload of the file takes time, I recommend you use the Assistant package. It contains the macOS big Sur, All you have to do is, install it and then on the applications directory you will see it.
Step 2. Create a macOS Big Sur DMG File
The macOS Catalina which you have downloaded from the App Store, or using the developer tool, they are just the installer. Even if you have used the Assistant package installer, all of them are nothing but the macOS Big Sur Installer.
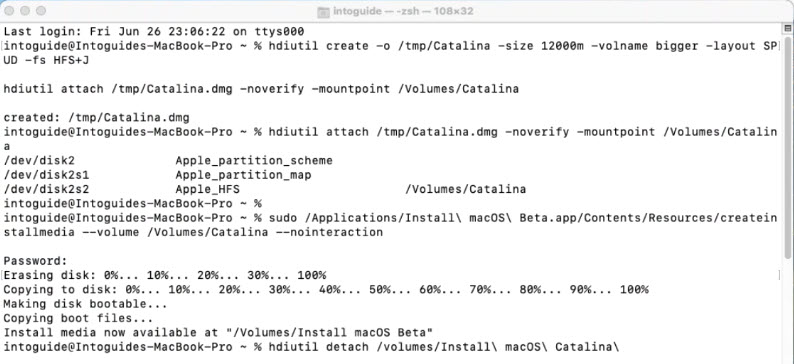
Since installing macOS Big Sur on VMware fusion requires a DMG file, it is good for you to know how to create a macOS Big Sur DMG file.
- First thing you have to make sure that the macOS Big Sur Installer is available on the Applications directory.

- Launch Terminal.
- Apply the codes one by one on the Terminal.
Download the codes to Create macOS Big Sur ISO and DMg file
Step 3. Download and Install VMware Fusion
This is the step where you need to download and install VMware Fusion on your computer to test macOS Big Sur. You can visit the official site of VMware to download VMWare Fusion.
- To start the installation, double click on the setup and click on the VMware fusion logo. After that enter your login password to move to the next step.
- Agree with the terms and conditions of VMWare fusion.
- If you have a license, type in the key, if not, choose the 30 days trial option which is pretty time for testing macOS Big Sur Beta 1.
- Choose to try VMware Fusion 11 and click continue.
- Decide to join the VMware community or not but I will uncheck it and move to the next step.
- If you see the message which says; VMWare fusion wants to access control system events… just choose OK.
- Then it will open the security and privacy just allow VMWare fusion theirs.
Step 4. Create a New Virtual Machine for macOS Big Sur
This is the step where you will be creating a new Virtual machine for the macOS Big Sur on VMware Fusion 11. To get started open the VMware fusion which is just installed.
- continue on the first window which is select the installation method.
- Address the macOS Big Sur dmg file which was created in step 2.
- Choose the operating system Apple OSX with a 10.15 version.
- If you want to customize the settings of the Virtual machine for macOS Big Sur, choose to customize settings.
- Once you click continue on the with the customization window, the settings of the macOS Big Sur will open. Choose hard disk and change the amount storage to 60 GB which is the minimum storage requirement of macOS Big Sur.
- Once you are done with the hard disk setting click on the play button to start the installation process.
Step 5. Install macOS Big Sur on VMware Fusion
The only big deal of installing macOS Big on VMware fusion is creating the DMG file. All the other steps are so much easy, especially installing macOS Big Sur.
- Choose language.
- Choose Disk Utility.
- Choose the hard disk and erase that with APFS or Mac OS Extended (Journaled).
- After the hard disk is erased; quit the window and move back to the recovery window, their choice Install macOS.
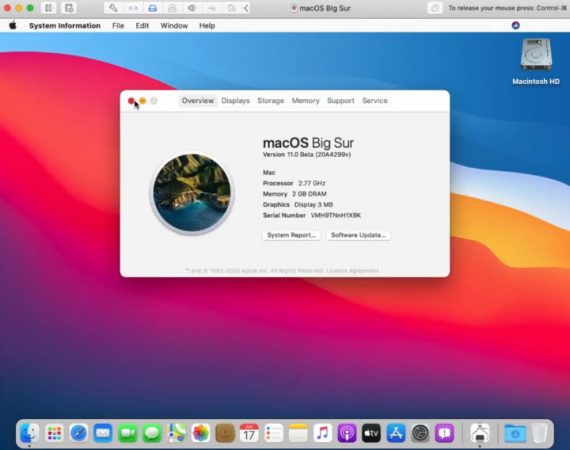
- Choose to continue> Agree> And select the drive which you just erased and wait until the system restarts.
- The other steps are choosing your region, language, creating a user account, express setup, sign in with Apple ID or a local account, and many more. I know you can pass them all, but Again I will upload the screenshot below in the gallery in case if you face any problem, just click on them to expand.
Summary
As long as you believe in yourself, you can do anything you wish for. for me it took three to download and install it on VMWare, that’s why I recommend you do things slowly every day and soon you will be able to Install it.