
Is it possible to install Windows on my macOS? In this tutorial you will learn how to install Windows 10 on mac and enjoy with two operating systems.
One of the benefits of using a Mac is that it allows you to run macOS automatically, or run Microsoft operating systems when you need to run programs and games under Windows.
In this article, we explain how to install Windows on a macOS, first with Apple’s dual-boot assistant and then with third-party virtualization software. We will also discuss the pros and cons of this.
Last thing before logging in: Do you know you don’t need to have a copy of Windows on your macOS to run Windows programs? Here’s how to run Windows applications on a Mac without Windows.
Which macOS version runs Windows?
It depends on the version of Windows you want to install, but every recent Mac should be able to run Windows 10. In fact, most Macs support it by the end of 2012. Here is a list of compatible devices that appear on the Apple site.
- MacBook introduced in 2015 or later
- MacBook introduced in 2012 or later
- MacBook Pro introduced in 2012 or later
- Ma cMini introduced in 2012 or later
- iMac introduced in 2012 or later
- iMac Pro on all models
- Mac Pro introduced in 2013 or later
If you want to install Windows on a Boot Camp partition, your Mac should also have at least 64 GB of storage. However, Windows requires 128 GB of space, and Apple is proposing to build such a partition.
Boot Camp or Virtualization
If you need to install Windows on your Mac, there are two main ways, and the choice you make depends on the type of software you need to run. Boot Camp is provided by Apple with Boot Camp Assistant installed on every Mac, (it is called “dual boot”) because it lets you run your Mac using Windows or MacOS Start up.
The Boot Camp Assistant can split your Mac hard drive (or SSD drive) into two parts, called a “partition”. Plays MacOS on one partition, then installs Windows on the second partition. You can run which operating system by pressing the Alt key on your keyboard when you boot your Mac.
Installing Windows on the Boot Camp partition effectively converts your Mac into a simple Windows PC, giving you all the power and memory of your Mac processor and graphics card for Windows alone.
This is the best option if you want to run Windows games, or run high-end graphics and design software that requires all the power of a device. The only downside of Boot Camp is that when you run Windows, you have access to all your regular Mac programs, meaning that if you want to use Mac programs like Apple Mail or Photos, you have to shut down Windows and Restart.
This is where another option, known as “virtualization”, can be useful. Instead of splitting your hard drive into separate partitions for macOS and Windows, you’re using a virtualization program to create a “virtual machine” that runs on macOS.
Virtual Machine (VM) is simply a program that runs just like any other Mac application on a Mac. However, the virtual machine imitates the performance of a PC and allows you to install Windows on the virtual machine, and then install the Windows programs you need to run.
This is definitely the easiest option, as it means you can run your Windows applications on your Mac desktop right alongside all your regular Mac programs, so you don’t need to double-boot and boot between MacOS and windows.
But virtualization also has its drawbacks. Running Windows on a virtual machine means that you run two operating systems at the same time, so you need a lot of processor and memory to get the right performance when running Windows applications.
However, most recent Macs can still deliver good performance when running Windows on a virtual machine, and it is only 3D games and high-end graphics that can power the device with extra power. For that Boot Camp is recommended.
How to install Windows 10 on Mac?
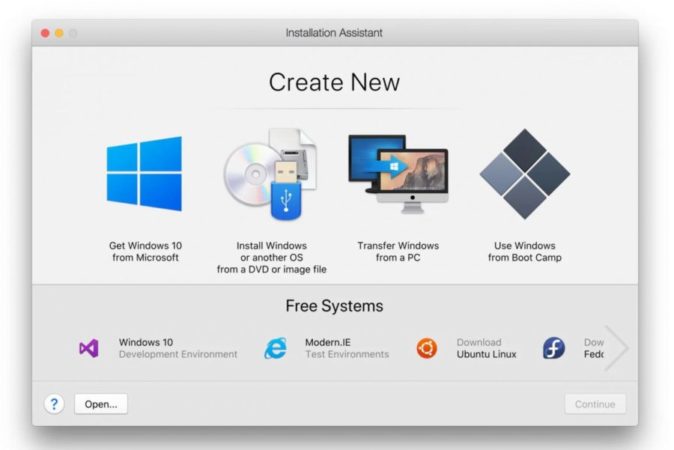
If you want to run Windows 10 on your Mac, you can download it’s ‘ISO file‘ from the Microsoft website. You can also download ISO files for Windows 7 and Windows 8.1. However, these versions of Windows were initially sold on disk, so if you still have the original disk, it’s probably faster to build ISOs using the disk installer. This is in fact quite obvious, and Apple also covers this option on its website.
Now you have Windows installation files, just run Boot Camp or your Virtualization software before you can install it.
What you need for Boot Camp for Windows installation?
Boot Camp Assistant is an application developed by Apple to help you install Windows on your Mac. You will find the Boot Camp Assistant app in the Utilities directory on the Applications, but before running Boot Camp Assistant you will need things to run Windows in Boot Camp.
- Apple recommends having at least 64GB of free storage available on your Mac’s internal hard drive (or SSD drive) for Windows installation. In fact 128 GB is recommended!
- You may also need at least 16GB of memory to control components such as your Mac monitor and camera, as well as your Mac keyboard and mouse. Some Macs are able to download these necessary drivers. However without the 16 RAM it can work too.
- You need a copy of Windows with the license number. Recent Mac models and any type of Mac running only work with Windows 10, though older models may also work with Windows 7 or Windows 8.1. You can check that versions of your Windows Mac are running on the Apple website. Depending on the version you use on Windows, the installation process will be different.
Once you are done, you will be ready to run Boot Camp Assistant and install Windows on your Mac.
How to install Windows on a Mac using Boot Camp?
Step 1. Open Boot Camp Assistant
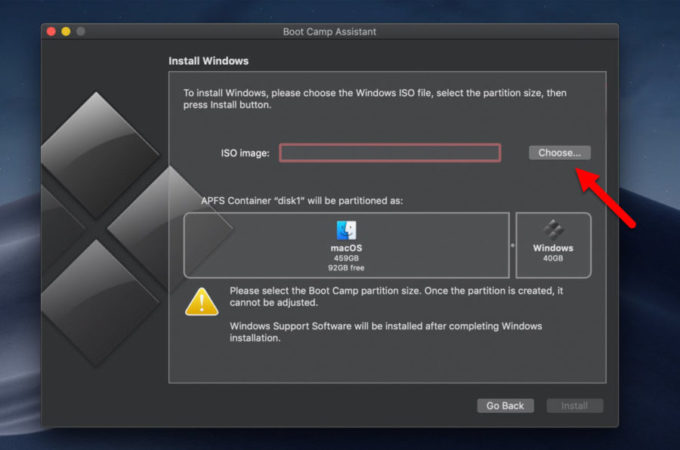
When you first run Boot Camp Assistant, it comes up with a variety of options immediately. The first option is to select the ISO image to use. Click the Select button and located the downloaded windows 10. This will copy your Windows ISO file to USB storage so you can install Windows. there is a slider by which you increase or decrease the amount of storage for windows.
Step 2. Download the Boot Camp Drivers For Windows
Boot Camp Assistant is telling you that it also download driver software for windows. However, this only download drivers for Windows 8.1 and Windows 10, so if you want to install Windows 7, which is still used by millions worldwide – you need to go back to Apple’s compatibility tables. Follow the website to find the driver software needed for your Mac, then follow the instructions for copying drivers to your USB storage.
Step 3. Partition the drive for Windows with Boot Camp
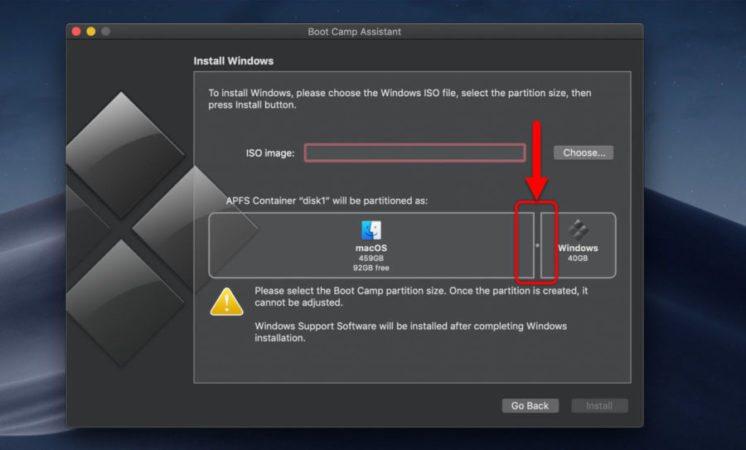
To dedicate Windows space, Boot Camp has to split its Mac hard drive into two separate parts, known as “partitions”. The below screenshot shows the usual macOS on the left and Windows on the right. To increase the amount of storage for windows, slide it over to left, and to decrease the amount of storage for windows, slide it to right side.
By default, Boot Camp Assistant provides a small Windows partition that is only 40 GB in size, but you can use the slider control to adjust the size of two partitions if needed.
If your Mac has more than one internal hard drive or SSD, you can assign one of these drives exclusively to Windows. However, Boot Camp does not play well with external drives connected via USB or Thunderbolt, so it is best to use your regular internal drive wherever possible. And if you have an external drive connected to your Mac for Time Machine backup, it’s a good idea to remove it because Boot Camp gets a little confused if you detect an external drive during installation.
When you’re done, click the Install button at the bottom of the window to get started.
Step 4: Install Windows 10 along side the macOS
After splitting your Mac drive, and downloading the Windows support drivers, click, your pc will restart. Installation of windows is so much easy just follow the usual installing windows. Select the language, Use the custom settings, create a user account and more.
Once the installation is complete, and when Windows starts up, you will be prompted to install additional Boot Camp drivers which was downloaded during the set up of Boot Camp Assistant.
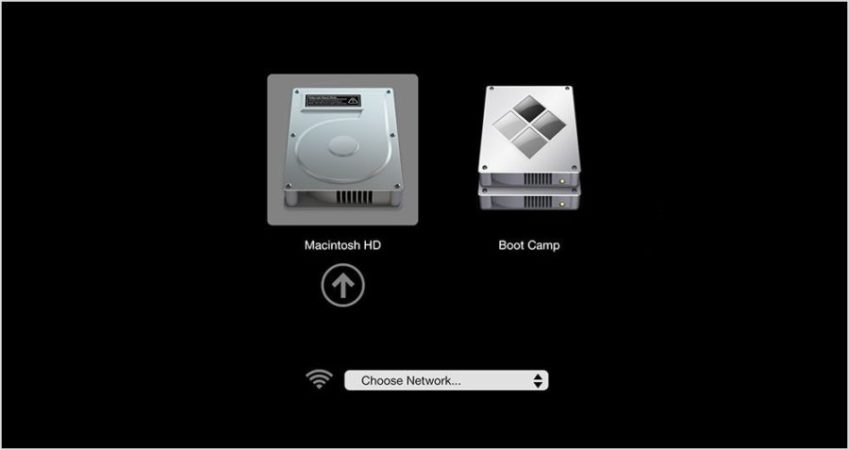
If you turned off your system, it will boot back to Windows, in order to boot into Windows or mac, while starting the computer Hold the option key. The you will be on the below window with the option to go to windows or mac.
Step 5. Run Windows 10
When you’re done, you can easily boot up by pressing Alt on your keyboard when you turn on the Mac. Once the computer is powered on, these two sections are displayed with macOS and Windows and you can easily select your operating system.
How to Install Windows 10 on a virtual machine on macOS?
Virtualization programs like Parallels Desktop and VMware Fusion offer an innovative and flexible alternative to the dual boot approach of Boot Camp. These programs create a virtual machine instead of dividing the Mac’s storage into separate partitions and installing Windows on the Boot Camp partition.
You can then install Windows on the VM, along with any Windows software and software you need to run it. The VM can run alongside other Mac programs like Safari or Apple Mail, so you don’t need to switch between the two operating systems, as you would with Boot Camp.
These programs are not free, so you should should purchase them, as well as another purchased version of Windows. There’s also a free virtualization program, called VirtualBox, but it’s quite complicated to use, so we’ll focus first on installing Parallels and VMware for Windows. If you’re feeling ready for the challenge, log on to the VirtualBox section and install windows 10 their.
Install Windows on MacOS with Parallels
The parallel desktop costs $69.99/ $79.99 and has a more colorful graphical interface than the VMware Fusion, but both programs use the same basic approach. They offer several options for creating a new VM on your Mac, using an installer disk or ISO file.
It’s also possible to connect an existing Windows PC to your Mac and create a VM on the Mac, which is an exact version of the PC, complete with Windows and all the Windows applications you need. And if you’re currently using Boot Camp, you can even create a VM that will copy your Boot Camp partition – a useful option for quickly checking multiple files or running programs that do not require great performance, without Turn off your Mac and booting to Windows.
After deciding how to install Windows, both programs allow you to adjust a number of important settings.
Install Windows on MacOS with VMware Fusion
VMware is a little more complex because it displays a window with many settings that may seem a bit daunting to first-time users. Parallels makes it a bit easier for beginners by providing a number of predefined options for productivity software such as Microsoft Office, or running 3D games or design software.
VMware costs $70.96/ $79.99 but there are discounts on upgrades from previous versions.
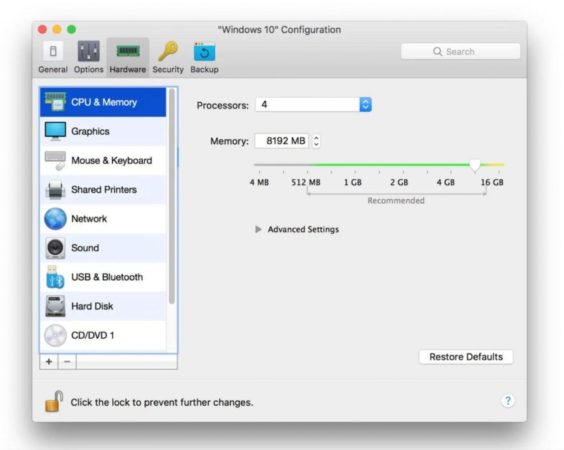
Both VMware Fusion and Parallels let you change the hardware configuration of your VM if necessary, just like choosing physical hardware for a real Mac or PC.
If your Mac has a multi-core processor, you can assign multiple cores to your VM to improve performance. You can also allocate extra memory and disk space, and even increase the amount of video memory your VM can use to access 3D graphics in games and other graphics software.
Other options offered by Parallels and VMware include connecting external devices such as a hard drive or even Bluetooth speakers to Windows VM. You can also specify how your VM interacts with macOS on your Mac, perhaps sharing the specific folders and files you need for a work project, or sharing your music or library.
One of the key aspects of how to run your VM on your Mac is the way it appears on your Mac desktop. By default, both Parallels and VMware run their VMs in one window – so you get a “Windows Window” that displays the Windows desktop located in its own window above the Mac desktop. However, it’s also possible to extend the Windows desktop to fit the full screen, making your Mac look just like a regular computer.
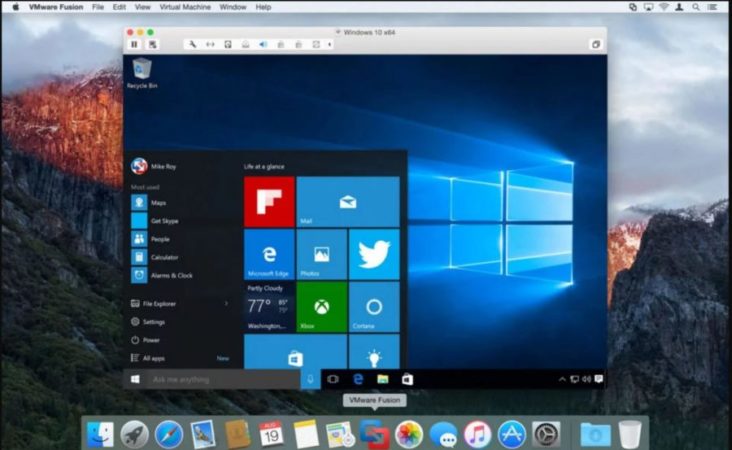
But a better option for many people is to hide the Windows desktop in general, so that personalized Windows applications, just like regular Mac programs, all appear on the Mac desktop alone.
The number of different options available here can be a little worrying, but the interesting thing about virtualization technology is that you really can’t ruin a VM. You can save different versions of your VM, just like saving different versions of a document in Microsoft Word. This lets you experiment with different settings to see which options work best for you, and then go back to the previous version of VM whenever you want.
Run Windows on macOS in VirtualBox
Here’s an alternative way to run Windows on a Mac: Use Oracle VirtualBox to run Windows as a virtual machine.
- Download the latest version of VirtualBox
- After downloading, find it on your Mac, mount it and double-click the VirtualBox.pkg file to install it.
- Once installation is complete, launch VirtualBox from your Applications folder.
- As explained above, download your version of Windows 10, and place it in a convenient location so you can access it from the VirtualBox.
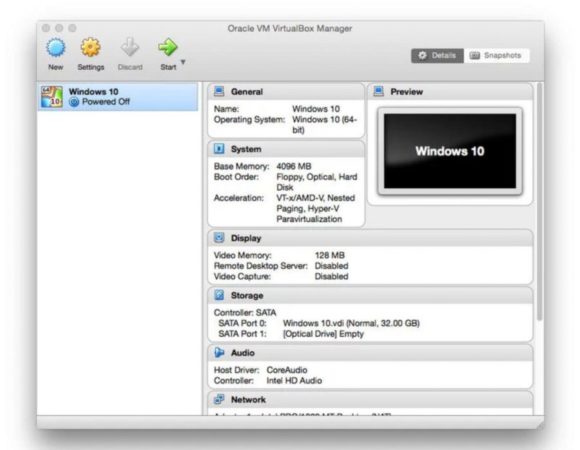
- Click the new button in the VirtualBox toolbar and give your new virtual machine a name (in our example “Windows 10”) and select your operating system version from the drop-down menu.
- Click Continue.
- Save enough resources – you will behave like a separate computer from the rest of your Mac when Windows is running.
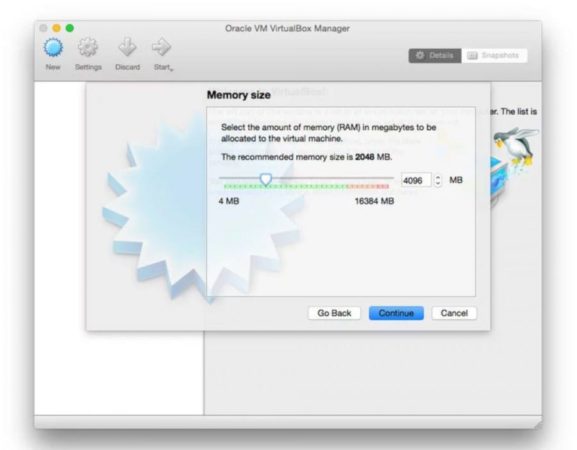
- To do this, you need to borrow resources from your Mac, which your Mac cannot touch while the virtual machine is running. The most important is this memory. As a constitution, the more memory you have on the VM, the better it will run.
- Creating a Virtual Drive – When you run a virtual machine, not only the operating system but also the programs running on it and the files created and edited are stored in a bundle that your Mac serves as It will see a virtual hard drive.
- This is convenient because it means you will not mix Windows and macOS assets, but it means that you are putting a large chunk of your disk out of the reach of macOS.
- When you click Continue, you will be asked which type of drive you want to create. Stick with VDI ( VirtualBox Disk Image). Unless you want to use this Windows installation with a different virtualization program like Parallels Desktop.
- VirtualBox can eliminate the storage space you have allotted immediately or partially increase it by increasing the size of your Windows drive over time by increasing the number of files and applications you need installed.
- If you have no specific reasons to disclose the full amount immediately, leave the Storage option on the Dynamically Assigned and click Continue.
- Install Windows – You’ve now created your new virtual machine – All you have to do now is install Windows. The new VirtualBox gives you a snapshot of your virtual machine’s composition and lets you switch between different virtual environments in the sidebar if you set up more than one.
- Click Start to begin the Windows installation process.
- Finally you need to find your installation file. We have saved our downloaded file on the SD card to the back of our Mac Mini. We need to tell VirtualBox where this is, so by clicking Start, the virtual machine for windows 10 will launch. Now click on the folder icon on the screen that appeared and select the ISO file on the card.
- After selecting your language, the installer should know whether you are updating a new version or choosing the custom installation option. Select Custom because you’re running a brand new virtual machine, then create a drive for windows to install.
- Before asking you for preferences, the virtual machine will restart several times during installation. You can choose the Express Settings option, which accepts all of Microsoft’s defaults, including using Bing as your search engine, automatically installing updates when available, and sending your browsing history to Microsoft.
- If you don’t want to do this, click on the Customize button and manually adjust the settings. Next, you should tell Windows whether the device is yours or your organization. Only you can know the right answer here, but if you are a home user or small business, chances are the second option is the most appropriate.
- Click Next to sign in, then enter your Microsoft account details. If you don’t already have a Microsoft account, click Create One.

Also Read: