
If you have tried installing macOS Mojave or macOS High Sierra on your PC, after installing you are not able to configure the bootloader, Internet drives, screen resolution, sound, and others. In simple words, you have not configured the macOS Mojave Post Installation, or in other words, you have not installed the macOS Mojave Drivers.
Comparing macOS Mojave drivers with windows 10 absolutely different from each other. In windows after performing a clean Installation you have to update the OS, all the drivers will be downloaded easily. But in macOS Mojave or macOS High Sierra and other versions of mac, you can’t apply the same process as you do on windows.
Microsoft Provides an ISO of their operating system which is already configured for boot and it is preconfigured with the windows bootloader. When it comes to mac, Apple does not provide their operating system’s dmg file, instead, people are making them by themselves. Where the bootloader is not configured.
If you really want to configure the macOS Mojave Post Installation, first you must know How to create Bootable USB for macOS Mojave, and Install macOS Mojave on PC-Hackintosh. Actually, the post Installation Process starts with the creating bootable USB, however, I am not pretty sure about the Post Installation without configuring the USB Installer media with Bootloader and the Post Installation Files.
That’s why First I recommend you to read How to Install macOS Mojave 10.14 on PC-Hackintosh? If you have already Installed the macOS Mojave without the Post Installation or macOS Mojave Drivers you have to follow the below steps. If you have not installed the macOS Mojave I recommend you to read the How to Install macOS Mojave on PC-Hackintosh?
Download Required Files:
- macOS Mojave Base Files ( Nvidia web driver + Clover Bootloader from this video + Config.Plist + Basic Kext’s )
- EFI partition from the Mojave – https://goo.gl/q8mYGA
- Clover Configurator – https://goo.gl/5Hi8ft
- Clover Boot Loader ( Newer Version ) – https://goo.gl/d8Li6c
- VoodooHDA – https://goo.gl/6zXhFx
macOS Mojave Post Installation Guide
After installing macOS Mojave on PC or Hackintosh the macOS Mojave Disk is not available on the desktop, so first, you have to enable that. Go the Finder and enable the Show Hard Disk, because you will need access to the macOS Mojave Disk.
If the macOS Mojave Disk Already available no need to perform the task.
Step 1. Install the Bootloader on the macOS Mojave Disk
The very first which is very important is the Bootloader which needs to be Configured, to do that, first you have to download the Clover Bootloader. After that Follow the below steps to Perform Post Installation Tasks on macOS Mojave.
- Double Click on the Clover to open the Dmg file.
- On the Introduction window of Clover Click continue.
- Again Click continue on the Readme page.
- Select the Disk where the macOS Mojave is installed and click continue.
- In the next window, select Customize and enable the below options, However, some of them are already selected, but you have to make sure they are enabled.
- check the box of UEFI.only
- The Target.ESP is selected already, don’t uncheck that.
- Next, expand the Driver64UEFI and check the below boxes.
APFS
OSxAptiofix2Drv-64
PartitionDxe-64
Please make sure, that the below 7 settings are already checked, and if any of any boxes are not selected, enable them manually.
- AppleImageCodec-64.UEFI
- AppleKeygenerator-64.UEFI
- AppleUITheme-64.UEFI
- DataHubDxe-64.UEFI
- FirmwareVolume-64.UEFI
- Fsinject-64.UEFI
- VboxHfs-64.UEFI
When the drives are selected, click install and enter your password for confirmation.
Step 2. Verify your System Definition
This Config.plist file contains all the necessary files and options to install macOS Mojave, but the only thing which is not configured is the system definition.
To configure the system definition, right click on the config.plist select open with clover configurator. In the clover configurator, on the left side select SMBIOS and select your system definition.
I am using the Intel i5 4460 CPU and the best match system definitions are iMac 14,2- intel core-i5 4570 @3.20 GHz. If your system definitions are not available their select an option which has similar hardware or CPU to your PC.

After selecting the system definitions, if you are a Pascal or Nvidia user, from the left side select system parameters and check the Nvidiaweb. Now Go ahead and save the changes to the Config.Plist file.

Step 3. Copy & Paste the APFS.EFI to Drivers64 and Drives64UEFI
Step 4. Install the macOS Mojave Drivers
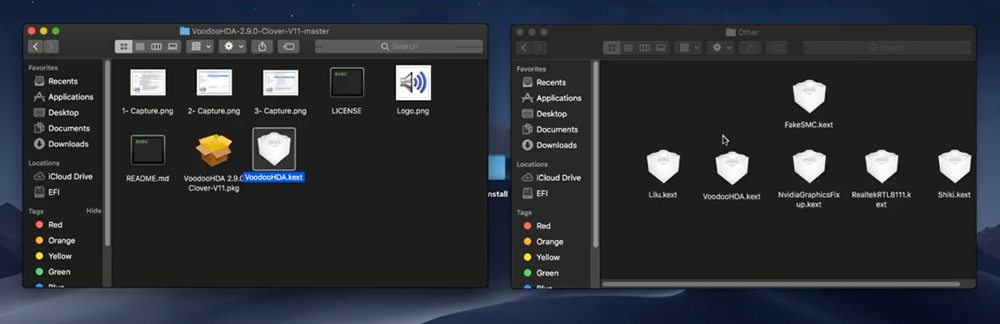
This time open the Kexts Folder, then visit the other folder inside the Kext and paste the below drives in EFI Partition.
- FakeSMC.Kext
- RealtekRTL8111.Kext
- shiki.kext.
- NvidiaGraphicsFixup.kext
- lilu.kext.
Step 5. Copy VoodooHDA.Kext to Other Folder inside the EFI Partition along with other Five Drivers.
- On the Welcome screen of Nvidia Web Drive click Continue.
- Agree to the Licence and continue.
- On the Destination panel, click continue and enter your password for confirmation.
- Once Installation Completes, it will ask you to Restart the system.
Step 6. Enable Sound on macOS Mojave
Coming soon…
Also Read:
- Install macOS Mojave on VirtualBox
- Install macOS Mojave on VMware
- Get macOS Mojave Features on Windows 10
Conclusion
This was about with the macOS Mojave Post Installation Guide. I Hope it helped you to fix the macOS Mojave Errors. In case if you have any problem, suggestion, ideas or opinions please let us know through contact us page.