How to Fix an External SSD Not Showing Up in Disk Utility
Disk Utility has long been the go-to tool for managing drives on macOS. If your external SSD isn’t showing up, this is the first place to check.
How to Open Disk Utility
-
Via Spotlight Search
-
Press Command (⌘) + Spacebar.
-
Type Disk Utility and hit Enter.
-
-
Via Finder
-
Open a Finder window.
-
Go to Applications → Utilities → Disk Utility.
-
-
Via Launchpad
-
Open Launchpad from the Dock.
-
Navigate to the Other folder and click Disk Utility.
-
Once Disk Utility is open, check the sidebar for your external SSD. If it’s not listed, follow the troubleshooting steps below to bring it back.Press Command + Space to open Spotlight, type “Disk Utility,” and hit Enter.
- Or, if you prefer the scenic route, go to Applications > Utilities > Disk Utility.

Once you open Disk Utility, look at the left-hand sidebar under “External.” If the drive doesn’t appear there, your Mac may be having trouble detecting it. This could indicate hardware problems, loose connections, or even power supply issues.
Check the Physical Connection
It may sound basic, but it’s important not to overlook. Many cases of an SSD not appearing on a Mac are caused by a simple connection problem. Ensure the physical setup is secure and functioning properly..

-
Check the cable for damage like frayed wires, bent connectors, or loose ends. Even a small issue can cause the SSD to stop working. If you’re using an adapter, make sure it’s the right one for your Mac and the SSD.
-
Try using a different cable. Cables fail more often than you’d think, so swap it out. Also, plug the SSD into another port on your Mac. Ports can wear out or fail.
-
If your SSD is in an external enclosure, test the enclosure itself. Hook it up to another drive to see if it works. If it doesn’t, the enclosure might be the problem instead of the SSD.
-
Make sure your SSD is getting enough power. Some SSDs—especially larger ones—need more power than a regular USB port can provide. Try to plug it into a high-power USB-C or Thunderbolt port, or use a powered USB hub to give it the extra boost.
-
Skip extensions, hubs, or docking stations for now. These can cause interference or limit power to the SSD. Connect the SSD directly to your Mac to keep things simple while you troubleshoot.
It’s also a good idea to try the SSD on a different computer if possible. This can help determine whether the problem lies with the SSD itself or with your Mac’s hardware or software. If the SSD works on another device, you’ll know where to focus your troubleshooting.
Reset NVRAM and SMC
If the SSD still doesn’t appear in Disk Utility, resetting your Mac’s NVRAM and SMC may help. These components control certain hardware settings and power management, and a simple reset can often resolve detection problems.
What Are NVRAM and SMC?
-
NVRAM (Non-Volatile Random Access Memory) holds quick-access settings like sound volume, display preferences, and details about connected hardware. If these settings get messed up, your Mac might have trouble with external drive detection.
-
SMC (System Management Controller) controls hardware-level functions like USB ports, power delivery, and even thermal management. Resetting it can solve issues with ports/power that stop your SSD from showing up on Mac.
How to reset NVRAM:
-
Shut down your Mac completely.
-
Turn it back on while holding Option + Command + P + R.
-
Keep holding the keys for about 20 seconds. If your Mac plays a startup chime, wait until you hear it twice before letting go.
-
Let your Mac restart and check Disk Utility again to see if the SSD appears.
How to reset SMC (the steps to reset SMC depend on your Mac model):
-
Apple Silicon Macs: Shut down your Mac, wait 30 seconds, and turn it back on. The SMC resets automatically.
-
Intel Macs with a T2 сhip: Shut down your Mac. Hold the Power button for 10 seconds, then release it and turn your Mac back on.
-
Other Intel Macs: Shut down your Mac. Press and hold Shift + Control + Option (on the left side of your keyboard) and the Power button at the same time for 10 seconds. Let go, then turn your Mac back on.
If your external SSD still won’t be detected after all troubleshooting steps, it’s likely a hardware problem. Issues such as a failed controller or damaged internal components can’t be fixed at home. If the drive contains important data, consider contacting a professional data recovery service.
How to Fix an SSD Not Showing Up in Finder
A common situation is that the SSD shows up in Disk Utility but not in Finder. Here’s how to address this, starting with the simplest steps.
Step 1: Check Finder Preferences
Sometimes the SSD doesn’t appear in Finder simply because Finder isn’t configured to show external drives. This is one of the easiest fixes to try first.
-
Open Finder and click Settings in the Finder menu at the top-left of your screen.
-
Go to the Sidebar section.
-
Make sure “External disks” is checked under “Locations.”


![]() Note. On older macOS versions, Settings is called Preferences. The steps are the same, just the name is different.
Note. On older macOS versions, Settings is called Preferences. The steps are the same, just the name is different.
Once you’ve made these changes, check Finder’s sidebar and your desktop to see if the SSD appears. If not, the drive might not be mounted.
Step 2: Mount the SSD in Disk Utility and Check For Errors
Another common reason your SSD doesn’t show up in Finder is that it’s unmounted. macOS usually mounts external drives automatically, but sometimes this doesn’t happen due to a system hiccup or an issue with the drive itself. The good news is you can manually mount it in just a few steps.
How to mount the SSD:
-
Open Disk Utility.
-
Look in the left-hand list under External for your SSD. If it’s listed but grayed out, it means it’s unmounted.
-
Select the SSD and click the Mount button at the top of the Disk Utility window.
-
Once the SSD is mounted, check Finder and your desktop to see if it shows up.

![]() What If It doesn’t mount? If your SSD won’t mount or Disk Utility gives you an error, there might be an issue with the file system. Use First Aid in Disk Utility. Just select your SSD in the list, then click First Aid at the top and let it run. This tool scans for errors and tries to fix them.
What If It doesn’t mount? If your SSD won’t mount or Disk Utility gives you an error, there might be an issue with the file system. Use First Aid in Disk Utility. Just select your SSD in the list, then click First Aid at the top and let it run. This tool scans for errors and tries to fix them.

If First Aid fails, the SSD’s file system might be too corrupted. You’ll likely need to reformat the drive, which we’ll cover next.
Step 3: Use TestDisk to Fix SSD
Before we cover formatting, we want to mention another possible solution: TestDisk. This free tool is designed to recover lost partitions and fix issues with drives that don’t show up properly. While it requires some command-line knowledge, it’s a powerful option to try before formatting.
![]() Why try TestDisk first?
Why try TestDisk first?
-
Formatting erases all data, but TestDisk gives you a chance to recover or repair partitions without losing your files.
-
It’s free and highly effective for drives with corrupted partition tables.
Here’s how to use TestDisk to repair an external SSD not showing up on a Mac:
-
Visit the official TestDisk website and download the macOS version.
-
Unpack the downloaded file to access the TestDisk program.
-
Open Terminal on your Mac (press Command + Space and search for “Terminal”).
-
Navigate to the folder where you unpacked TestDisk with cd command: cd /path/to/TestDisk
-
Launch TestDisk: ./testdisk.
-
Select Create option and press the Enter button.
-
TestDisk will display all connected drives. Use the arrow keys to highlight your SSD and press Enter.
-
When prompted, choose the partition table type. TestDisk often detects this automatically, but if not, stick with the default option.
-
Select Analyze to scan the SSD for lost or damaged partitions.
-
If TestDisk identifies partitions, highlight them and select Proceed to attempt recovery.
-
If no partitions are found, use the Write option to rebuild the partition table. Confirm your changes when prompted.


Once TestDisk completes the process, restart your Mac and check Disk Utility or Finder to see if the SSD is now visible. If not, well, there’s always formatting as a last resort.
Step 4: Reformat Your Drive if Necessary
When the external SSD’s file system is too far gone or not natively supported on macOS, formatting is your only option. Formatting repairs the file system, and allows your Mac to recognize and use the SSD again. However, keep in mind that formatting wipes everything on the drive.
![]() If you have important files you don’t want to lose, you can recover them first before formatting. Check out How to Retrieve Files from an External SSD That’s Not Showing Up on Mac for steps to save your data. Once your files are recovered, come back here to continue with formatting.
If you have important files you don’t want to lose, you can recover them first before formatting. Check out How to Retrieve Files from an External SSD That’s Not Showing Up on Mac for steps to save your data. Once your files are recovered, come back here to continue with formatting.
How to format the external SSD:
-
Open Disk Utility.
-
Select your SSD from the left-hand list.
-
Click Erase at the top of the window.
-
Adjust the settings in the pop-up window:
-
Name: Enter a name for the SSD.
-
Format: Choose APFS for macOS-only use or exFAT for compatibility with macOS and Windows.
-
Scheme: Select GUID Partition Map (this is often set as the default).
-
-
Click Erase to begin. This process may take a few minutes.


When the process is finished, click Done and check Finder to confirm the SSD is now accessible.
How to Fix an SSD Not Showing Up on the Desktop
If your external SSD shows up in Finder but doesn’t appear on the Desktop, the problem is likely tied to your display settings. macOS usually shows connected drives on the Desktop by default, but this setting can sometimes get turned off. Let’s go through how to fix it.
How to check Finder settings:
-
Open Finder and click Settings (or Preferences) in the Finder menu at the top-left corner of your screen.
-
Go to the General tab.
-
Make sure “External disks” is checked under “Show items on the desktop.”

☰ Check Desktop sorting. Right-click on the Desktop and choose “Sort By” or “Clean Up By.” Select “None” or “Name” to make sure your SSD icon isn’t hidden behind other items. This fix can help if the drive is being sorted out of view by your Desktop settings.
How to Retrieve Files from an External SSD That’s Not Showing Up on Mac
In many cases, formatting was needed to fix an external SSD that wouldn’t appear on a Mac. The problem is that formatting erases all data on the drive. If your SSD contains important files, it’s better to attempt recovery first. There are several data recovery software options available for this purpose. These tools are mainly designed to recover deleted or lost files but can also retrieve existing files—provided the SSD is visible in Disk Utility. If the SSD doesn’t appear in Disk Utility, recovery software won’t be able to help.
![]() Note: No recovery software can guarantee 100% success, especially with SSDs. The TRIM function, which optimizes SSD performance, makes recovering lost or deleted files extremely difficult (if not impossible). However, if you only need existing files and the SSD shows up in Disk Utility, recovery should be straightforward with the right software.
Note: No recovery software can guarantee 100% success, especially with SSDs. The TRIM function, which optimizes SSD performance, makes recovering lost or deleted files extremely difficult (if not impossible). However, if you only need existing files and the SSD shows up in Disk Utility, recovery should be straightforward with the right software.
Over the years, we’ve tried many recovery apps, but one we recommend is Disk Drill. Here’s why it’s a solid choice:
-
High success rate.
-
Compatible with all kinds of devices: SSDs (internal and external), HDDs, USB drives, SD cards, and more.
-
Supports all common file systems: APFS, HFS+, exFAT, NTFS, and older formats.
-
Intuitive interface makes it easy for anyone to recover data, even with little technical experience—lost files can be restored in just a few clicks.
-
Packed with extra features, including Byte-for-byte backup, S.M.A.R.T. monitoring, Data Protection, and Clean-Up Tools.
-
Offers a Basic Version that allows scanning drives and previewing files for free.
To get started with Disk Drill:
-
Go to the official CleverFiles site, download the Mac version, and install it on your computer.
-
Open Disk Drill from your Applications folder.
-
Grant the necessary permissions, such as Full Disk Access, so the app can scan drives correctly.
-
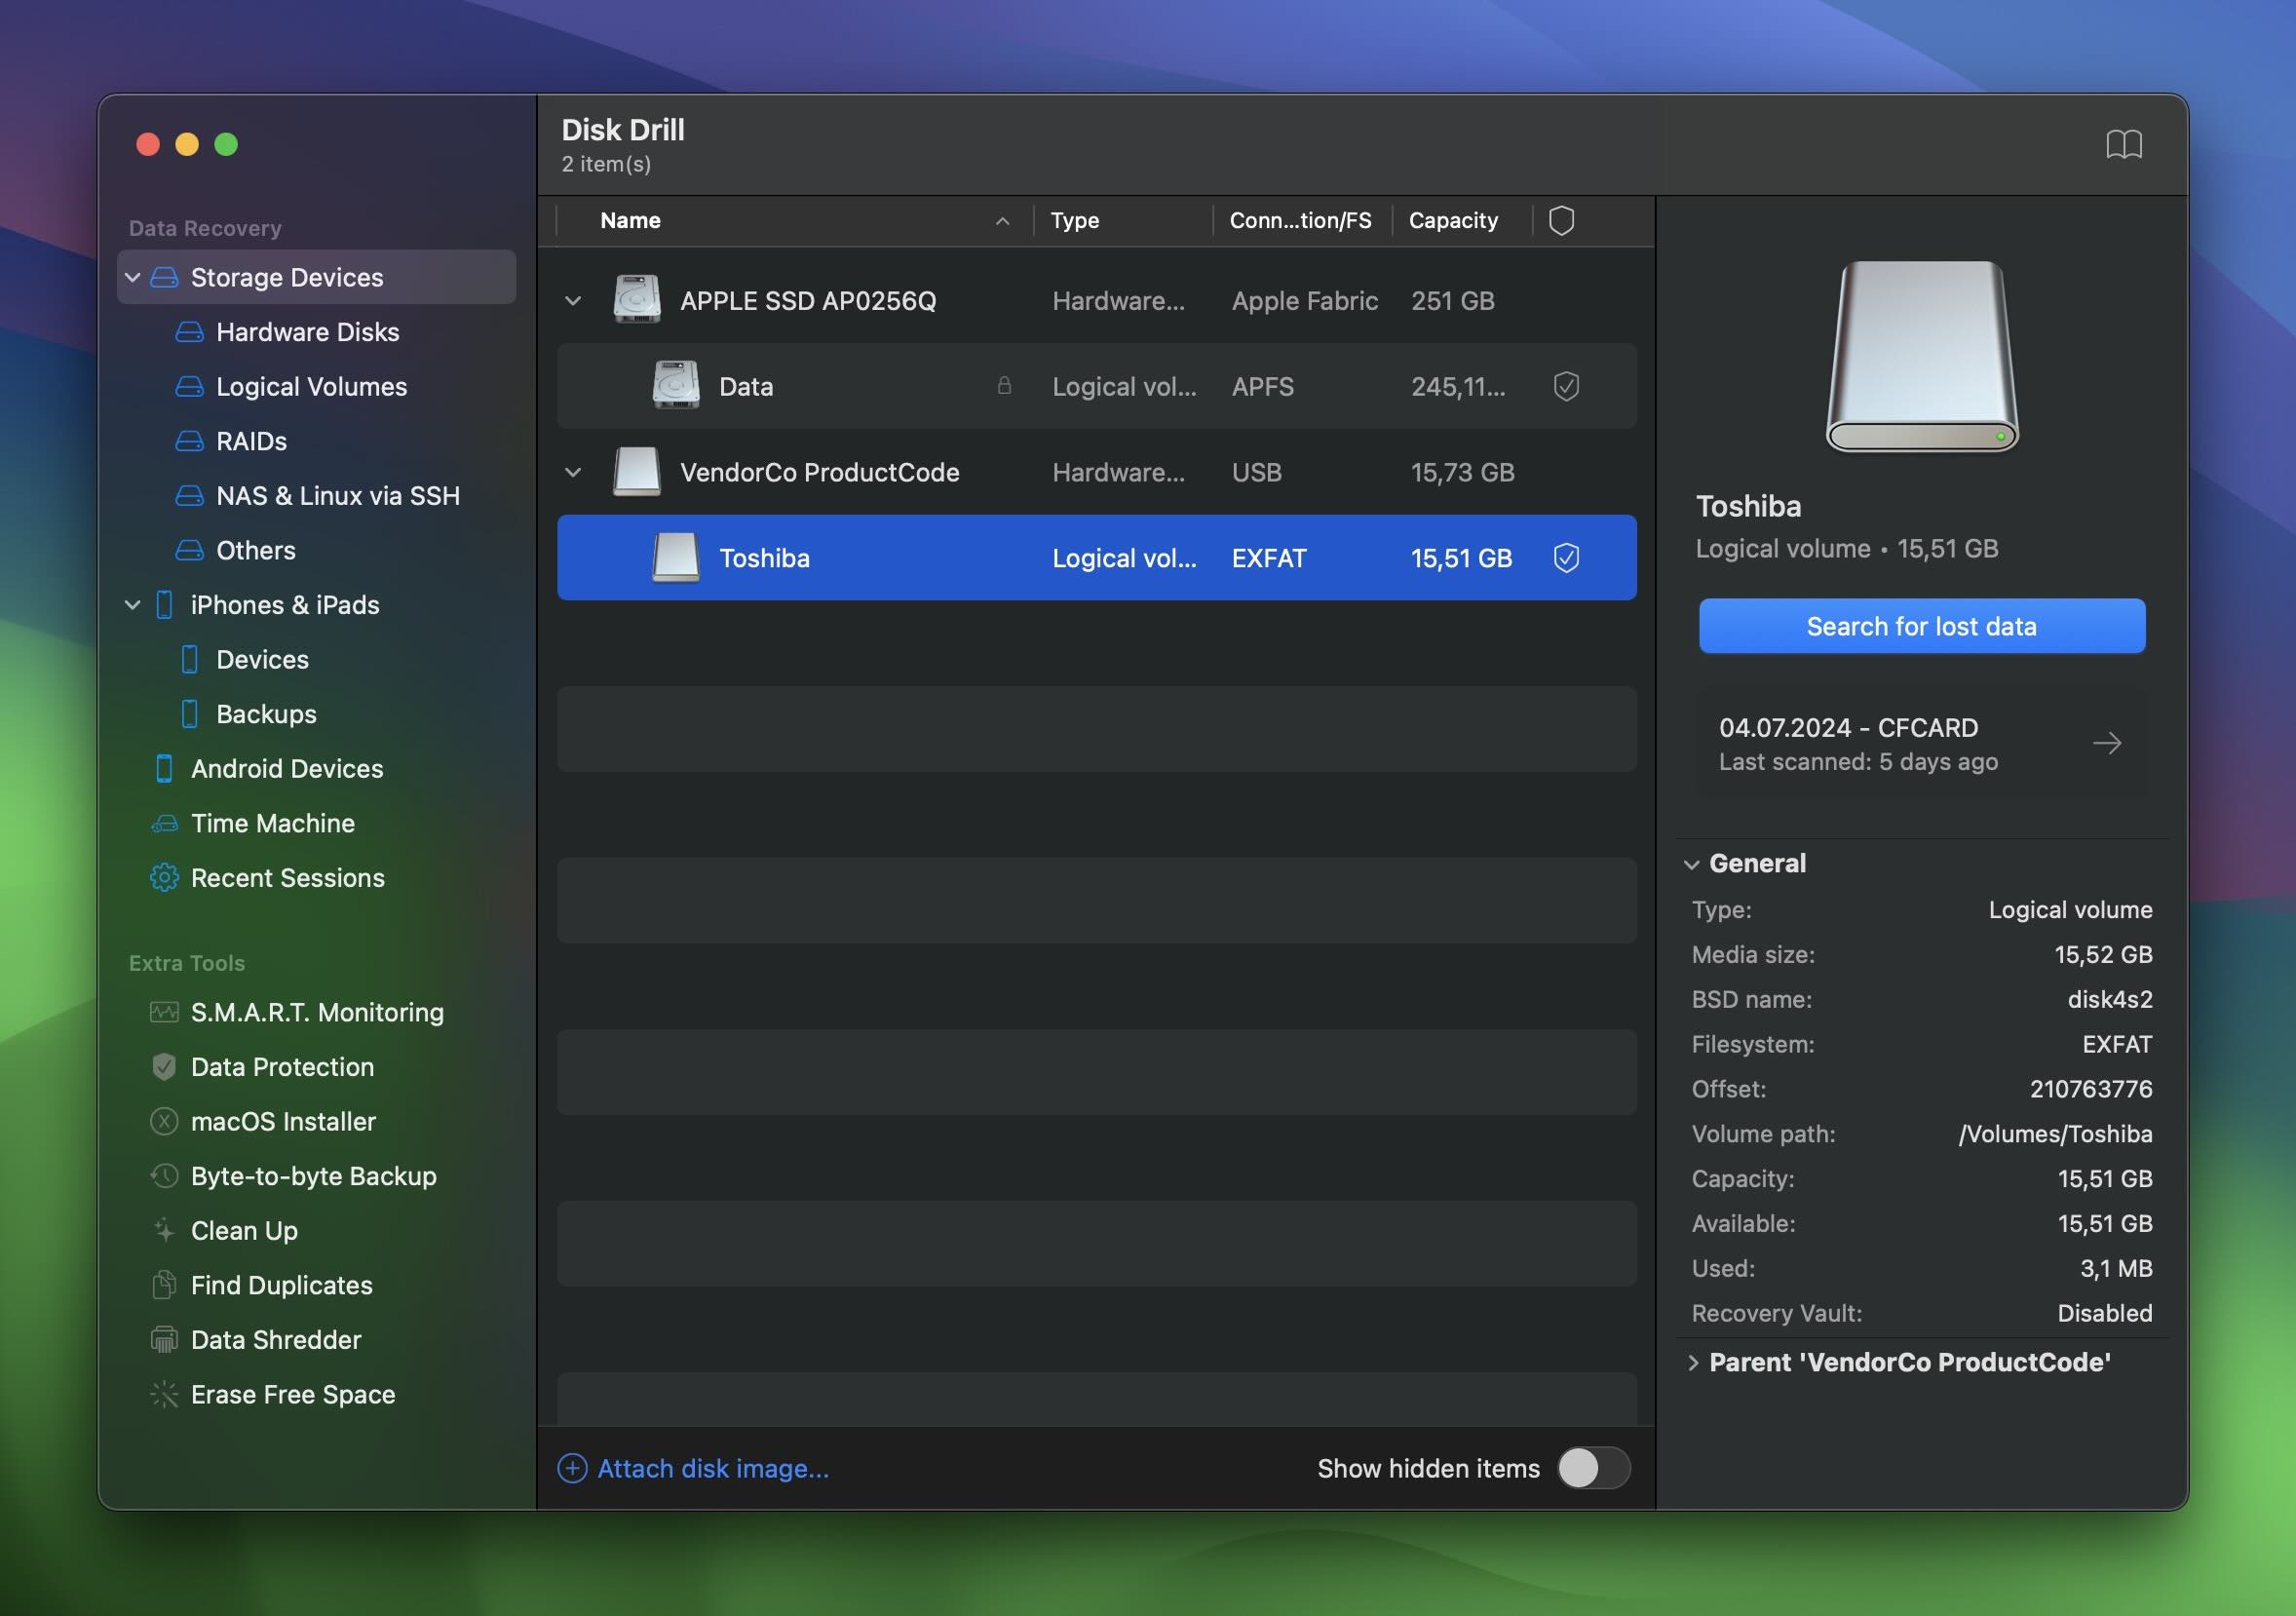
On the main Disk Drill screen, locate your SSD in the list of available drives.
-
Highlight the SSD and click Search for Lost Data to start the scan.
-
Disk Drill will start the scan, which looks for both existing and deleted/lost files.
-
As Disk Drill scans your SSD, you’ll see categories like Pictures, Documents, Videos, Audio, and Archives. You can select any category to narrow down your search, or click Review found items to view all recoverable files at once.
-
As Disk Drill scans your SSD, you’ll see files organized into sections: Existing (files currently accessible on the SSD), Deleted or Lost (files that were removed or lost due to corruption or accidental deletion), Reconstructed (files recovered from fragmented or raw data that don’t have their original names or structure).
-
Clicking on a file will show a thumbnail preview so you can quickly check its contents. For a closer look, click the eye icon
 for a full preview.
 -
Once you’ve selected all the files you want to retrieve, click the Recover button at the bottom of the screen. Disk Drill will then prompt you to choose a location to save the files. Select a location on your Mac’s internal drive or another external drive—to save the files, you’ll need the PRO version of Disk Drill.


Once you’ve recovered everything you need from the SSD, you can go back and format it.
![]() Try Disk Drill’s S.M.A.R.T. Monitoring. We mentioned earlier that Disk Drill comes with a lot of useful extra features, and we highly recommend you check out S.M.A.R.T. Monitoring. It’s a handy tool that tracks your drive’s health and warns you about potential issues before they become serious.
Try Disk Drill’s S.M.A.R.T. Monitoring. We mentioned earlier that Disk Drill comes with a lot of useful extra features, and we highly recommend you check out S.M.A.R.T. Monitoring. It’s a handy tool that tracks your drive’s health and warns you about potential issues before they become serious.
Here’s how to use it:
-
Open Disk Drill and find the S.M.A.R.T. Monitoring feature, then turn it on.
-
From the list of drives, select your external SSD.
-
Check the health status it reports.

If the health level shows as Good, great! Your SSD doesn’t have any major issues. However, if it flags problems, we don’t recommend using this SSD for anything important. It wouldn’t be wise to keep critical data on a drive that might fail.
The Bottom Line
From our experience, most SSD problems can be fixed using the DIY methods outlined above. Once resolved, the SSD typically functions just as well as before.
However, some issues—such as hardware failures or severe corruption—cannot be fixed at home. If your SSD contains critical data, professional data recovery services may be the safest option.
Keep in mind that these services can be costly, often several times the price of a new SSD. If the data is irreplaceable, it may be worth it, but for less important files, replacing the SSD could be the more practical solution.
To prevent future problems, back up your data regularly and use tools like S.M.A.R.T. monitoring to track your drive’s health. We hope this guide helped you get your SSD back on track!