
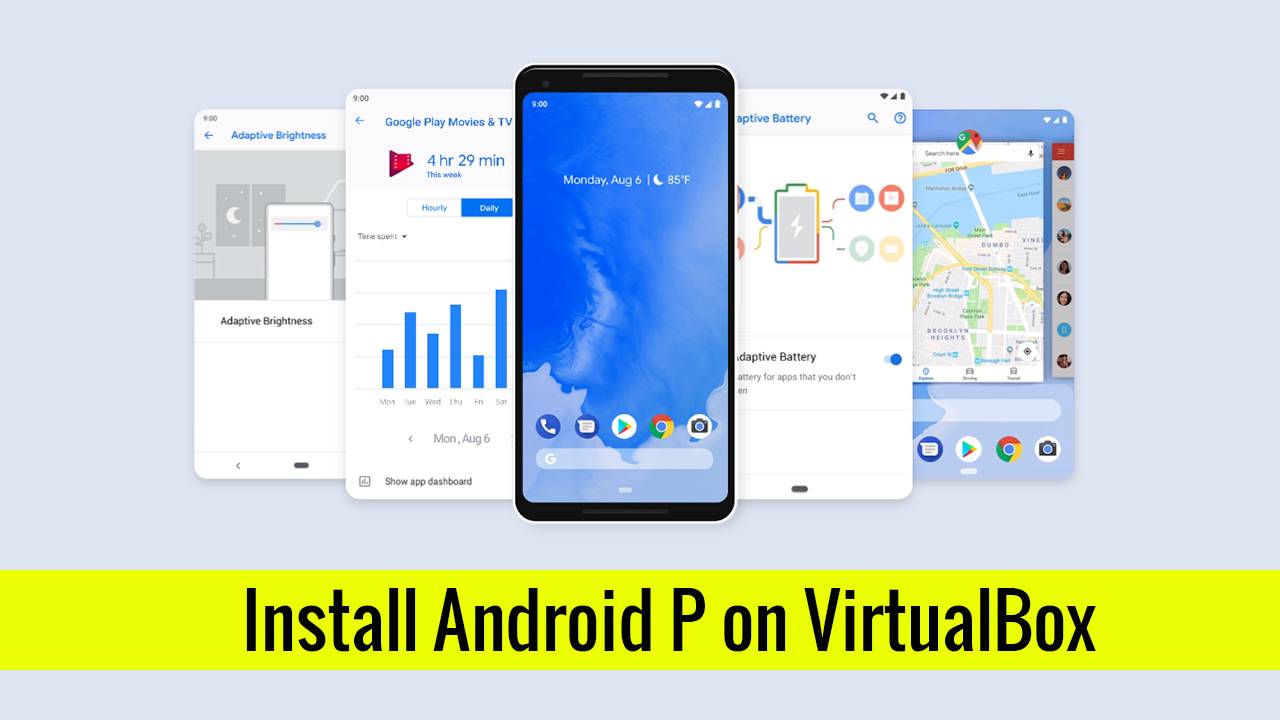
Android Pie is the ninth major biggest version of the Android Operating system which is developed and published by Google. Google has really worked on it by adding the Indoor positioning with Wi-Fi RTT, cutout support, image decoder and more. Android Pie has come with many new features, overall Google has added worked on every part of their new operating system like notifications, menus, accessibility and more. According to the Android Developer site, the below features are available.
- Indoor positioning with Wi-Fi RTT
- Display cutout support
- Updates on Notifications such as Channel settings, broadcasts, and Do Not Disturb
- Multi-camera support and camera updates
- ImageDecoder for drawables and bitmaps
- Animation
- HDR VP9 Video, HEIF image compression, and Media APIs
- Data cost sensitivity in JobScheduler
- Neural Networks API 1.1
- Autofill framework
- Security enhancements such as Android Protected Confirmation, Unified biometric authentication dialog, Hardware security module, Secure key import into Keystore, APK signature scheme with key rotation, Option to allow key decryption only on unlocked devices, Legacy encryption support.
- Android backups such as Client-side encryption backups, Define device conditions required for backup.
And many new features are available with Android P. Unfortunately I have only listed their names, but you have to write about the complete details of the new features of Android here.
Required Files:
- Download VirtualBox
- Download Android P ISO- Coming up soon
Install Android P on VirtualBox on Windows 10
Step 1. Install VirtualBox on Your system
After the required files are downloaded the very first step which is required is to Install VirtualBox on your system. If you don’t Know How to Install follow the below procedures, but if you know to skip those procedures and move to the next step.
- Right-click on the setup on VirtualBox and click open.
- On the welcome screen click next.
- When you reached the custom setup page, don’t do anything and click next.
- Again click next.
- Don’t worry about the warning with network interfaces and click yes.
- Once you reached the Ready to Install Page, click install and wait until the installation is complete.
- Once the Installation is Complete click finish to open the VirtualBox.
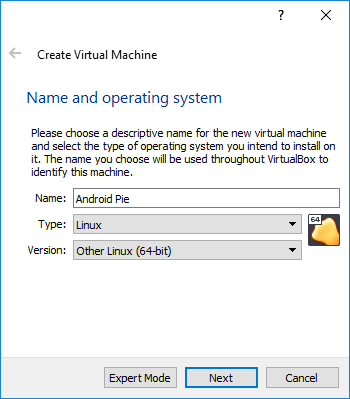
Step 2. Create a Virtual Machine for Android P (Pie) on VirtualBox on Windows
To create a new Virtual Machine, first, you have to launch the VirtualBox if that is not opened. Once the programmed is launched click on the New and give a name for the VirtualBox. That case I will give a name of Android Pie with other Linux Version.
- After that You have to specify the amount of RAM for Android P, I will give 2 GB.
- Next, You have to select Create a Virtual Hard Disk Now and click next.
- Now You have to specify the Hard Disk File Type and click next. I recommend you simply click next.
- Select Dynamically allocated and click next.
- Specify the location where you want to save the Virtual Machine For Android P with the amount of storage. I will go with the Default settings, it will be saved in the documents on Drive C with 8 GB storage.
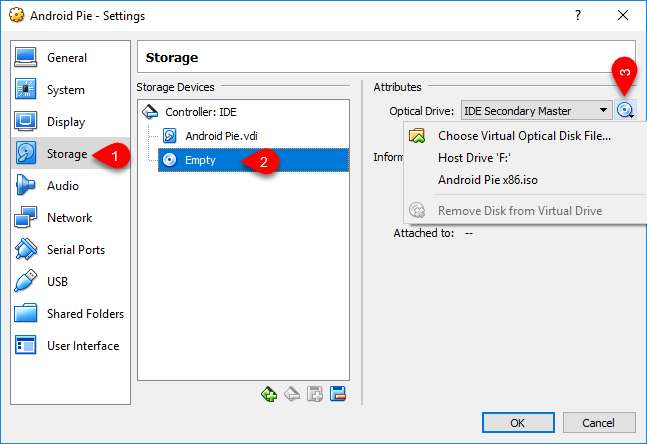
Step 3. Add the Android P ISO to the Virtual Machine in order to Install Android P on VirtualBox
Select settings of the Created Virtual Machine and navigate to storage, select empty and on the right panel locate the Android P ISO.
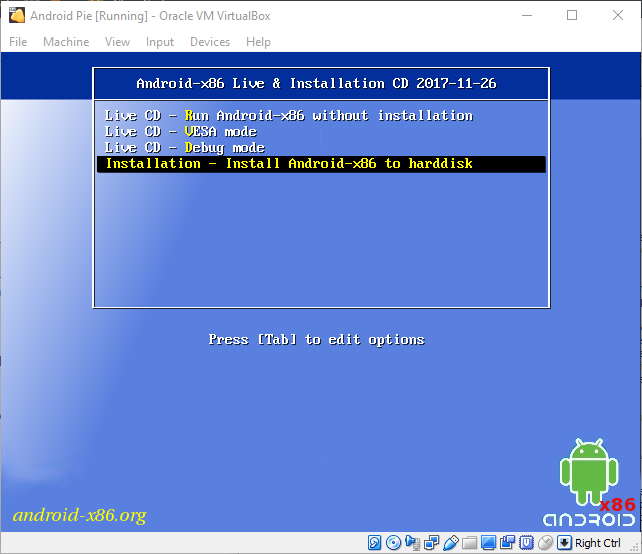
Step 4. Install Android P on VirtualBox on Windows 10
After Inserting the Android P ISO in VirtualBox, you need to start the Installation Process. So, click on the start and follow the other procedures.
- After that select Install Android-x86 to HardDisk
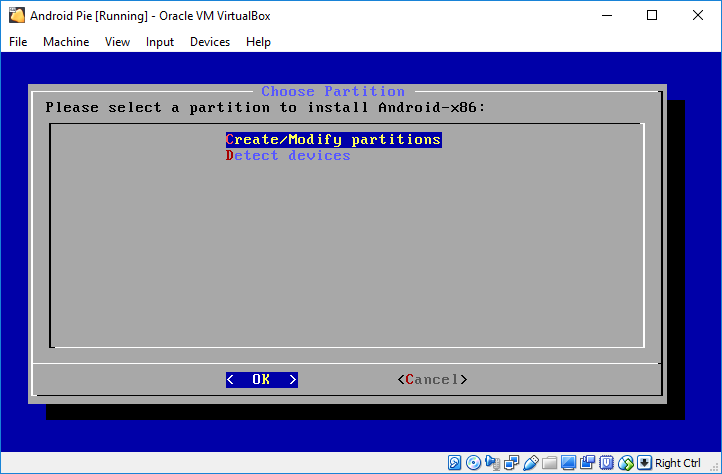
Step 5. Once you select the Install Android x86 to hard disk, some codes will come and go away, just don’t press anything on the keyboard. After that, you have to create a new Partition on your hard disk where you need to Install Android P on it. To Create a New a Partition simply selects Create/Modify Partition and press enter on the keyboard.
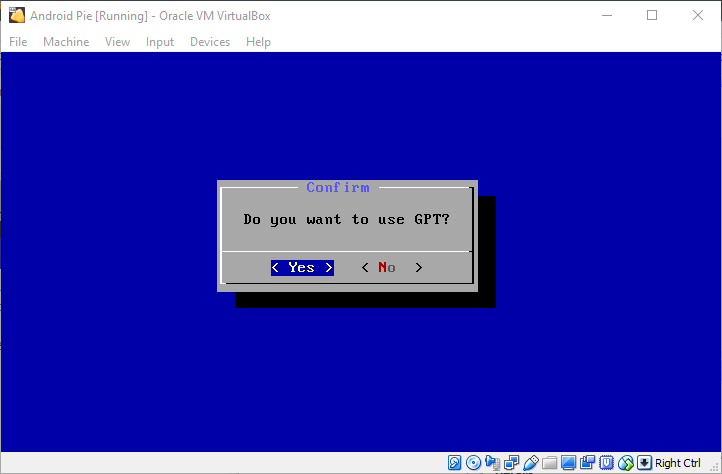
Step 6. Depending on your system’s partition you have to select the same partition for Android P. For Example If your system is running in Windows 10 with GPT Partition then you have to select GPT if not certainly you have to select the MBR.
In this case, I will go with MBR settings because of my Operating system in MBR Partition.
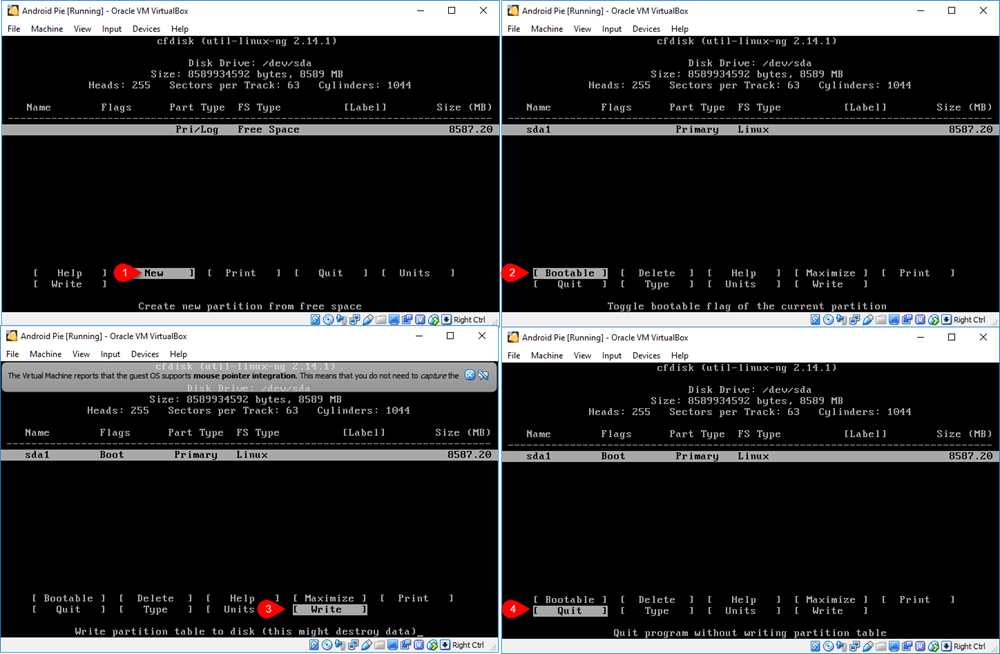
Step 7. Partition the 8 GB Storage
In this step, we need to configure the Partition of 8 GB Storage which we created earlier. Once you passed the GPT Window, you will be directed to a dark window, where you have to configure the partition. Also, keep in mind, you have to use Arrows and enter buttons to navigate around and confirming a command.
- First You have to New select to Create a New Drive.
- Then Partition must be primary for the Drive which you selected just now.
- After That, You have to press enter on the keyboard to configure the amount of storage for the drive.
- Once the Drive is created, you need to boot that by selecting Bootable. When the drive is bootable under the flags boot will be written.
- Once the drive is bootable, you have to format that as Linux Partition. To do That Select write, then type yes and hit enter on the keyboard.
- When the drive is formatted, select Quit to exit the partition process.
Step 8. Configure other settings
Once the partition is created, you need to configure some other settings and then you will be done with How to Install Android P on VirtualBox on Windows 10.
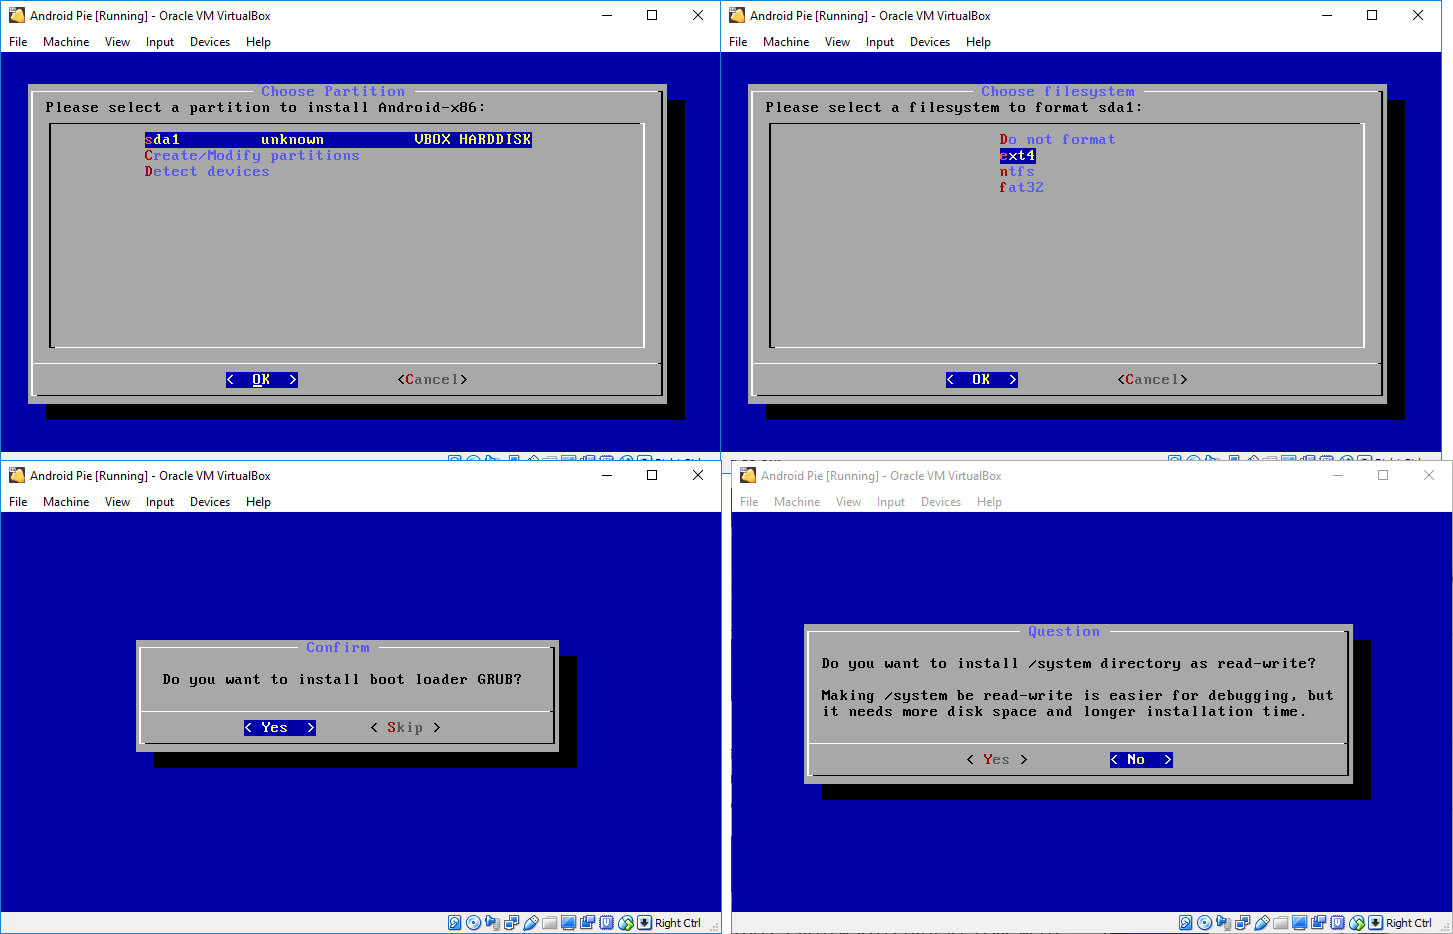
- After you quit the partition window, you will be directed into a blue window, where you have to select the sda1. sda1 is the same drive which you created in step 7.
- After that, you have to format once again for a file system using ext4.
- Once you select the ext4, in this step it will ask you once again, are you sure to format the partition sda1. You have to select yes and move on to the next step.
- Here you need to install Bootloader for Android P, so simply select yes to Install boot loader GRUB.
- When you reached the panel which asks you Do You want to Install/ system directory as read-write, you have to select No.
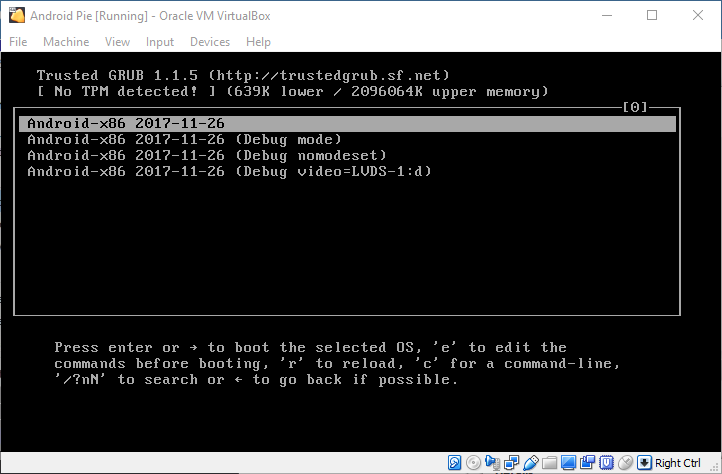
After that select reboot to restart the android P on VirtualBox.
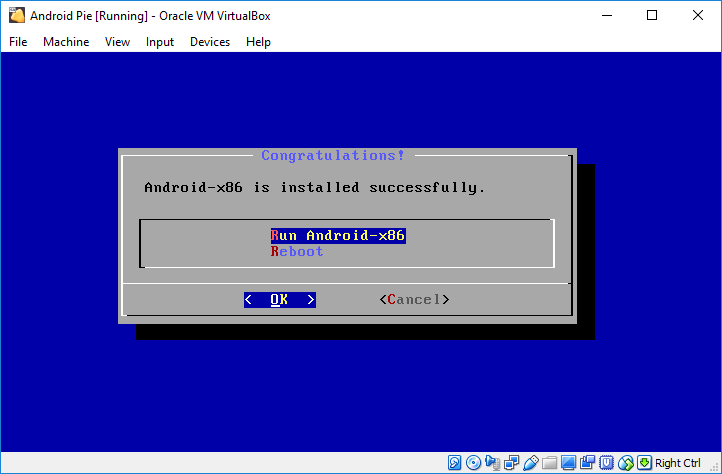
Once the Android P is rebooted, you will a list of menus in black background, simply select the first one and press enter.
Conclusion
That’s all with How to Install Android P on VirtualBox on macOS Mojave and Windows 10. I hope you have installed Android P on PC without any trouble. By the way if you had any question or suggestion please let me know on the comment.
4 comments
After booting it, it drops me to a console instead of the GUI of Android. 🙁
No more instruction on what to do?
Same what now
answer here: https://android.stackexchange.com/questions/144535/android-x86-marshmallow-not-booting-on-virtualbox-and-vmware-workstation
Useless without the ISO