
The era of mac OS X series has been archived, apple moved from the 10.x series and stepped in the 11.x series on the WWDC 2020. macOS Big Sur is officially the 11.0 and the start of the new operating system for their macs. Not every computer has released will support macOS Big Sur, there are a list of the compatible devices which supports the macOS Big sur. Before getting strarted, it is better for you to check if your mac is on the list or no, if you there is not, you have to search for a method to install macOS big sur of unsupported macs.
macs which support macOS Big sur:
- MacBook from year 2015 or later
- MacBook Air from 2013 onwards
- MacBook Pro late 2013 and later
- Mac Mini from 2014 onwards
- iMac 2014 or later
- iMac Pro 2017
- Mac Pro 2013 and 2019
Steps to create macOS big Sur bootable Installer
Step 1. Download macOS Bir Sur Image
Currently the macOS big sur is on beta version which means only developers has access to the macOS beta version. Fortunately, we have already provided the macOS Develope rBetaAccess Utility tool for users without developer account. They can use this tool to download the macOS big sur beta on their computer.
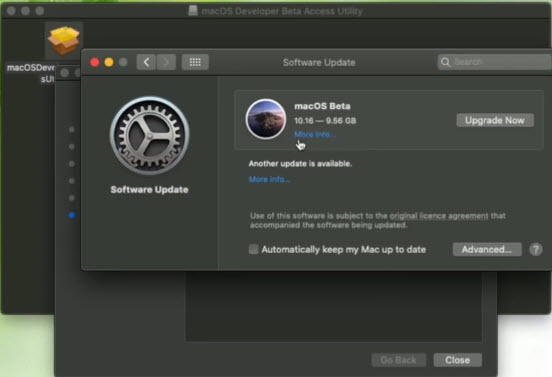
As soon as we get the macOS Big DMG file we will attach that their, so you should not use the developer tool. Do not forget to get a full backup of your system before attempting to start the installation, because the beta versions are not stable.
Step 2. Create macOS big Sur bootable Installer
For this post we will be using the Terminal to create macOS big Sur bootable Installer, although there are planty of other method. We will be providing all the methods one by one so whatever is easy, you should try that.
Ok, for now, perpare the following things.
- Before you start, you need to prepare a USB flash drive. You need a USB with at least 16 GB of storage.
- Make sure there is nothing in the flash you want, as it will completely delete all the contents of the flash.
- In order to install faster, it’s best to use a USB 3.0 flash.
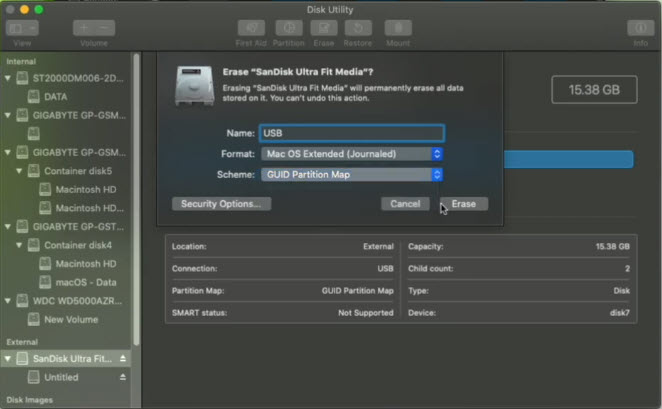
Step 1. Format the USB Flash Drive
You have to clean make a partition for the USB, so, the first step is to attach the USB flash drive to the computer. Then open the disk utility, choose the USB flash drive and erase that with the settings below.
- Name: USB
- Format: Mac OS X Extended (Journaled)
- Scheme: GUID Partition Map
Although you can choose the format partition apple’s last year settings, APFS but it depends on you.
Close disk utility and launch the terminal, In the Terminal type the following commands.
sudo /Applications/Install\ macOS\ Beta.app/Contents/Resources/createinstallmedia --volume /Volumes/USBThen enter your password and wait.
How to boot to macOS Big Sur from bootable USB installer?
Once everything is ready, you can processed with the installation process.
- Attach the Bootable USB Installer.
- Power off or restart your mac.
- Power on the your mac and Hold on the option key.
- choose the macOS big sur from the drop down menu.
- When the utility window, appeared, choose disk utility.
- From their erase the drive where you want to install macOS big sur.
- Once you are done choose install and wait until the installation is complete.
Summary
Creating a bootable USB for macOS Big sur is easy on mac, although on windows it can be created but it takes some time. To create bootable USB for macOS big sur, first you have to download that, then Format the USB and use the commands to create that Bootable USB Installer. If you are having troubling using the Terminal, you can use the Unibeast or diskmakerx to create bootable USB installer.