

With Windows Command Prompt, you can get real power of the operating system, a program that will easily accompany you into the deepest layers of Windows.
Windows operating system users have always felt a sense of limitation in the settings and controls of the Control panel. If you want to taste the full control over your Internet network and have all the options that Windows can provide, then you should use Command Prompt.
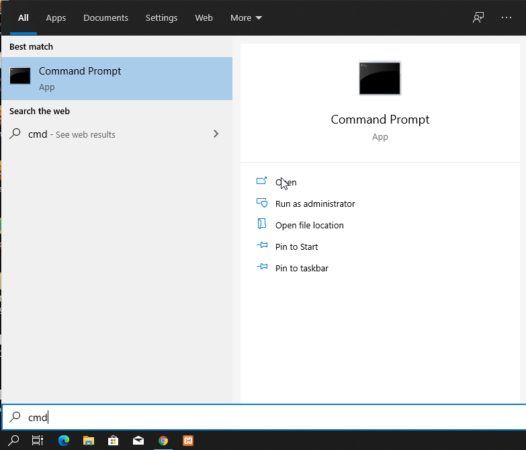
Haven’t used Command Prompt yet? Do not worry. It’s simple to use, you can learn more about it by typing the following commands. Here’s a look at some of the most commonly used network domain commands for managing and troubleshooting your home network easier. The first step is to search for the Command Prompt in the search box of Start menu. You can use the abbreviation for that CMD and execute it by clicking on the program. And Besides, several methods are available for opening a program in windows.
8 Network Management Commands on Windows
1. Ping Command
Open CMD and type ping /? and hit enter, the following syntaxes are the result.
Usage: ping [-t] [-a] [-n count] [-l size] [-f] [-i TTL] [-v TOS]
            [-r count] [-s count] [[-j host-list] | [-k host-list]]
            [-w timeout] [-R] [-S srcaddr] [-c compartment] [-p]
            [-4] [-6] target_name

Options:
    -t             Ping the specified host until stopped.
                   To see statistics and continue - type Control-Break;                                                                    To stop - type Control-C.                                                                                -a             Resolve addresses to hostnames.                                                                          -n count       Number of echo requests to send.                                                                         -l size        Send buffer size.                                                                                        -f             Set Don't Fragment flag in packet (IPv4-only).                                                           -i TTL         Time To Live.
    -v TOS         Type Of Service (IPv4-only. This setting has been deprecated
                   and has no effect on the type of service field in the IP
                   Header).
    -r count       Record route for count hops (IPv4-only).
    -s count       Timestamp for count hops (IPv4-only).
    -j host-list   Loose source route along host-list (IPv4-only).
    -k host-list   Strict source route along host-list (IPv4-only).
    -w timeout     Timeout in milliseconds to wait for each reply.
    -R             Use routing header to test reverse route also (IPv6-only).
                   Per RFC 5095 the use of this routing header has been
                   deprecated. Some systems may drop echo requests if
                   this header is used.
    -S srcaddr     Source address to use.
    -c compartment Routing compartment identifier.
    -p             Ping a Hyper-V Network Virtualization provider address.
    -4             Force using IPv4.
    -6             Force using IPv6.
The “ping” command is one of the simplest yet most applicable commands in the command line environment. With this command you can find out if your computer can get an IP address or domain name? And if so, how long does it take to get the data back there? In other words, you can check your Internet or network connection through the Ping command. Professional users often open browser to check internet by searching Google. To check on their Internet connection; they will be fully professional and fluent in the domain name of the Google website in the CMD.
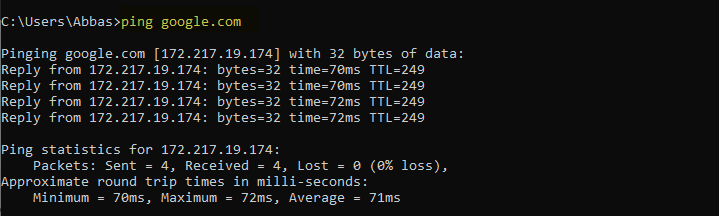
The command-line workflow sends multiple packets of data and records the number and timing of packets returned. If some of these packages are unreturned, you will encounter a Lost message. The meaning of these messages is especially important for those who play online games because the missing pack will indicate inappropriate game play and one of the best ways to check this is to use the same command.
By default, 1 packet will be sent, each with 4 seconds to wait before expiration. If you want, you can increase the number of packages and simply use the following command:
ping www.google.com -n 10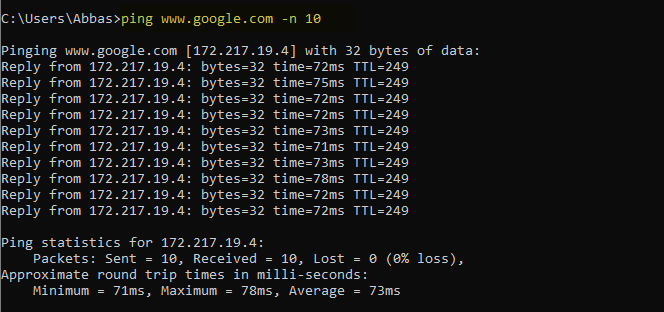
It is also possible to increase the timeout time by using the following command with milliseconds denying the user the time they want.
ping www.google.com -w 6000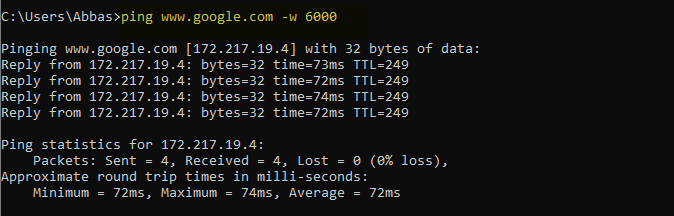
2. Tracert Command
It is the second command for network management but first have a look at the Tracert syntax on the CMD.
Usage: tracert [-d] [-h maximum_hops] [-j host-list] [-w timeout]
               [-R] [-S srcaddr] [-4] [-6] target_name

Options:
    -d                 Do not resolve addresses to hostnames.
    -h maximum_hops    Maximum number of hops to search for target.
    -j host-list       Loose source route along host-list (IPv4-only).
    -w timeout         Wait timeout milliseconds for each reply.
    -R                 Trace round-trip path (IPv6-only).
    -S srcaddr         Source address to use (IPv6-only).
    -4                 Force using IPv4.
    -6                 Force using IPv6.
Tracert stands for Traceroute. Type the tracert command and then enter the IP address or domain name with the same space as before. This command will perform investigations by sending packets and attempting to connect to the intended destination in order to troubleshoot possible network problems. The working process of this command is to record all the paths that go from one server to another to eventually reach the destination you entered.
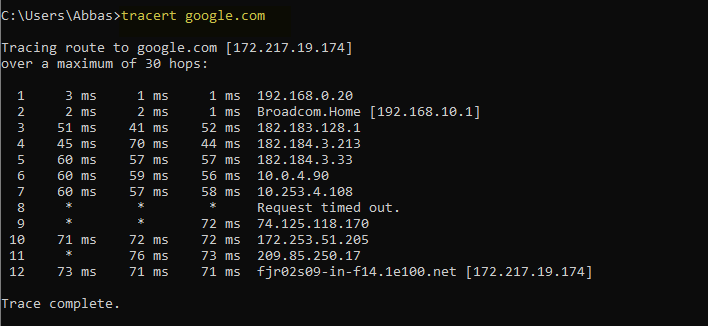
As you can see in screenshot, the list jumps from server to server and information such as latency or server response time and IP address or server names are displayed line by line. But why is there a time when it shows three rows? Because the tracert command sends three packets per jump to monitor the slowdown or possible loss of the packet. Therefore, keep in mind the average of the three packages for a more accurate calculation of the Latency period.
3. Pathping Command
An advanced version of the tracert command is pathping, but have a look at the syntaxes.
Usage: pathping [-g host-list] [-h maximum_hops] [-i address] [-n]
[-p period] [-q num_queries] [-w timeout]
[-4] [-6] target_name
Options:
-g host-list Loose source route along host-list.
-h maximum_hops Maximum number of hops to search for target.
-i address Use the specified source address.
-n Do not resolve addresses to hostnames.
-p period Wait period milliseconds between pings.
-q num_queries Number of queries per hop.
-w timeout Wait timeout milliseconds for each reply.
-4 Force using IPv4.
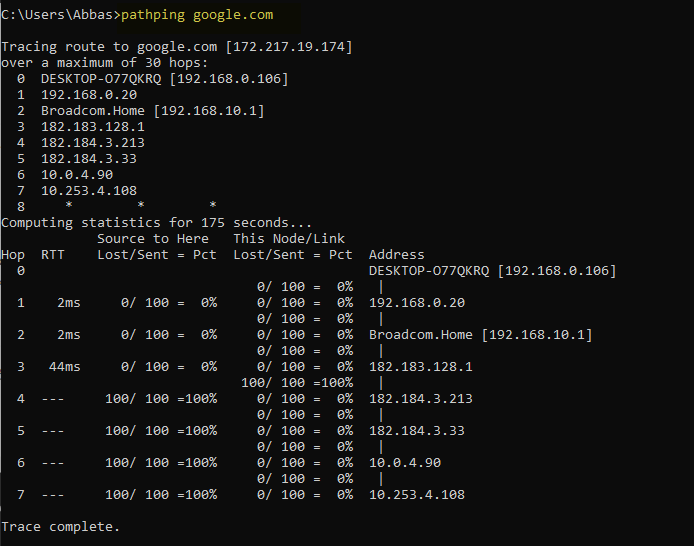
-6 Force using IPv6.The pathping command will produce results similar to the tracert command, but with more details that will extend the execution time of the command. After sending packets to your destination, you will see results by checking the route taken and calculating the lost packets based on each jump.
4. Ipconfig Command
Usage: pathping [-g host-list] [-h maximum_hops] [-i address] [-n]
                [-p period] [-q num_queries] [-w timeout]
                [-4] [-6] target_name

Options:
    -g host-list     Loose source route along host-list.
    -h maximum_hops  Maximum number of hops to search for target.
    -i address       Use the specified source address.
    -n               Do not resolve addresses to hostnames.
    -p period        Wait period milliseconds between pings.
    -q num_queries   Number of queries per hop.
    -w timeout       Wait timeout milliseconds for each reply.
    -4               Force using IPv4.
    -6               Force using IPv6.
PS C:\Users\Abbas> ipconfig /?

USAGE:
    ipconfig [/allcompartments] [/? | /all |
                                 /renew [adapter] | /release [adapter] |
                                 /renew6 [adapter] | /release6 [adapter] |
                                 /flushdns | /displaydns | /registerdns |
                                 /showclassid adapter |
                                 /setclassid adapter [classid] |
                                 /showclassid6 adapter |
                                 /setclassid6 adapter [classid] ]

where
    adapter             Connection name
                       (wildcard characters * and ? allowed, see examples)

    Options:
       /?               Display this help message
       /all             Display full configuration information.
       /release         Release the IPv4 address for the specified adapter.
       /release6        Release the IPv6 address for the specified adapter.
       /renew           Renew the IPv4 address for the specified adapter.
       /renew6          Renew the IPv6 address for the specified adapter.
       /flushdns        Purges the DNS Resolver cache.
       /registerdns     Refreshes all DHCP leases and re-registers DNS names
       /displaydns      Display the contents of the DNS Resolver Cache.
       /showclassid     Displays all the dhcp class IDs allowed for adapter.
       /setclassid      Modifies the dhcp class id.
       /showclassid6    Displays all the IPv6 DHCP class IDs allowed for adapter.
       /setclassid6     Modifies the IPv6 DHCP class id.


The default is to display only the IP address, subnet mask and
default gateway for each adapter bound to TCP/IP.

For Release and Renew, if no adapter name is specified, then the IP address
leases for all adapters bound to TCP/IP will be released or renewed.

For Setclassid and Setclassid6, if no ClassId is specified, then the ClassId is removed.

Examples:
    > ipconfig                       ... Show information
    > ipconfig /all                  ... Show detailed information
    > ipconfig /renew                ... renew all adapters
    > ipconfig /renew EL*            ... renew any connection that has its
                                         name starting with EL
    > ipconfig /release *Con*        ... release all matching connections,
                                         eg. "Wired Ethernet Connection 1" or
                                             "Wired Ethernet Connection 2"
    > ipconfig /allcompartments      ... Show information about all
                                         compartments
    > ipconfig /allcompartments /all ... Show detailed information about all
                                         compartments
The ipconfig command is often known as the most commonly used command line command in Windows. In addition to the useful information it provides, it also lets you perform specific tasks in addition to combining multiple switches.

This command will by default show the information about the network adapters on your system and their details. The most important information from this command is the details of the IPv4 address and Default Gateway address in the wireless adapter and Ethernet adapter.
One of the functional Command with combination of ipconfig syntax for the purpose of clearing DNS cache is typed as follows:
ipconfig /flushdns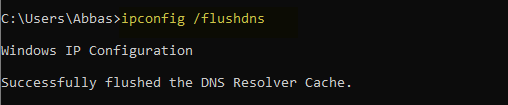
This command applies when a user is connected to the Internet and only certain websites or servers do not go up for some time such as timeout. You may be able to reload your site again with this command; this may be a problem elsewhere if this does not help you.
5. Getmac Command
Every device that meets IEEE 802 standards has its own MAC address. The MAC address is a source of media access control defined in each segment in accordance with specific principles and is unique as a fingerprint. Components makers are required to assign the MAC address to the device and store the information about it in the hardware. Some users control their network connectivity by restricting specific MAC addresses, thereby increasing network security.
GETMAC [/S system [/U username [/P [password]]]] [/FO format] [/NH] [/V]

Description:
    This tool enables an administrator to display the MAC address
    for network adapters on a system.

Parameter List:
    /S     system            Specifies the remote system to connect to.

    /U     [domain\]user     Specifies the user context under
                             which the command should execute.

    /P     [password]        Specifies the password for the given
                             user context. Prompts for input if omitted.

    /FO    format            Specifies the format in which the output
                             is to be displayed.
                             Valid values: "TABLE", "LIST", "CSV".

    /NH                      Specifies that the "Column Header" should
                             not be displayed in the output.
                             Valid only for TABLE and CSV formats.

    /V                       Specifies that verbose output is displayed.

    /?                       Displays this help message.

Examples:
    GETMAC /?
    GETMAC /FO csv
    GETMAC /S system /NH /V
    GETMAC /S system /U user
    GETMAC /S system /U domain\user /P password /FO list /V
    GETMAC /S system /U domain\user /P password /FO table /NH
This command may display more than one MAC address, depending on the number of network adapters on your system. For example, Wireless and Ethernet Mac have different addresses that you can split if necessary.

6. Nslookup Command
The nslookup command, which is briefly derived from the name Server Lookup, is very powerful; however, many users do not need all the power. For ordinary Windows users like you and me, the primary use of this command is to find a domain-specific IP address.
nslookup google.com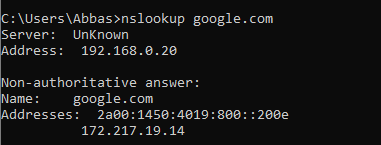
Keep in mind that each domain name may not have just one specific IP address, so it may show you a new IP each time you use it. Especially large websites, because of their division of works, they use a lot of machines, and this leads to different IPs.
If you want to convert the obtained IP address to a domain name, just enter the IP address in your browser and wait for the website to load. Not all IPs will reach a specific domain, however, and some addresses may not be available on the Internet.
7. Netstat Command
Netstat syntax is a tool used to provide general statistics, troubleshooting and network analysis. This command is very powerful and sophisticated and can be as simple as needed if you ignore its advanced aspects. Its sophisticated features are effective for people who manage large networks such as businesses or academic environments.
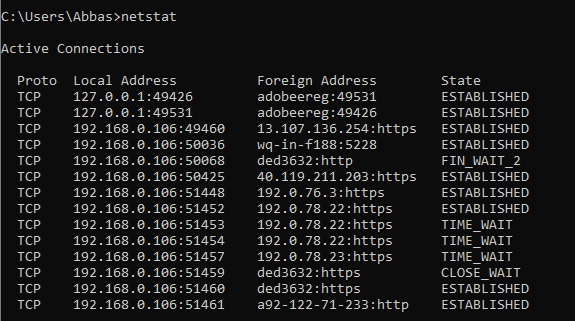
By default, the netstat command shows all the active connections on your system, whether those connections are LAN or over the network or an Internet connection. Active connection here does not only mean data exchange between two ports, but can also include all open and ready ports for connection.
Displays protocol statistics and current TCP/IP network connections.

NETSTAT [-a] [-b] [-e] [-f] [-n] [-o] [-p proto] [-r] [-s] [-x] [-t] [interval]

  -a            Displays all connections and listening ports.
  -b            Displays the executable involved in creating each connection or
                listening port. In some cases well-known executables host
                multiple independent components, and in these cases the
                sequence of components involved in creating the connection
                or listening port is displayed. In this case the executable
                name is in [] at the bottom, on top is the component it called,
                and so forth until TCP/IP was reached. Note that this option
                can be time-consuming and will fail unless you have sufficient
                permissions.
  -e            Displays Ethernet statistics. This may be combined with the -s
                option.
  -f            Displays Fully Qualified Domain Names (FQDN) for foreign
                addresses.
  -n            Displays addresses and port numbers in numerical form.
  -o            Displays the owning process ID associated with each connection.
  -p proto      Shows connections for the protocol specified by proto; proto
                may be any of: TCP, UDP, TCPv6, or UDPv6.  If used with the -s
                option to display per-protocol statistics, proto may be any of:
                IP, IPv6, ICMP, ICMPv6, TCP, TCPv6, UDP, or UDPv6.
  -q            Displays all connections, listening ports, and bound
                nonlistening TCP ports. Bound nonlistening ports may or may not
                be associated with an active connection.
  -r            Displays the routing table.
  -s            Displays per-protocol statistics.  By default, statistics are
                shown for IP, IPv6, ICMP, ICMPv6, TCP, TCPv6, UDP, and UDPv6;
                the -p option may be used to specify a subset of the default.
  -t            Displays the current connection offload state.
  -x            Displays NetworkDirect connections, listeners, and shared
                endpoints.
  -y            Displays the TCP connection template for all connections.
                Cannot be combined with the other options.
  interval      Redisplays selected statistics, pausing interval seconds
                between each display.  Press CTRL+C to stop redisplaying
                statistics.  If omitted, netstat will print the current
                configuration information once.
In fact, the netstat command is more efficient for ordinary users because it covers the port information completely and becomes useful when the user needs the port. Also, using additional switches, the netstat command can change the displayed information, for example by typing the -r switch to display the routing table.
8. Netsh Command
The netsh command is taken from the Network Shel, it can be used to view all networking operations. In other words, with this command you will have almost all the processes of the previous command.
By launching the netsh command on the command line alone, you will change the Command Prompt to Network Shell mode. There are several areas in this shell, each with a specific section. For example, one of the fields related to routing commands, another for DHCP commands, another for troubleshooting, etc., but it can also be used to set up independent commands. Enter the following command to view all network shell fields as shown below:
netsh /?Usage: C:\Windows\system32\netsh.exe [-a AliasFile] [-c Context] [-r RemoteMachine] [-u [DomainName\]UserName] [-p Password | *]
[Command | -f ScriptFile]
The following commands are available:
Commands in this context:
? - Displays a list of commands.
add - Adds a configuration entry to a list of entries.
advfirewall - Changes to the `netsh advfirewall' context.
branchcache - Changes to the `netsh branchcache' context.
bridge - Changes to the `netsh bridge' context.
delete - Deletes a configuration entry from a list of entries.
dhcpclient - Changes to the `netsh dhcpclient' context.
dnsclient - Changes to the `netsh dnsclient' context.
dump - Displays a configuration script.
exec - Runs a script file.
firewall - Changes to the `netsh firewall' context.
help - Displays a list of commands.
http - Changes to the `netsh http' context.
interface - Changes to the `netsh interface' context.
ipsec - Changes to the `netsh ipsec' context.
lan - Changes to the `netsh lan' context.
mbn - Changes to the `netsh mbn' context.
namespace - Changes to the `netsh namespace' context.
netio - Changes to the `netsh netio' context.
p2p - Changes to the `netsh p2p' context.
ras - Changes to the `netsh ras' context.
rpc - Changes to the `netsh rpc' context.
set - Updates configuration settings.
show - Displays information.
trace - Changes to the `netsh trace' context.
wcn - Changes to the `netsh wcn' context.
wfp - Changes to the `netsh wfp' context.
winhttp - Changes to the `netsh winhttp' context.
winsock - Changes to the `netsh winsock' context.
wlan - Changes to the `netsh wlan' context.
The following sub-contexts are available:
advfirewall branchcache bridge dhcpclient dnsclient firewall http interface ipsec lan mbn namespace netio p2p ras rpc trace wcn wfp winhttp winsock wlan
To view help for a command, type the command, followed by a space, and then
type ?.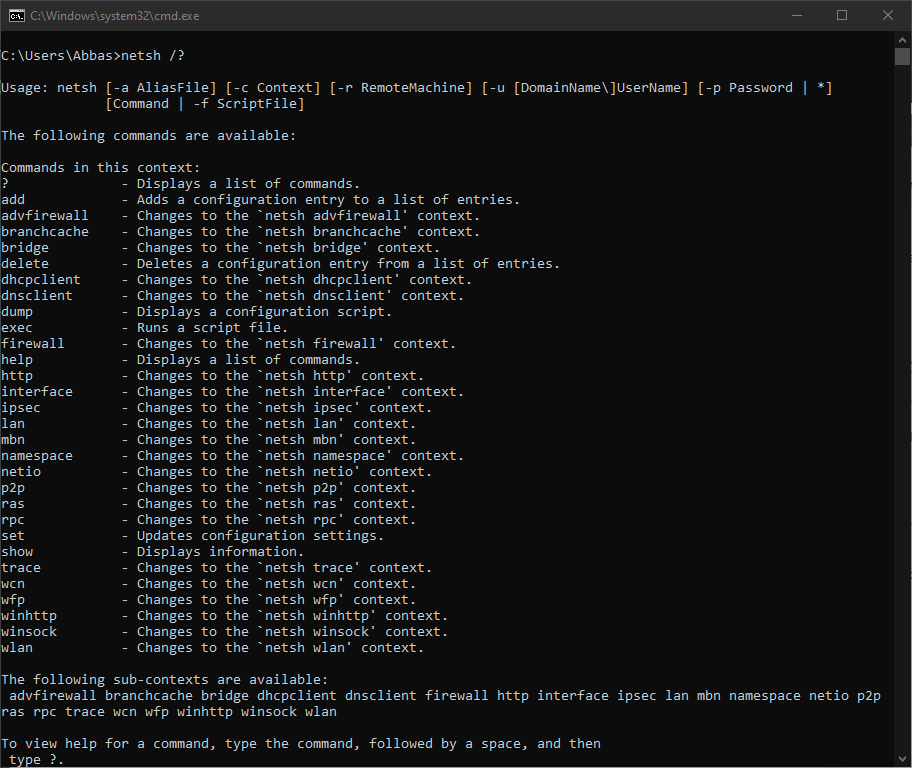
And to show all the commands available for a particular field, enter the command as shown below:
netsh wlan /?
The following commands are available:

Commands in this context:
?              - Displays a list of commands.
add            - Adds a configuration entry to a table.
connect        - Connects to a wireless network.
delete         - Deletes a configuration entry from a table.
disconnect     - Disconnects from a wireless network.
dump           - Displays a configuration script.
export         - Saves WLAN profiles to XML files.
help           - Displays a list of commands.
IHV            - Commands for IHV logging.
refresh        - Refresh hosted network settings.
reportissues   - Generate WLAN smart trace report.
set            - Sets configuration information.
show           - Displays information.
start          - Start hosted network.
stop           - Stop hosted network.

To view help for a command, type the command, followed by a space, and then
 type ?.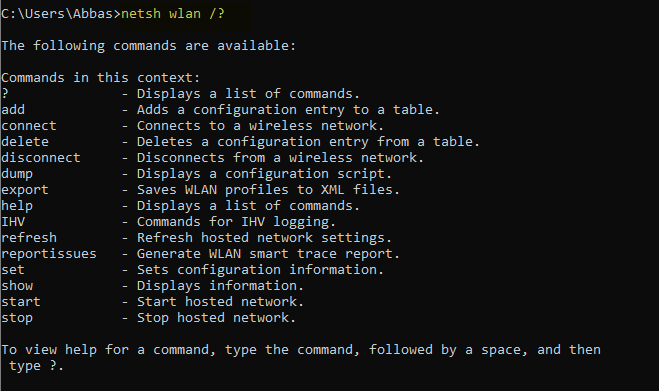
You can also break into another layer if necessary to get more instructions, just execute the command as shown below:
netsh wlan show /?
The following commands are available:

Commands in this context:
show all       - Shows complete wireless device and networks information.
show allowexplicitcreds - Shows the allow shared user credentials settings.
show autoconfig - Shows whether the auto configuration logic is enabled or
                 disabled.
show blockednetworks - Shows the blocked network display settings.
show createalluserprofile - Shows whether everyone is allowed to create all
                 user profiles.
show drivers   - Shows properties of the wireless LAN drivers on the system.
show filters   - Shows the allowed and blocked network list.
show hostednetwork - Show hosted network properties and status.
show interfaces - Shows a list of the wireless LAN interfaces on
                 the system.
show networks  - Shows a list of networks visible on the system.
show onlyUseGPProfilesforAllowedNetworks - Shows the only use GP profiles on GP configured networks setting.
show profiles  - Shows a list of profiles configured on the system.
show randomization - Shows whether MAC randomization is enabled or
                 disabled.
show settings  - Shows the global settings of wireless LAN.
show tracing   - Shows whether wireless LAN tracing is enabled or disabled.
show wirelesscapabilities - Shows the wireless capabilities of the system
show wlanreport - Generate a report showing recent wireless session information.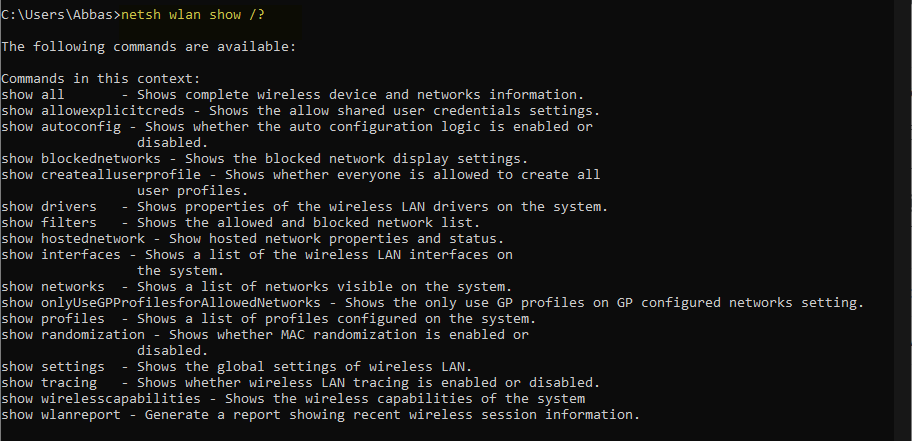
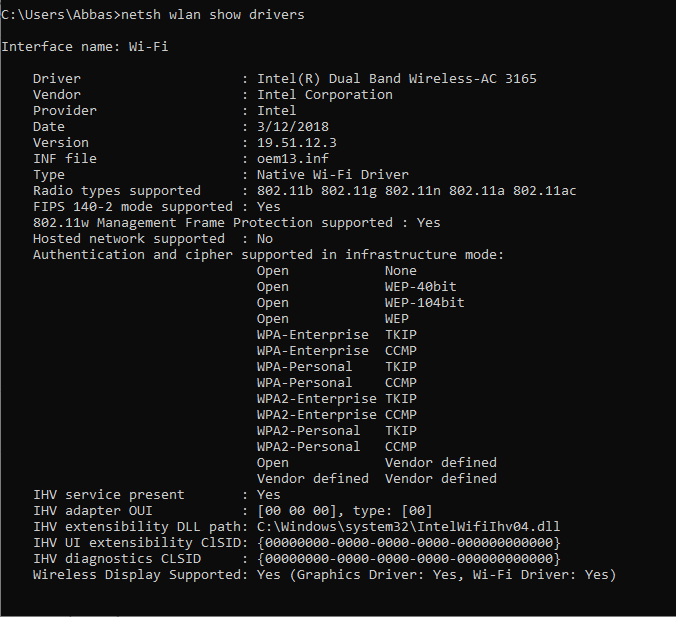
And by executing the following command, all wireless network drivers on the system will display:
Interface name: Wi-Fi

    Driver                    : Intel(R) Dual Band Wireless-AC 3165
    Vendor                    : Intel Corporation
    Provider                  : Intel
    Date                      : 3/12/2018
    Version                   : 19.51.12.3
    INF file                  : oem13.inf
    Type                      : Native Wi-Fi Driver
    Radio types supported     : 802.11b 802.11g 802.11n 802.11a 802.11ac
    FIPS 140-2 mode supported : Yes
    802.11w Management Frame Protection supported : Yes
    Hosted network supported  : No
    Authentication and cipher supported in infrastructure mode:
                                Open            None
                                Open            WEP-40bit
                                Open            WEP-104bit
                                Open            WEP
                                WPA-Enterprise  TKIP
                                WPA-Enterprise  CCMP
                                WPA-Personal    TKIP
                                WPA-Personal    CCMP
                                WPA2-Enterprise TKIP
                                WPA2-Enterprise CCMP
                                WPA2-Personal   TKIP
                                WPA2-Personal   CCMP
                                Open            Vendor defined
                                Vendor defined  Vendor defined
    IHV service present       : Yes
    IHV adapter OUI           : [00 00 00], type: [00]
    IHV extensibility DLL path: C:\Windows\system32\IntelWifiIhv04.dll
    IHV UI extensibility ClSID: {00000000-0000-0000-0000-000000000000}
    IHV diagnostics CLSID     : {00000000-0000-0000-0000-000000000000}
    Wireless Display Supported: Yes (Graphics Driver: Yes, Wi-Fi Driver: Yes)
The network shell command is very complex and detailed and can be explained in a separate article. At the moment, just know that if you are going to set up and control your network completely professionally and technically, you should have mastery of all aspects of this command code.
Also read: