

MacOS 10.15 Catalina is an operating system for mac which was officially introduced by Apple on 3rd June 2019. This is the 16th biggest release of Apple’s operating system which will be available for users in 2019. Those users who have Mac Book 2015 and later, iMac 2012 and Later, MacBook Air 2012 and Later, iMac Pro 2017 and later, MacBook Pro 2012 and Later, Mac Pro 2012 and later can support macOS 10.15 Catalina. Apple has saved its reputation on naming its OS from nature, this time Catalina is an Island located on the southwest of Los Angeles. In 2019’s Apple’s WWDC Apple released several other products like iOS 13 with Dark Mode, iPadOS, Apple and Apple WatchOS 6, Apple Pro 2019 with XDR Display, Mac Pro 2019.
macOS 10.15 Catalina New Features:
- Apple Music, TV and Podcasts are now on macOS 10.15 Catalina.
- Premiering Apple TV on MacOS 10.15 Catalina.
- Enjoy Using iPad Apps on MacOS 10.15 Catalina.
- Update on Photos.
- Improvements on Notes on mac.
- Updates on Reminders and Safari.
- Use iPad as a second monitor for macOS 10.15 Catalina.
- Take usage of Apple Pencil.
- Screen Time.
- Communication Limits.
- Better Security and Privacy.
- Find me.
- Approve your mac with Apple Watch.
- Voice Access to all devices.
How to Install macOS Catalina on VirtualBox?
In order to Install macOS 10.15 Catalina on VirtualBox on Windows on PC, first, prepare the required files, then install them. After that, I have guided you How to prepare the VirtualBox for Installing it, thus, at last, you will know how to install with step by step Guide. So, Let’s start.
- New: How to Install macOS Big Sur on VirtualBox on Windows?
- Install macOS 10.15 Catalina on VMware on Windows
Required Files:
VirtualBox: VirtualBox a Virtualization software that can run multiple virtual operating systems in an operating system, doesn’t matter if you are on windows, mac or Linux. For example, Linux can be run on Windows without the need to restart the system or specify a specific menu for the hard disk format. VirtualBox, which uses a very simple user interface, has a much larger volume than similar software. VirtualBox also supports almost all operating systems. Windows, Linux, Macintosh, Solaris, DOS and all other types of operating systems will be fully supported in this tool. Here are some features of VirtualBox.
Features of VirtualBox:
- It is an Open Source Software.
- Ability to on 15 types of Windows and 24 types of Linux operating system.
- File Sharing between the host and the VM.
- Take Snapshots of the VM.
- Import or Export the Create OS as a VMDK File or Appliance File.
- Install an OS using the VMDK File.
- Export Oracle Cloud Infrastructure.
- Cut/ copy and move the Operating system to another computer.
- Add multiple Hard disks to the VM.
- Supports VDI (VirtualBox Disk Image), VHD (Virtual Hard Drive) and VMDK ( Virtual Machine Disk) File Format.
- Install Dos Operating System
- Use ISO File, CD/DVD.
- Take Photos while installing an OS or working on it.
- Directly use the USB ports on the VM.
After knowing the VirtualBox with all its features, You have to download and Install it in your Windows PC. The Installation Process is easy, just click next, next, and next, again next and click yes> Install and Finish.
VirtualBox Extension Pack: VirtualBox Extension pack is a set of tools which adds new features and capabilities to the VirtualBox. This Extension provides support for USB 2.0, USB 3.0, VirtualBox RDP, Disk Encryption, NVMe and PXE boot for Intel cards for all computers.
Go ahead and download the VirtualBox Extention pack in order to avoid the freezing errors of mouse and Keyboard while Installing. Once you downloaded, simply double click> select Install> Agree to the license and Agreement> and finally OK.
WinRAR: WinRAR can compress different files up to 10% more than ZIP files in RAR format. It can Zip and Unzip RAR, 7Z, ACE, ARJ, BZ2, CAB, GZ, ISO, JAR, LZH, TAR, UUE and more. Another interesting feature of this software is Self-Extract, which allows you to compress the compressed file as an executable file with the .exe extension so that it can be installed on computers without the WinRAR software installed.
Some Features of WinRAR:
- Zip or Unzip Files.
- Give the zipped file a Password.
- Encrypt your files with WinRAR.
- Rescue Files from Virus.
- Reduce the amount of file.
- Convert Archive to SFX.
- Send Files to Other Files.
- Repair damaged zip files.
Download and Install WinRAR on Your System because later you have to use it to extract the macOS 10.15 Catalina.
macOS 10.15 Catalina VMDK: macOS 10.15 Catalina comes with two different extensions of .vmdk and .dmg. In macOS, you can not download the macOS dmg file like windows as iSO, instead, you are downloading it from the App Store. But the VMDK is a virtualization image which can be created with VMware (Vmware workstation Pro and VMware Fusion) and VirtualBox. Even you can create it with Hyper-V but not for Apple’s OS. Unfortunately, in Windows, we can’t install macOS 10.15 Cataline with .dmg extension, but the VMDK is the best choice for installing mac on windows. But if you are on a Mac, you can install it both with macOS’s dmg and VMDK file. You have to download the macOS 10.15 Catalina VMDK file if you want to install on VirtualBox on Windows.
Steps to Install macOS 10.15 Catalina on VirtualBox on Windows PC
In required Files Section I mentioned to Install VirtualBox, VirtualBox Extension Pack, and WinRAR after downloading. If you have not done, go ahead and install them right now.
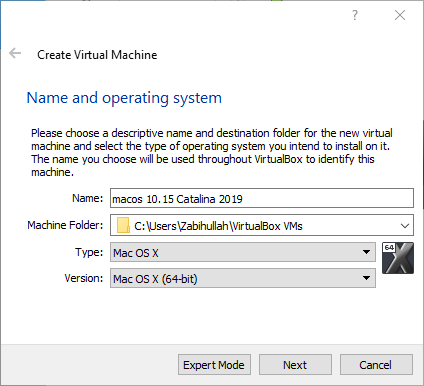
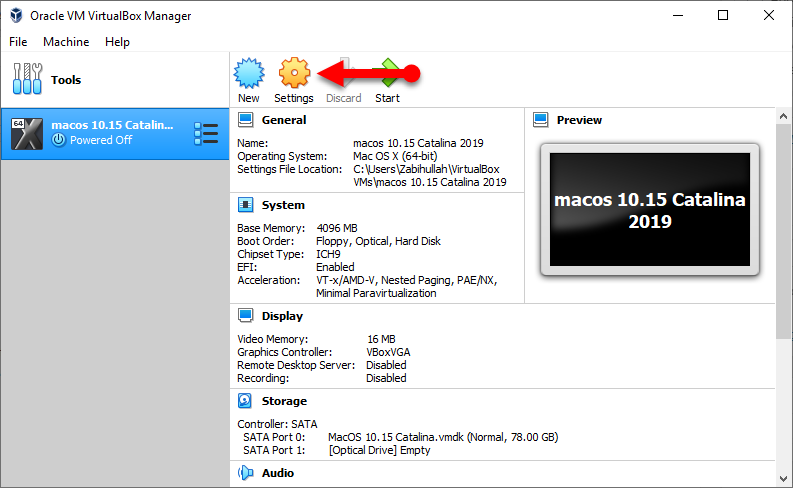
Since you have installed the required files except for the macOS 10.15 Catalina, open the VirtualBox and click on on the “New” to create a new Virtual Machine.
Provide a name for VM, then copy it because later you will use it to bring changes on the Codes. Choose a location to save the files of the VM, also Guest of Mac OS X and Mac OS X (64 Bit).
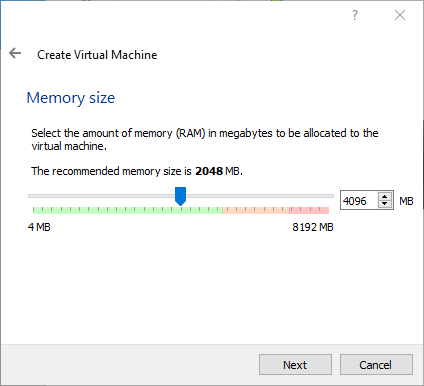
Increase the amount of RAM to 4 GB which will be 4096 MB. Please keep in mind macOS Guest operating system can work on 2 GB but it works so slow.
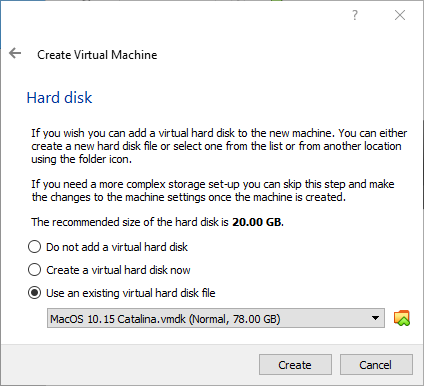
Go ahead and select Use an Existing Virtual Hard drive file, click browse> select Add and locate the macOS 10.15 Catalina which you Extracted before. When you clicked choose, you will be back Hard Disk Window, so simply click create.
Once the create button is clicked you will be back to the main page of VirtualBox, where you will see the VM you just created. Click on settings to bring changes for installing macOS 10.15 Catalina on VirtualBox on Windows.
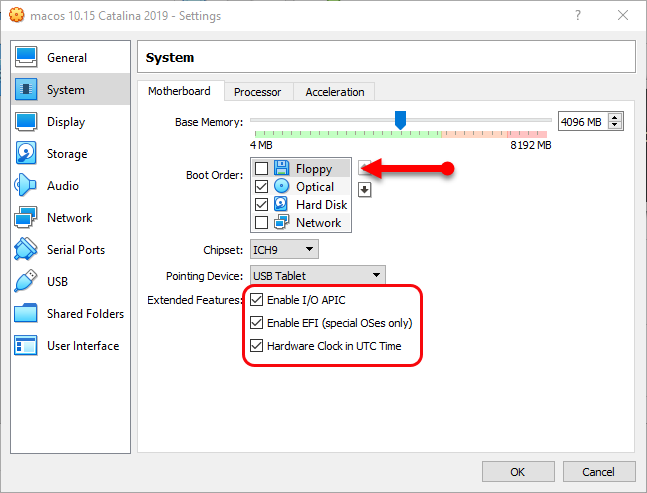
Go to the System tab> Motherboard, here you have to uncheck the box of Floppy, and make sure that the below settings are checked.
- Optical
- Hard Disk
also
- Enable I/O APIC
- Enable EFI (Special OSes only)
- Hardware Clock in UTF Time
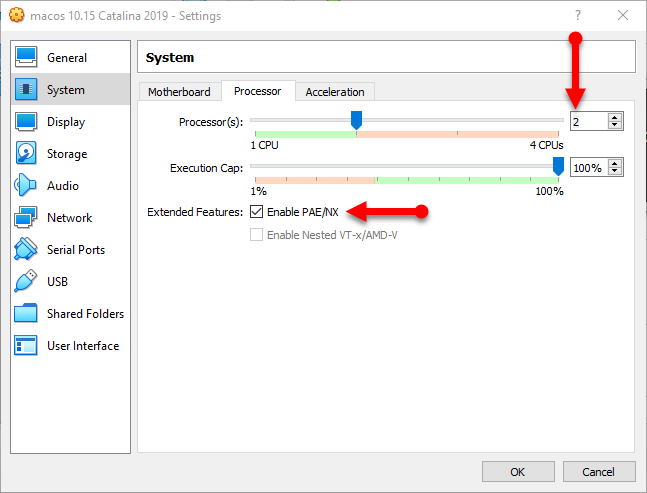
Next, move to the processor tab and increase the number of processor up to 2 with execution cap of 100, Also check the box the Enable PAE/NX.
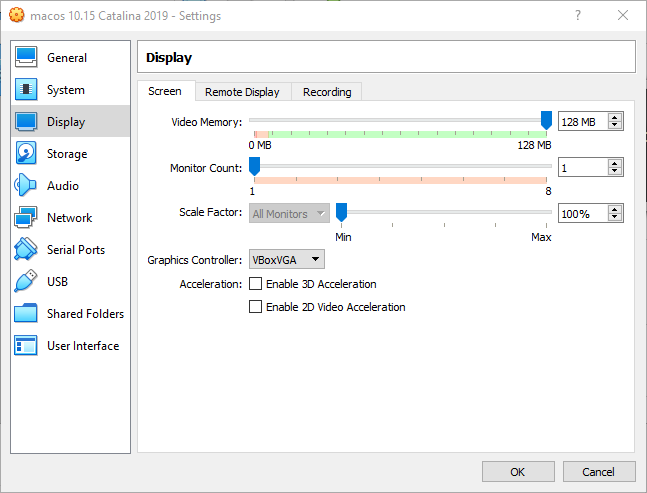
on Display Tab set the below settings.
- Video Memory: 128 MB
- Monitor count: 1
- Scale Factor: %100
- Graphics Controler: VBoxVGA
For better performance, with a greater look, you can turn on the Below boxes too.
- Enable 3D Acceleration
- Enable 2D Video Acceleration
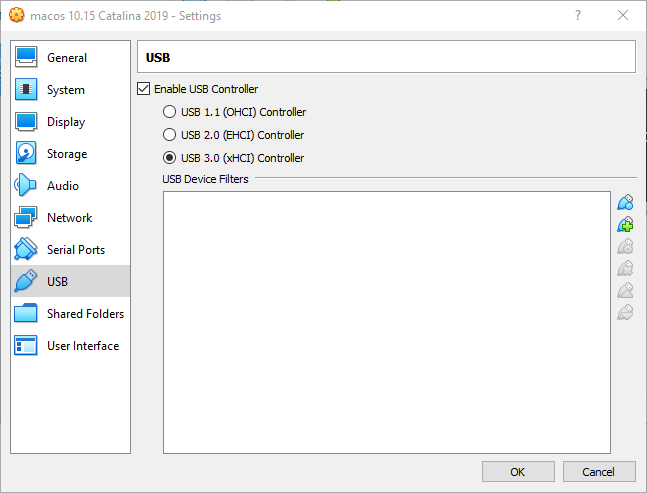
Head over to the USB tab and enable the USB 3.0 (xCHI) Controller, enabling this feature will solve the freezing error mouse and Keyboard on the VM. When the USB 3.0 is selected, click OK> you will be to back to the main window on VirtualBox.
Once you are on the main panel on VirtualBox Go File> and select Exit.
Don’t close the VirtualBox by clicking on the X button, it won’t close from background.
If the VirtualBox is not quite from the background, applying codes for configuring VirtualBox settings will be useless. In order to apply the codes, first, copy the below codes, and paste that inside the Notepad, then replace the “Your VM Name” with the name of the VM which you created before.
To save time for replacing the VM Name, Go to Edit menu> replace, in the first box type the “Your VM Name”, on the second box the name of your VM.
Codes For VirtualBox v6.x:
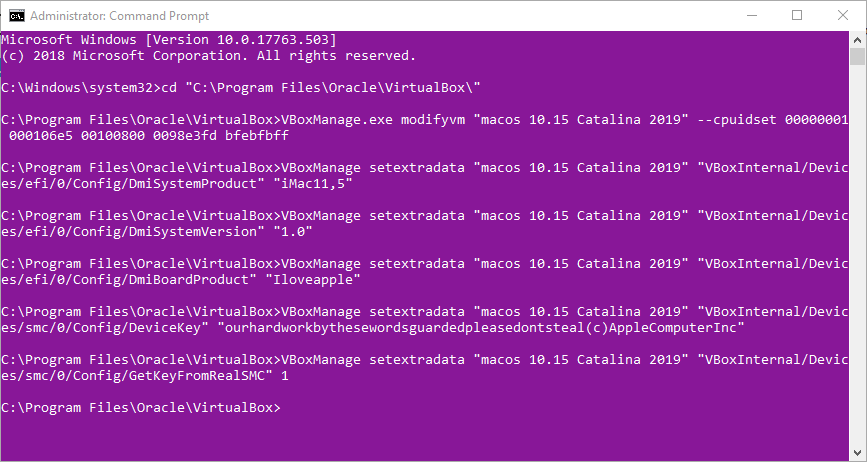
cd "C:\Program Files\Oracle\VirtualBox\"
VBoxManage.exe modifyvm "Your VM Name" --cpuidset 00000001 000106e5 00100800 0098e3fd bfebfbff
VBoxManage setextradata "Your VM Name" "VBoxInternal/Devices/efi/0/Config/DmiSystemProduct" "iMac11,3"
VBoxManage setextradata "Your VM Name" "VBoxInternal/Devices/efi/0/Config/DmiSystemVersion" "1.0"
VBoxManage setextradata "Your VM Name" "VBoxInternal/Devices/efi/0/Config/DmiBoardProduct" "Iloveapple"
VBoxManage setextradata "Your VM Name" "VBoxInternal/Devices/smc/0/Config/DeviceKey" "ourhardworkbythesewordsguardedpleasedontsteal(c)AppleComputerInc"
VBoxManage setextradata "Your VM Name" "VBoxInternal/Devices/smc/0/Config/GetKeyFromRealSMC" 1
Codes For VirtualBox v5.x:
cd "C:\Program Files\Oracle\VirtualBox\"
VBoxManage.exe modifyvm "Your Virtual Machine Name" --cpuidset 00000001 000106e5 00100800 0098e3fd bfebfbff
VBoxManage setextradata "Your Virtual Machine Name" "VBoxInternal/Devices/efi/0/Config/DmiSystemProduct" "iMac11,3"
VBoxManage setextradata "Your Virtual Machine Name" "VBoxInternal/Devices/efi/0/Config/DmiSystemVersion" "1.0"
VBoxManage setextradata "Your Virtual Machine Name" "VBoxInternal/Devices/efi/0/Config/DmiBoardProduct" "Iloveapple"
VBoxManage setextradata "Your Virtual Machine Name" "VBoxInternal/Devices/smc/0/Config/DeviceKey" "ourhardworkbythesewordsguardedpleasedontsteal(c)AppleComputerInc"
VBoxManage setextradata "Your Virtual Machine Name" "VBoxInternal/Devices/smc/0/Config/GetKeyFromRealSMC" 1
Codes For VirtualBox v4.x:
cd "C:\Program Files\Oracle\VirtualBox\"
VBoxManage.exe modifyvm "Your Virtual Machine Name" --cpuidset 00000001 000306a9 04100800 7fbae3ff bfebfbff
VBoxManage setextradata "Your Virtual Machine Name" "VBoxInternal/Devices/efi/0/Config/DmiSystemProduct" "MacBookPro11,3"
VBoxManage setextradata "Your Virtual Machine Name" "VBoxInternal/Devices/efi/0/Config/DmiSystemVersion" "1.0"
VBoxManage setextradata "Your Virtual Machine Name" "VBoxInternal/Devices/efi/0/Config/DmiBoardProduct" "Iloveapple"
VBoxManage setextradata "Your Virtual Machine Name" "VBoxInternal/Devices/smc/0/Config/DeviceKey" "ourhardworkbythesewordsguardedpleasedontsteal(c)AppleComputerInc"
VBoxManage setextradata "Your Virtual Machine Name" "VBoxInternal/Devices/smc/0/Config/GetKeyFromRealSMC" 1
Code for AMD Systems:
cd "C:\Program Files\Oracle\VirtualBox\"
VBoxManage.exe modifyvm "Your Virtual Machine Name" --cpuidset 00000001 000106e5 00100800 0098e3fd bfebfbff
VBoxManage setextradata "Your Virtual Machine Name" "VBoxInternal/Devices/efi/0/Config/DmiSystemProduct" "iMac11,3"
VBoxManage setextradata "Your Virtual Machine Name" "VBoxInternal/Devices/efi/0/Config/DmiSystemVersion" "1.0"
VBoxManage setextradata "Your Virtual Machine Name" "VBoxInternal/Devices/efi/0/Config/DmiBoardProduct" "Iloveapple"
VBoxManage setextradata "Your Virtual Machine Name" "VBoxInternal/Devices/smc/0/Config/DeviceKey" "ourhardworkbythesewordsguardedpleasedontsteal(c)AppleComputerInc"
VBoxManage setextradata "Your Virtual Machine Name" "VBoxInternal/Devices/smc/0/Config/GetKeyFromRealSMC" 1
VBoxManage modifyvm "Your Virtual Machine Name" --cpu-profile "Intel Core i7-6700K"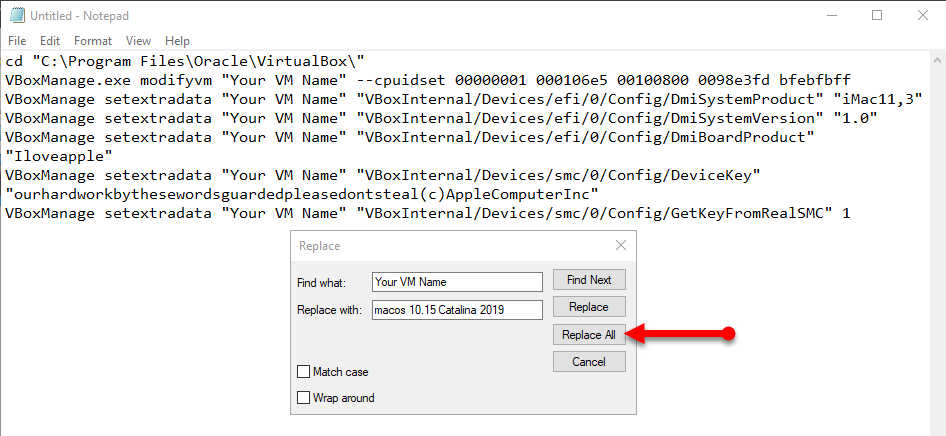
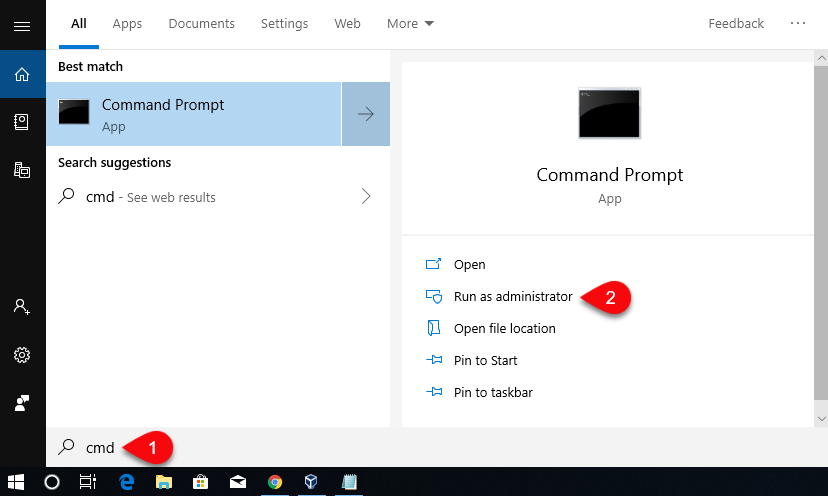
Now open the start menu> search for CMD> right click and select Run as Administrator.
Copy the codes line by line and paste that one by one the CMD, I mean apply the codes one by one.
Install macOS Catalina 10.15 on VirtualBox on Windows PC
If you have passed all the steps correctly, you can run the Virtual Machine and install macOS 10.15 Catalina on VirtualBox. If you have done anything wrong especially in the section of apply codes in CMD, you will face so many errors. So, go ahead launch the VirtualBox, start the VM to begin the installation of macOS 10.15 Catalina.
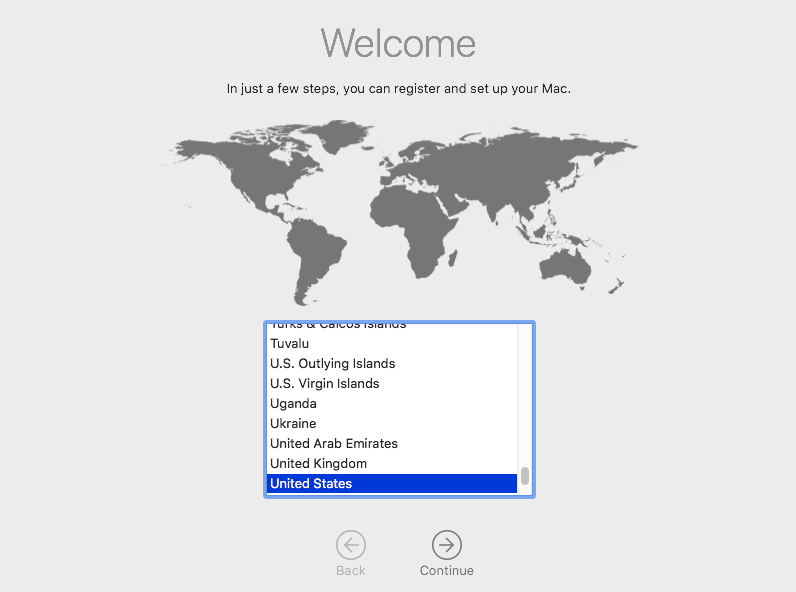
After the Virtual Machine starts running, you will face some codes, after a minute you will be on the welcome screen, where you have to select your country.
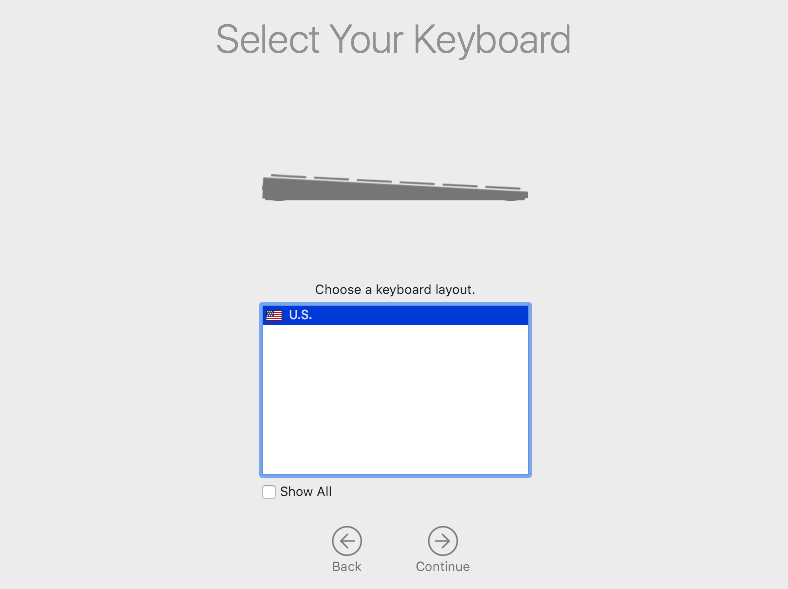
macOS 10.15 Catalina asks you to add a second Keyboard if you have, if not skip it by selecting continue.
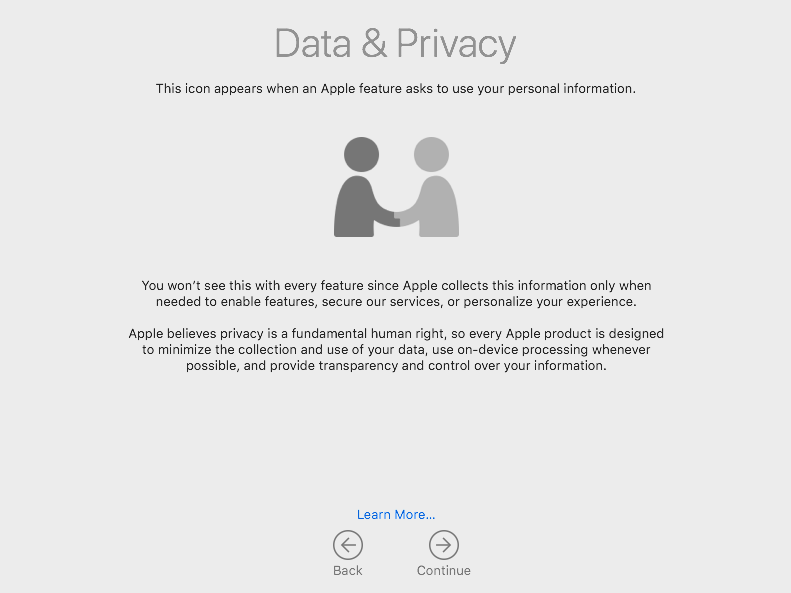
Agree to Data & Privacy of Apple by clicking continue.
Select don’t transfer any information to this mac, because this tool is for migration. With this tool, you can transfer information from a mac or a windows PC to the current mac.
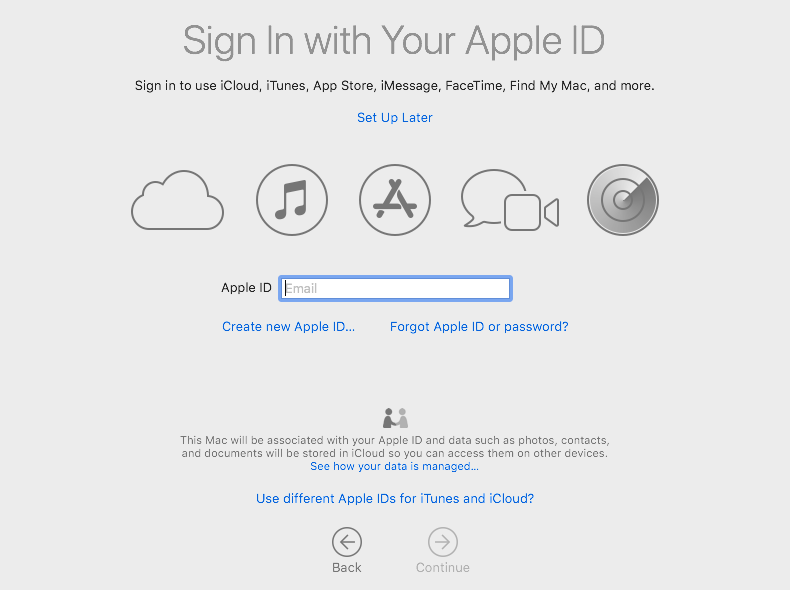
Here Apple asks you to add to choose a sign method of Apple ID or without non-Apple ID Account, I prefer to go with a local account by selecting Set up Later.
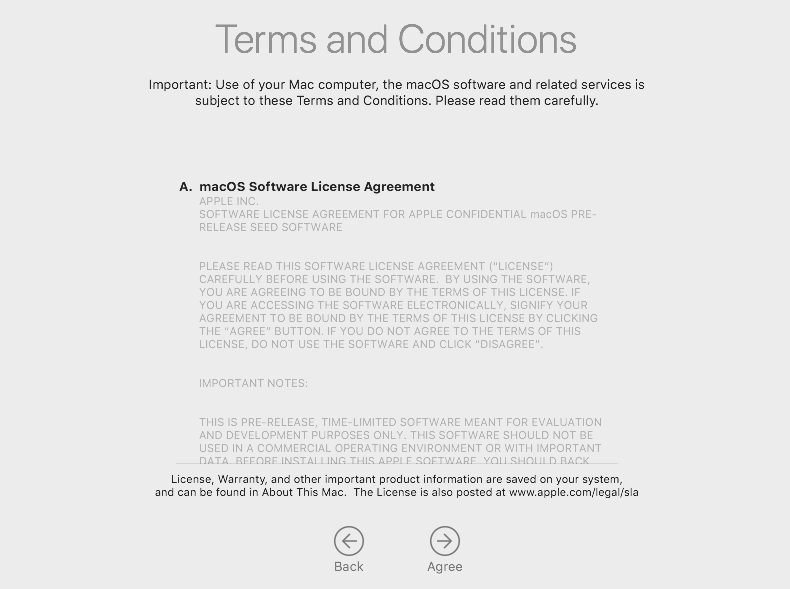
Agree to terms and conditions of macOS 10.15 Catalina.
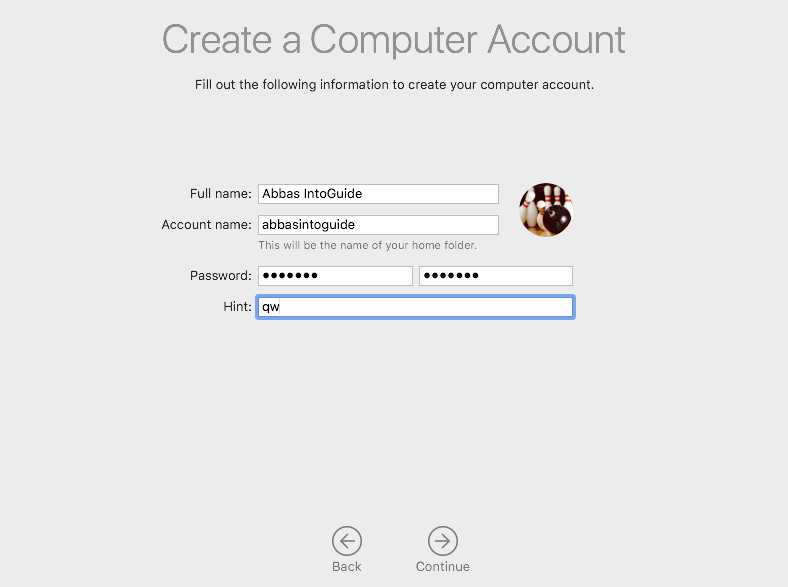
Create a user account by entering your information such as Full Name, Account name, Password, and a hit key. If you have noticed, mac can’t be used like Windows without a password on login.
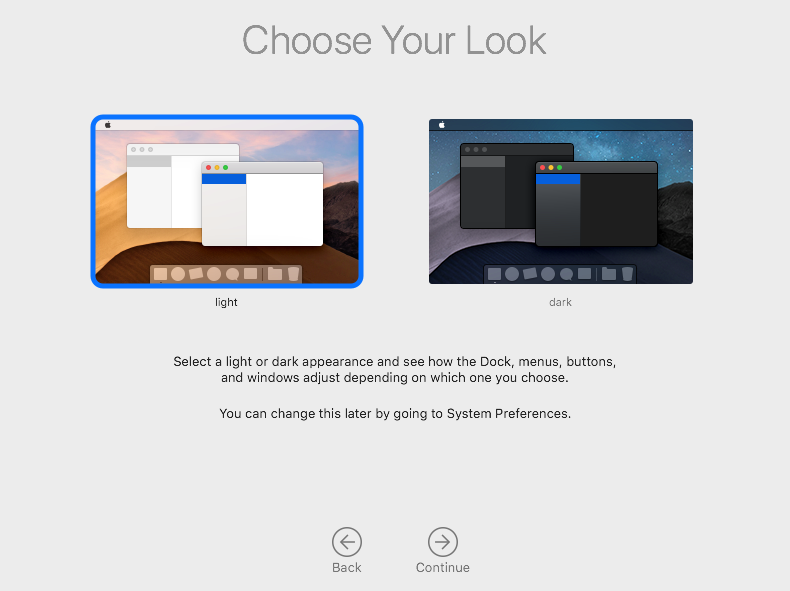
Choose a look for your mac, you have the light theme and most awaited feature in macOS Mojave Dark mode.
Conclusion
Download Required Files, Prepare the Virtual Machine and Finally Install macOS 10.15 Catalina on VirtualBox. Also Congratulations to those guys who have successfully installed and those guys who have filed “Never Give up“. So, if you faced error or your stuck comment here, I will get to know as soon as possible. Please do share if it is worthy of sharing.
82 comments
i got an error says a mount point is required for installation and it also gives an error code
Was excited to get started on this, but the “intoguide.com” password isn’t working on the VMDK rar file…
Hi,
As far as I know, it don’t have password.
For Now please download the following macOS Catalina VMDK File from the below links. It is from an iranian site, the password to extract is soft98.ir
nvm, the google drive file worked. Thanks!
Anyone managed to plug in and recognize and iphone using ios 13?
I cannot install it. I can see the Apple UI but the installation crashes constantly.
Is there any way tto get sound in the Virtual Machine. Everything is good, but it does not sound.
After the instalation screen when the codes appear again I got stuck. I says requests to user space are disable. How can I solve it
Reset the VM. I had the same problem and something made me reset it and wallah!
Hi,
After read the comments I fixed my … boot efi’ is not recognized … problem with the “install.nsh” command. It looks like it works because after a minute or so with code the installation MAC screen appears, it stucks in “Intalling… About 14 minutes remaining…”
Yesterday I ha the same problem, I have tried again but same problem…any tip?
Thanks!
Hi, try Installing it with an ISO.
Here is the guide and the required files.
Thanks!
Finally I could install it!But i see that is version 10.15, and there is an update available, is it possible to upgrade version? I mean, in Software Updates?
What i want is to install XCode but the one in the AppStore say version 10.15.2 is needed… any tip for this?
Thanks so much!
Hello, when I started the virtual box the startup.nsh didn’t run and it went straight to shell11>…. I typed install.nsh and it returned “install.nsh” is not recognized as an internal or external command, operable program or script file.
Please help!!!
Hi ghulam I previously downloaded mac OS catalina from geekrar.com and after sucessful installation the mouse pointer stucks and slows down I have 16GB ram and I7-7700HQ Intel processor with a dedicated 4GB 1050Ti Nvidia for accelerating virtualbox.Did you have any issues related to mine ? or Is your installation file clean from all these bloatwares?
Hi jayce;
This is a problem with those who are performing the installation with VMDK file [Only with Catalina not Mojave]. I tried the installation with an ISO file on VirtualBox, it was working so much awesome. I recommend you to try once the macOS Catalina Installation with ISO.
Install macOS Catalina with ISO on VirtualBox on Windows
I installed it but when it restarts it says Error Loading Kernel cache (0x9),what can I do
Hi,
Is your processor an AMD or intel?
the install is just looping for me. it goes for a long time and then loads a few more codes and then restarts. did i miss something?
Does anybody know how to login with their apple ID to connect their imessage and facetime?
I believe that the macOS running on VirtualBox is not provided with an actual serial number. It’s the reason why no one can access FaceTime, imessage and other apps.
I type install.nsh but it says FS1:\macOS Install Data\locked and i type again install.nsh but i doesn’t work what i need to type
Can you post the pink .png info for the pasting of eachline is actual text that can be copied? It says to paste in one by one but there’s no ability to copy it since it’s a .png…..
Does anyone know how to get acces to icloud ( imessage , facetime etc ) on a virtualbox with macOS
my command prompt gives me this
VBoxManage.exe: error: Could not find a registered machine named ‘MacOS’
VBoxManage.exe: error: Details: code VBOX_E_OBJECT_NOT_FOUND (0x80bb0001), component VirtualBoxWrap, interface IVirtualBox, callee IUnknown
VBoxManage.exe: error: Context: “FindMachine(Bstr(a->argv[0]).raw(), machine.asOutParam())” at line 546 of file VBoxManageModifyVM.cpp
This error occurs beacause of the name of file or the location. You need to type the same name inside the codes.
Can you make the codes “copy-able” please? They are a .png you cannot copy and then paste from into the cmd window….oopsie!
After following video it ran fine and after I was able to log in and everything but after I restart VM and I type install.nsh I get three error messages:
error. Directory ‘FS1:\macOS Install Data’ was not found
error. Directory ‘FS1:\Locked Files’ was not found
error. Directory ‘FS1:\Boot Files’ was not found
please give me password for unzip
Awesome Tutorial! Works like a charm!
I got stuck here:
imgur.com/a/Dnem32v
type install.nsh
After I type “install.nsh” it just says this….
//imgurcom/a/WqCU2lY
Thanks for this advice which works pretty well. However there are three steps that I needed to do to allow the install process to proceed without errors.
1. Go to ‘Turn Windows Features on or off.’ and turn off ‘Hyper-V’
2. While in the ‘Windows Features’ control panel also make sure that ‘Windows Sandbox’ is turned off.
3. if ‘Hyper-V’ was on you will also need to edit the BCD file to make sure ‘Hyper-V’ is not invoked on boot (even though you have turned it off above): Open a ‘Command’ or ‘Powershell’ window with Administrator privileges and type “bcdedit /set hypervisorlaunchtype off”
Then reboot and try the install again. Worked for me.
Thanks!
SUCCESSSSS….
i got error message “boot.efi” while booting for installation, i tried with “install.nsh” but still not recognized. and then, viola… with “boot” only, the boot process beginning…
hi, when the sys its installing, ig get stuck on 14 minutes remaining…
Can anyone help me?
Hi,
altought I had other problems regarding the UEFI shell starting Catalina from a .vmdk I also encountered your problem.
What fixed it for me was to choose two cpus for the virtual system. (Under VirtualBox: Settings>System>processors/cpu>adjust to two.
I hope this helps also in you case.
Cheers,
daniel
Anyone have Network/ethernet problems? What Network settings work for you for plugged in ethernet (not wifi)?
I am stuck with this error on the install screen Catalina
A disk with a mount point is required : (-69854)
CPU: Intel
Followed instructions and video. All went fine, but install.nsh runs and returns to shell. boot.efi runs but returns to shell without error. Intel processor. Any ideas?
Hi,
I had the “boot efi” is not recognnized as an internal o external command” error, then I type install.nsh. After that I got this:
Error allocating 0xa00 pages at 0x00000000028000000 alloc type 2
Error loading kernel cache (0x9)
How can I solve this? 🙁
Hi,
have you got a solution because I have the same probleme?
Hi guys!
I have a problem with de CMD step.
Processor: Ryzen 5 2400G
First I try with this:
cd “C:\Program Files\Oracle\VirtualBox\”
VBoxManage.exe modifyvm “macOS_10.15_Catalina_2019” –cpuidset 00000001 000106e5 00100800 0098e3fd bfebfbff
VBoxManage setextradata macOS_10.15_Catalina_2019 “VBoxInternal/Devices/efi/0/Config/DmiSystemProduct” “iMac11,3”
VBoxManage setextradata macOS_10.15_Catalina_2019 “VBoxInternal/Devices/efi/0/Config/DmiSystemVersion” “1.0”
VBoxManage setextradata macOS_10.15_Catalina_2019 “VBoxInternal/Devices/efi/0/Config/DmiBoardProduct” “Iloveapple”
VBoxManage setextradata macOS_10.15_Catalina_2019 “VBoxInternal/Devices/smc/0/Config/DeviceKey” “ourhardworkbythesewordsguardedpleasedontsteal(c)AppleComputerInc”
VBoxManage setextradata macOS_10.15_Catalina_2019 “VBoxInternal/Devices/smc/0/Config/GetKeyFromRealSMC” 1
Then I try with the same command + this one:
VBoxManage modifyvm “macOS_10.15_Catalina_2019” –cpu-profile “Intel Core i7-6700K”
But my CPU is a ryzen 5 maybe I need to modify “Intel Core i7-6700K” by “Intel Core i5-8300H”. So I do it, but it’s worst. So, I try by “Intel Core i5-8250U” … and the same results that with “Intel Core i5-8300H”.
The error message is: Info on guest CPU ‘Intel Core i5-8250U’ (or “Intel Core i5-8300H”) could not be found. Please, select a different CPU. (VERR_CPUM_DB_CPU_NOT_FOUND).
And the error code: E_Fail (0x80004005)
Can you help guys please !
I am using an AMD processor and needed to use this command:
VBoxManage modifyvm “macOS Catalina” –cpu-profile “Intel Core i7-2635QM”
The i7-6700K did not work for me. It had to be the above one to work.
Hi Niels
Thx for the cmd line it also works for me on my AMD laptop.
How do I set up Wifi connection and how do I change Graphics Display from 7 MB to 128 MB
Setup Virtual Machine, made modifications just fine, started virtual machine and now getting error: FS1\system\library\coreservices\boot.efi is not recognized as an internal or external command, operable program, or script file. So I tried install.nsh but now fs1:\macOS Install Data\Locked Files\Boot Files\boot.efi is displayed in the shell window. Any suggestions? Using AMD Athlon cpu. Thanks.
If you are getting the FS1 error, watch the video, the installer runs into the error in the Shell line.
At the prompt type: INSTALL.NSH
And it will work.
The poster did not list this in the instructions but it is in the video.
I’m having them same issue as Hebyar. Running install.nsh at the prompt doesn’t appear to do anything and instead the VM appears to lock up. Does anyone have any suggestion?
Mike,
Ok, it may take a long time and also, I had to reboot once to allow it to continue, maybe try and reboot your VM.
Tom
I’m having the same problem. I’ve tried install.nsh but even after waiting for an hour the screen is still locked up. I have an AMD CPU and have used the AMD command lines and followed all the steps but nothings working. Is there anything else I can try?
im getting error: Failed to open a session for the virtual machine Catalina 2019.
Implementation of the USB 3.0 controller not found!
Because the USB 3.0 controller state is part of the saved VM state, the VM cannot be started. To fix this problem, either install the ‘Oracle VM VirtualBox Extension Pack’ or disable USB 3.0 support in the VM settings (VERR_NOT_FOUND).
Result Code: E_FAIL (0x80004005)
Component: ConsoleWrap
Interface: IConsole {872da645-4a9b-1727-bee2-5585105b9eed}
Hi, follow the below instructions.
Fix Failed to open a session.
Hello,
i’M STUCK @ THE WELCOME SCREEN, HOW CAN I SOLVE THIS?
Hi, install the virtualbox extention pack. After installation enable the usb 3.0 for the vm which contains the macOS.
Hi. After “install.nsh” OS reboots and nothing happens. I see console again. How to fix it?
Omfg its working ! Thx so much !!! One last thing is my resolution. It’s stuck on 1024-768 and when I go either in the Mac display panned and the virtual box display menu it won’t let me click 1920-1200 it’s kind a grey like you can’t select it. What can I do ?
sarted the machine, got script and thing, mac os installed and rebooted. at the reboot i get a with and yellow script and an error box : the instruction at 0x00007ff8872c6060 is using the memory adress 0.0000000000000010. the memori cant be read. click ok to end
This error can be caused by bad memory, a bad CPU, older drivers, hardware conflicts, and a bunch of other stuff. However, if your system is brand new with new technology. You may apply the below procedures to fix the problem.
1. Increase Virtual Memory:
right-click on My Computer, go to the Advanced tab, and click on Settings under Performance. Then click on the Advanced tab again under Performance Options and click the Change button under Virtual memory.
2. Update Drivers and Install Latest Patches
3. Perform a System Restore.
4. Run System File Checker: To run the system file checker, open CMD and type in sfc /scannow
5. Uninstall Old Versions of Java Runtime
Thanks you very much. One last thing, is it the last beta of Catalina and also does the vmk files matter. Like can I use another disk image of Catalina for this project or does it had to be yours ?
Yes, it has, but soon the final version will be released, however, the beta version is perfect for this project.
Also could you refresh the download link for google drive because they are error 404 and media fire light is super slow I’m trying to redownload the Catalina .vmdk
The download link is updated.
Virtual box 6. I’ve got the same error and tried to solve it with install.nsh but it told me something like locked boot I thing ima launch it again to tell you the exact error. Anyway, because I was on a amd I thought maybe it would work to add the code for and 6 processor in the prompt but didn’t work
try the new code for AMD.
I typed the code for amd 5 that you gived us in the comment but it say error unknown command -cpu-profile… I’m on a rysen 7 2700x if have anything do do with it. Also I typed the code in the command prompt did I need to type it in the vm prompt ?
AMD Codes are different compared to the actual codes for Intel Processors, try the below codes for AMD Systems.
cd “C:\Program Files\Oracle\VirtualBox\”
VBoxManage.exe modifyvm “Your Virtual Machine Name” –cpuidset 00000001 000106e5 00100800 0098e3fd bfebfbff
VBoxManage setextradata “Your Virtual Machine Name” “VBoxInternal/Devices/efi/0/Config/DmiSystemProduct” “iMac11,3”
VBoxManage setextradata “Your Virtual Machine Name” “VBoxInternal/Devices/efi/0/Config/DmiSystemVersion” “1.0”
VBoxManage setextradata “Your Virtual Machine Name” “VBoxInternal/Devices/efi/0/Config/DmiBoardProduct” “Iloveapple”
VBoxManage setextradata “Your Virtual Machine Name” “VBoxInternal/Devices/smc/0/Config/DeviceKey” “ourhardworkbythesewordsguardedpleasedontsteal(c)AppleComputerInc”
VBoxManage setextradata “Your Virtual Machine Name” “VBoxInternal/Devices/smc/0/Config/GetKeyFromRealSMC” 1
VBoxManage modifyvm “Your Virtual Machine Name” –cpu-profile “Intel Core i7-6700K”
Call to WHvSetupPartition failed: ERROR_SUCCESS (Last=0xc000000d/87) (VERR_NEM_VM_CREATE_FAILED).
Result Code:
E_FAIL (0x80004005)
Component:
ConsoleWrap
Interface:
IConsole {872da645-4a9b-1727-bee2-5585105b9eed}
This error occurs because the hyper-V is enabled on your system, turn off the Hyper-V features.
im only having 32 bit mac version at the fisrt step is it ok ?
Just an FYI you can’t sign in if you have two factor authentication turned on with your apple account
Sorry, I didn’t get your question.
Sorry,Sir.I don’t understand that type install.nsh , could you please give me a tutorial? Thank you.
Hi, visit our YouTube channel.
I have uploaded it’s video.
please code for amd 6 procceser i stuck in install.nsh there shell not boot stuck there same ppk problms that my also
Hi, Here you go, along side the other code, at the end add the below code too.
VBoxManage modifyvm “Your VM Name” –cpu-profile “Intel Core i7-6700K” turned off PAE/NX and Nasted VT-X/AMD-V
Hi
Followed the instructions but when i start it up i get this error
https://i.gyazo.com/49b65409cca43a265485a858fd115f2e.png
Sorry for late answering, but it took time to figure out the error.
To solve this error in the shell
Type install.nsh
Thanks for the that information bro. Thanks a lot, Great work
error:“boot efi”, then type install.nsh
After I did this, I started the virtual machine and the following appeared:
Shell > FSL: \ system/library/coreservices \ boot efi
‘FSL: \ system/library/coreservices \ boot efi’ is not recognized as an internal or externa command, operable program, or script file.
Then fs2, 3, 4, 5, 6, 7
help me please, thank you
Hi
I apologize, it took time to figure out How to solve the error.
To solve this error you have to boot to the flag.
To do that type install.nsh