
Virtualization technology has really made simple to Install and test any operating system in any Desktop OS. In Windows operating system, the most popular virtual machines are VMware Workstation pro and the open-source software from oracle known as VirtualBox. However, there is Microsoft Virtualization software (Hyper-V), but it cannot support macOS as Guest Operating system. You know the VMware and VirtualBox are not the built-in apps of Microsoft, but they are really awesome. Since they both have separate companies of their own, their Virtualization technology is available for Windows, Linux, and macOS.
Installing macOS on Virtual Machines are really a big deal of time, otherwise, the process is simple as drinking water. So, to Install macOS 10.15 Catalina on VirtualBox on Windows, you have to prepare a Virtual machine with configured settings specifically for macOS on Windows. Once the Virtual machine is created, attach the macOS 10.15 Catalina Virtual Machine image (VMDK File) to and start the installations.
- Install macOS 10.15 Catalina VirtualBox on Windows PC
- Install macOS 10.15 Catalina VMware on Windows PC
Transfer Files Between macOS Catalina and Windows PC on VirtualBox
Copying and pasting files from windows Host to the running operating system on Virtual Machine has always been a problem. I remembered those time with Ubuntu, it does not have any option to copy files from Host to the running OS. Until the tool was configured for Oracle for Ubuntu, the same goes for Windows too, but yet the VirtualBox default tool can not copy files from host to running macOS on VirtualBox on Windows. Doesn’t matter if the tools of VirtualBox cannot work to copy files from Windows Host to the macOS VM because the file-sharing always works.
For file sharing between the macOS 10.15 Catalina on Windows on VirtualBox, first, configure the Network settings of the VirtualBox. For file sharing between the macOS 10.15 Catalina on Windows on VirtualBox, first, configure the Network settings of the VirtualBox. After that, you need to enable the file-sharing inside the running macOS guest operating system on mac. Then find the IP Address of your Virtual Machine then visit the shared folder on Windows.
File Sharing has an important role in any company because it saves so much time. In companies, the file-sharing is configured by departments epically for office workers, graphic designers. I remembered while sharing files from windows server 2016 to the clients, we were facing so much problem especially with Windows 10 users. But later we found a way to fix the issues using some policies on Server 2016.
The below method also works with the VMware Workstation Pro and player too, as long as you got the idea of how it works. Each step is essential for file sharing, so follow them so carefully.
Step 1. Set a Network Connection with specific settings
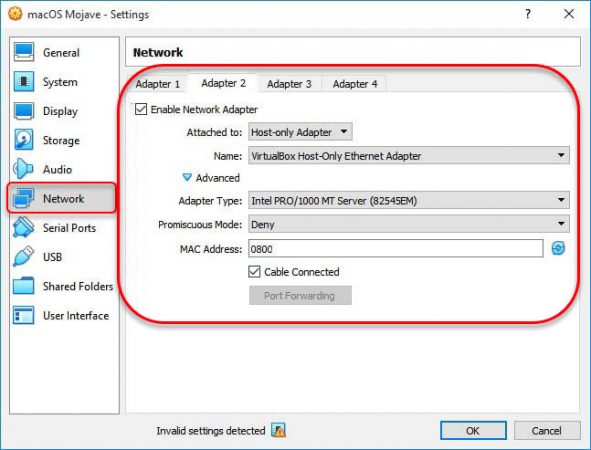
Turn off the Virtual Machine if you are using, > then visit the settings of the Virtual Machine. Head over to the Network section, move to the adapter 2, make sure the below settings are configured.
- Enable Network adapter
- Attached to: Host-only Adapter
- Name: VirtualBox Host only-Ethernet Adapter
- Adapter type: Intel Pro/1000MT Server (82545EM)
- Promiscuous Mode: Deny
- mac address: 8000
- Enable Cable Connected
Step 2. Enable File sharing on mac
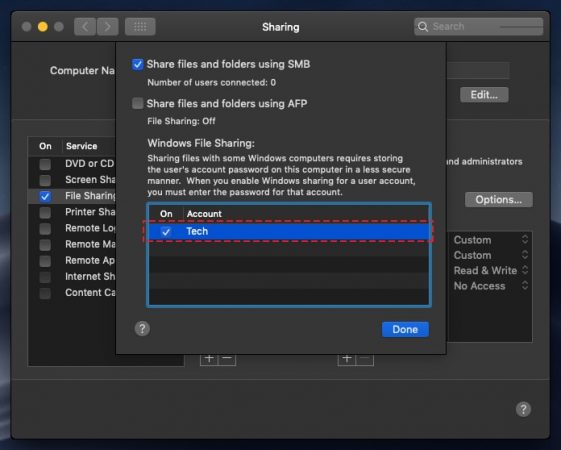
Launch the VirtualBox containing the macOS 10.15 Catalina, then open the system preferences> sharing.
From the drag options, select the file-sharing box, under the shared folder click on the plus icon (+), Now browse for the folder which you want to share with windows.
Now is the time to set up a user name and password for the network to the host could access, to do that, click on the options.
When you are done properly from there, enable the share files and folders using SMB alongside the user account and password you set it up before.
Step 3. Find the Virtual Machine IP Address
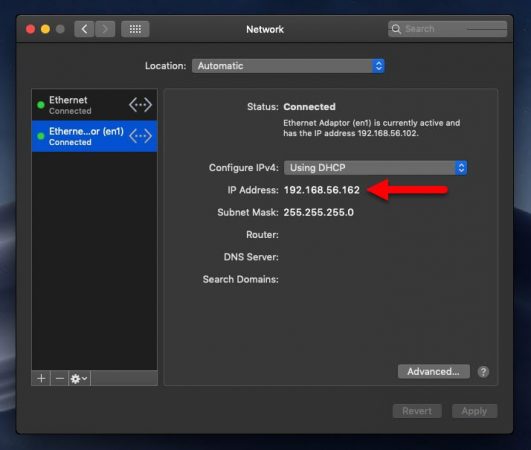
Before accessing the shared folder on Windows, you have to find the IP Address of your Virtual Machine OS. So, start by going to the System Preferences> Network, click on the connected Network, there you will the IP Address if your Virtual machine OS.
Step 4. Access the shared folder inside the Windows
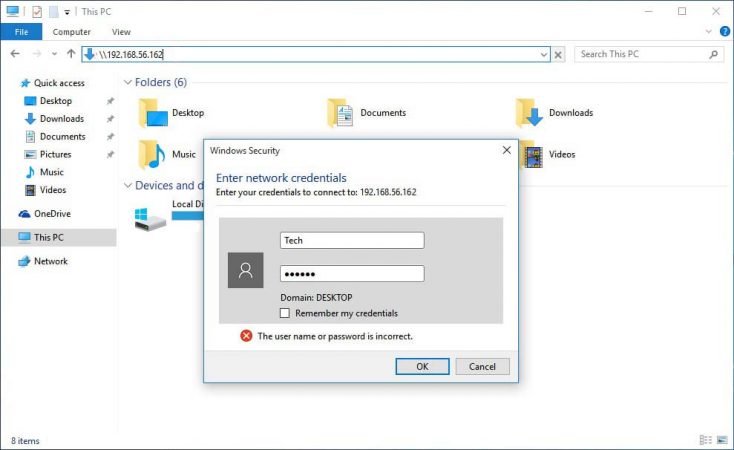
Well, let’ start accessing the shard files on windows by visiting the Network on This PC on Windows 10. However, if you do not have comfort with the Network, simple search for the IP Address of the macOS 10.15 Catalina on This PC. Once the IP Address is mentioned in the search box, enter the credentials you entered while sharing the folder.
Finally, you can copy the files from Documents shared by the Guest OS on Windows, and Now if you need to send files inside the macOS, simply paste them there.
Step 5. Access the shared folder easily
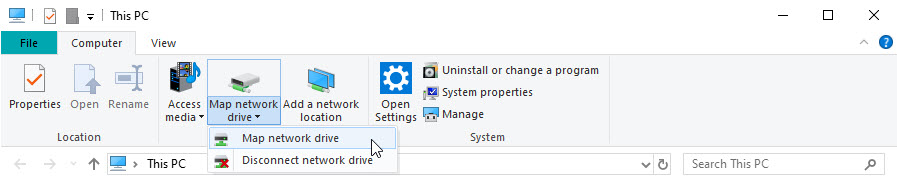
Every time searching for the IP Address, then again entering the credentials, takes some time. Let’s make it easier for accessing by creating the ‘Documents’ folder a drive, to turn the Documents folder into a drive follow the below procedures.
- Open ‘This PC’, Go to the computer menu.
- Click on the ‘Map Network Drive’.
- Select a Drive letter for the folder.
- After that, locate the folder which you want to be mapped.
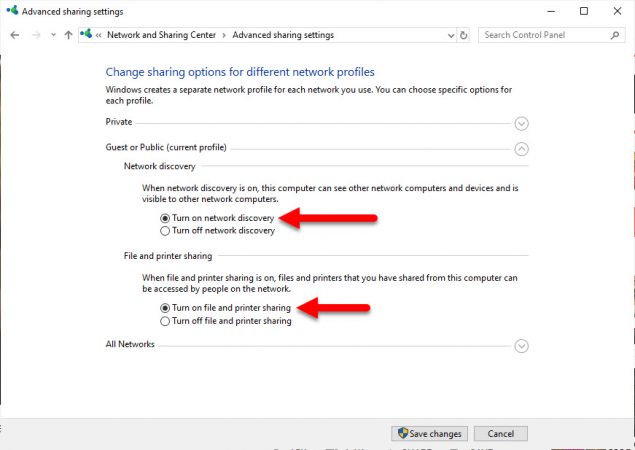
Note: Most of the While sharing files, even for mapping a folder to a drive, you will kind of face an error. The error is about the sharing option settings in windows, to fix those types of the error, follow the below procedures.
- Open settings.
- Visit Network> then status and scroll down until you find the ‘Network and Sharing Center’
- On the Network and Sharing Center window, select the ‘Change advanced sharing settings’
- Turn on the Network Discovery
Conclusion
It was the process on How to Transfer Files Between macOS Catalina and Windows PC on VirtualBox. In simple words makes sure both the Virtual Machine and host are on the same Network, then share the folder inside the mac, and simply access it on Windows.
1 comment
when saving mac it shows the error that
Failed to save the settings.
Invalid MAC address format.
Result Code: E_INVALIDARG (0x80070057)
Component: NetworkAdapterWrap
Interface: INetworkAdapter {e9a0c183-7071-4894-93d6-dcbec010fa91}